

Mountain Bike Parts Guide: How to Choose the Right Fit
- by Nigel
-

You've just fitted a new cassette that looked right online, and now the chain skips every time you stand up on a climb. The part wasn't faulty. It just didn't match the system already on your bike, and that's the mistake that costs riders the most time and money with mountain bike parts.
Core Mountain Bike Parts at a Glance
A mountain bike is six working systems, not a pile of separate components. Each system has one spec that decides whether a replacement fits, works, or fails under load. Check that spec before you look at price, weight, or colour.
That skipping cassette is the classic example. The cassette might slide onto the wheel, look centred, and shift on the stand. On the trail, a mismatched speed count or a worn chain leaves gaps the chain can't sit in properly, so it jumps when you pedal hard. The fix is rarely a better cassette. It's a matched cassette, chain, and shifter.
The Six Systems and What to Check First
Use this table as your map before you order anything. If you can't answer the spec in the last column for your bike, don't buy the part yet.
Core mountain bike systems and the spec to check
| System | Main parts | What it does | Spec to check first |
|---|---|---|---|
| Drivetrain | Cassette, chain, crankset, derailleurs, shifters | Turns pedalling into gear changes | Speed count and freehub type |
| Brakes | Calipers, rotors, pads, levers | Controls speed and stopping power | Rotor size and mount standard |
| Wheels | Hubs, rims, spokes, axles | Carries rider and bike load | Axle type and hub spacing |
| Tyres | Casing, tread, bead, inner tube or tubeless set-up | Grip and puncture protection | Bead diameter, width and tubeless rating |
| Suspension | Fork, shock, linkage | Absorbs impacts and vibration | Travel in millimetres and axle type |
| Cockpit | Handlebars, stem, grips, seatpost or dropper | Sets control and body position | Clamp diameter and seatpost diameter |
How to Read the Table on Your Own Bike
Start with the drivetrain. Count the sprockets on your cassette and look at the freehub body behind it. That count and that freehub shape limit every chain, shifter, and cassette choice you make.
Next, look at brakes and wheels together, because they're bolted together. Rotor diameter, caliper mount, hub spacing, and axle type must all line up. A wheel that fits the frame can still carry the wrong rotor mount or freehub for your parts.
Tyres are where the bike meets New Zealand dirt. Bead diameter must match the rim exactly, width must clear the frame and fork, and the casing needs to suit the terrain. A light casing feels fast until a sharp rock cuts the sidewall far from the car park.
Suspension is measured in travel millimetres, but travel alone doesn't tell you if a fork or shock fits. Axle type, steerer, and shock mounting hardware matter just as much. The cockpit is simpler, yet it traps people often. A bar won't fit a stem with a different clamp diameter, and a dropper won't fit a seat tube that's a fraction too small.
Workshop rule: Write down the spec from the part already on the bike, not from the listing you want to buy. The old part is evidence. The listing is a guess until you've checked it.
How Parts Work Together as One System
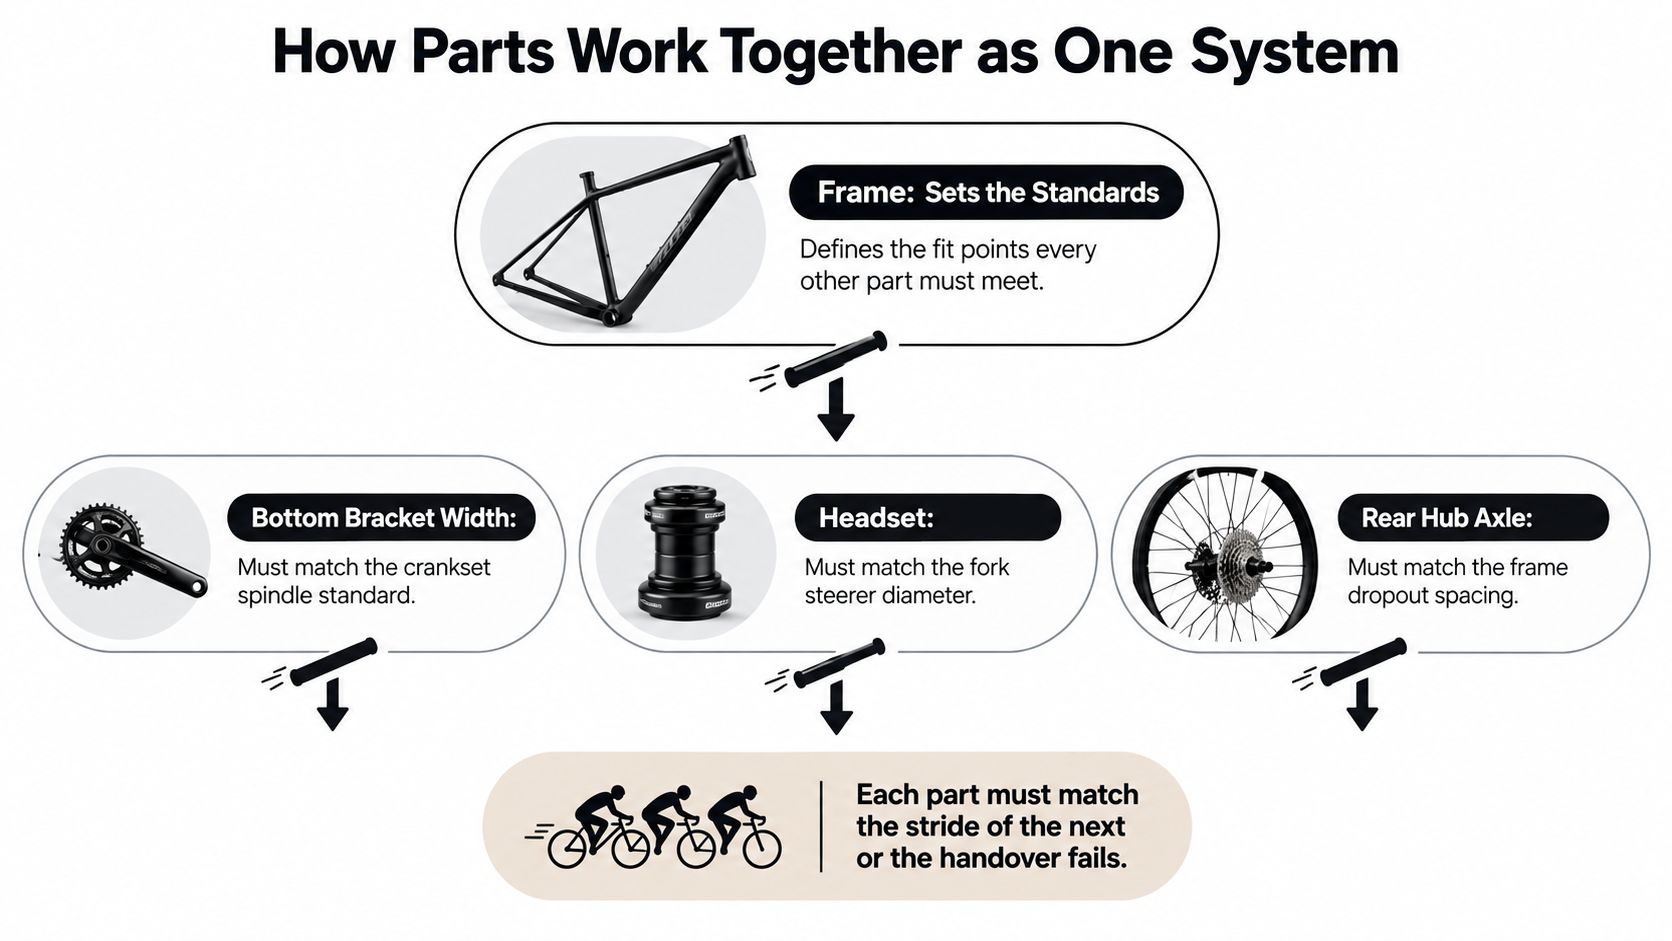
Think of the bike as a relay team. Each runner has to match the stride of the next, or the handover fails. The frame is the first runner, and it sets the pace for everyone else.
Your frame defines bottom bracket width, headset size, dropout spacing, axle type, seatpost diameter, and brake mount. You don't choose these standards when you buy mountain bike parts. You inherit them from the frame you already own, and every component must meet them.
The diagram below shows that hierarchy. The frame sits at the top, and the fit points flow down from it.
Four Interfaces Where Mismatches Happen
Most returns and workshop headaches come from four meeting points. Check each one in this order.
- Wheel interface: The axle diameter, axle length, thread pitch, and hub spacing must match the frame or fork dropouts exactly.
- Drivetrain interface: Speed count, freehub type, and chainline decide whether the chain sits straight and shifts cleanly.
- Brake interface: Rotor size, rotor mount, and caliper mount or adaptor must agree, or the pads won't contact the rotor correctly.
- Cockpit interface: Bar clamp diameter, stem clamp, and fork steerer diameter must match before reach or rise even matters.
Two Examples That Catch Riders Out
Put a 12-speed chain on an 11-speed cassette and it may run on the stand. Don't trust that. The narrower chain doesn't sit as intended on the wider-spaced sprockets, so it wears faster and can skip under load. It feels like a tuning problem, but no amount of derailleur adjustment fixes a width mismatch.
Suspension swaps have the same hidden cost. Moving to a longer-travel fork can change the head angle, reduce tyre clearance, and alter the front brake mount position. You've bought one part and changed three interfaces. That's not a reason to avoid the upgrade. It's a reason to measure all three before you order.
The order that works is simple. Confirm the frame and hub standard first, then the component system, then the individual fit measurement. If you start with the shiny part and work backwards, you'll keep finding mismatches after the box arrives.
Matching Drivetrain and Brake Parts
Most drivetrain failures in the workshop come from one mismatched number. Usually it's the speed count. Sometimes it's the freehub type. Either way, the part looks close enough until you put power through it.
Speed Count and Freehub Come First
Modern trail bikes commonly run 10, 11, or 12 speed drivetrains. The shifter pulls a set amount of cable or sends a set signal, the derailleur moves a set distance, and the cassette spaces its sprockets to match. If one part in that chain counts differently, shifting suffers.
Chains narrow as speed counts rise, so mixing speeds isn't a harmless shortcut. A chain that's too narrow or too wide for the cassette and chainring will shift poorly, wear unevenly, and skip when you're climbing. Match shifter, cassette, chain, and chainring to the same speed count and system.
The freehub is the second trap. Shimano HG, SRAM XD, and Micro Spline freehub bodies have different splines and dimensions. A cassette only fits its matching freehub body. It doesn't matter that the wheel fits your frame if the cassette can't mount on the hub. Pull the old cassette off, photograph the splines, and compare them before you order. If you're weighing up budget drivetrain families, it's worth reading a direct comparison of Microshift and Shimano drivetrains before you commit to a system you'll need spares for later.
Drivetrain and brake compatibility rules
| Part | Common specs | Compatibility rule | Common mistake |
|---|---|---|---|
| Drivetrain speed | 10, 11 or 12 speed | Shifters, cassette and chain must share the speed count | Mixing 12-speed chain with 11-speed cassette |
| Freehub | Shimano HG, SRAM XD, Micro Spline | A cassette fits only its matching freehub body | Buying a cassette that fits the wheel but not the hub |
| Crankset set-up | 1x (single chainring) or 2x (double) | Chainring and chain must suit the set-up and speed count | Fitting a 2x chain guide on a 1x system |
| Rotor size | 180mm, 200mm and 203mm | Rotor must match caliper mount and adaptor standard | Ordering a larger rotor without the right adaptor |
| Thru-axle | Front and rear sizes vary by diameter, length and thread pitch | Hub, fork or frame axle standard must match exactly | Assuming 12mm axles are interchangeable |
| Brake fluid | Mineral oil or DOT fluid | Never mix fluid types; check the system label | Topping up DOT fluid in a mineral oil system |
1x or 2x Cranksets
A 1x set-up uses a single chainring and a wide-range cassette. It's simpler, there's no front derailleur to tune, and it suits most trail riding in New Zealand. Chain retention comes from a narrow-wide chainring and usually a clutched rear derailleur.
A 2x set-up gives a wider overall gear range with smaller steps between gears. That still suits long climbs, touring, and riders who spin at a steady cadence on mixed terrain. The trade-off is more parts to match. The chainring, chain, front derailleur, and shifter must all suit the set-up and speed count.
Don't mix hardware between the two. A chain guide, chainring, or derailleur designed for one layout won't automatically work on the other, even if it bolts on.
Rotors, Mounts, and Axles
Larger rotors provide more braking force and handle heat better on long, steep descents. That's why you'll see 180mm, 200mm, and 203mm rotors on trail and enduro bikes. The cost is weight, and the limit is what your frame, fork, and adaptor allow. A bigger rotor without the correct caliper adaptor puts the pads in the wrong position, so braking gets worse, not better.
Check the rotor mount too. The rotor bolt pattern or centre-lock interface on the hub must match the rotor, and the caliper must sit square over it. If any part of that stack is wrong, you'll get rubbing, uneven pad wear, or pulsing.
Thru-axles cause the same false confidence. Two axles can share a diameter and still differ in length and thread pitch. Forcing the wrong thread damages the frame or fork, and that's an expensive mistake from a small part. Measure the old axle and note every marking on it.
Never guess brake fluid from the colour in the reservoir. Read the lever or reservoir label, every time.
Brake Fluid Is Not Interchangeable
Shimano systems commonly use mineral oil. Many SRAM and other systems use DOT fluid. They must never be mixed, and you shouldn't top one up with the other in a pinch.
The seals inside the lever and caliper are made for one fluid type. The wrong fluid can damage those seals and turn a simple bleed into a rebuild or replacement. Check the label on the lever body or reservoir cap before you open the system. If you can't identify the fluid, don't add anything. Take a photo and ask the workshop first.
Choosing Wheels, Tyres and Suspension for Your Terrain
Wheel and tyre choices change three things at once. They change grip, they change rolling speed, and on soft New Zealand trails they change how much damage your rear wheel does to the surface. Suspension changes a fourth thing: how much impact reaches your hands, feet, and back.
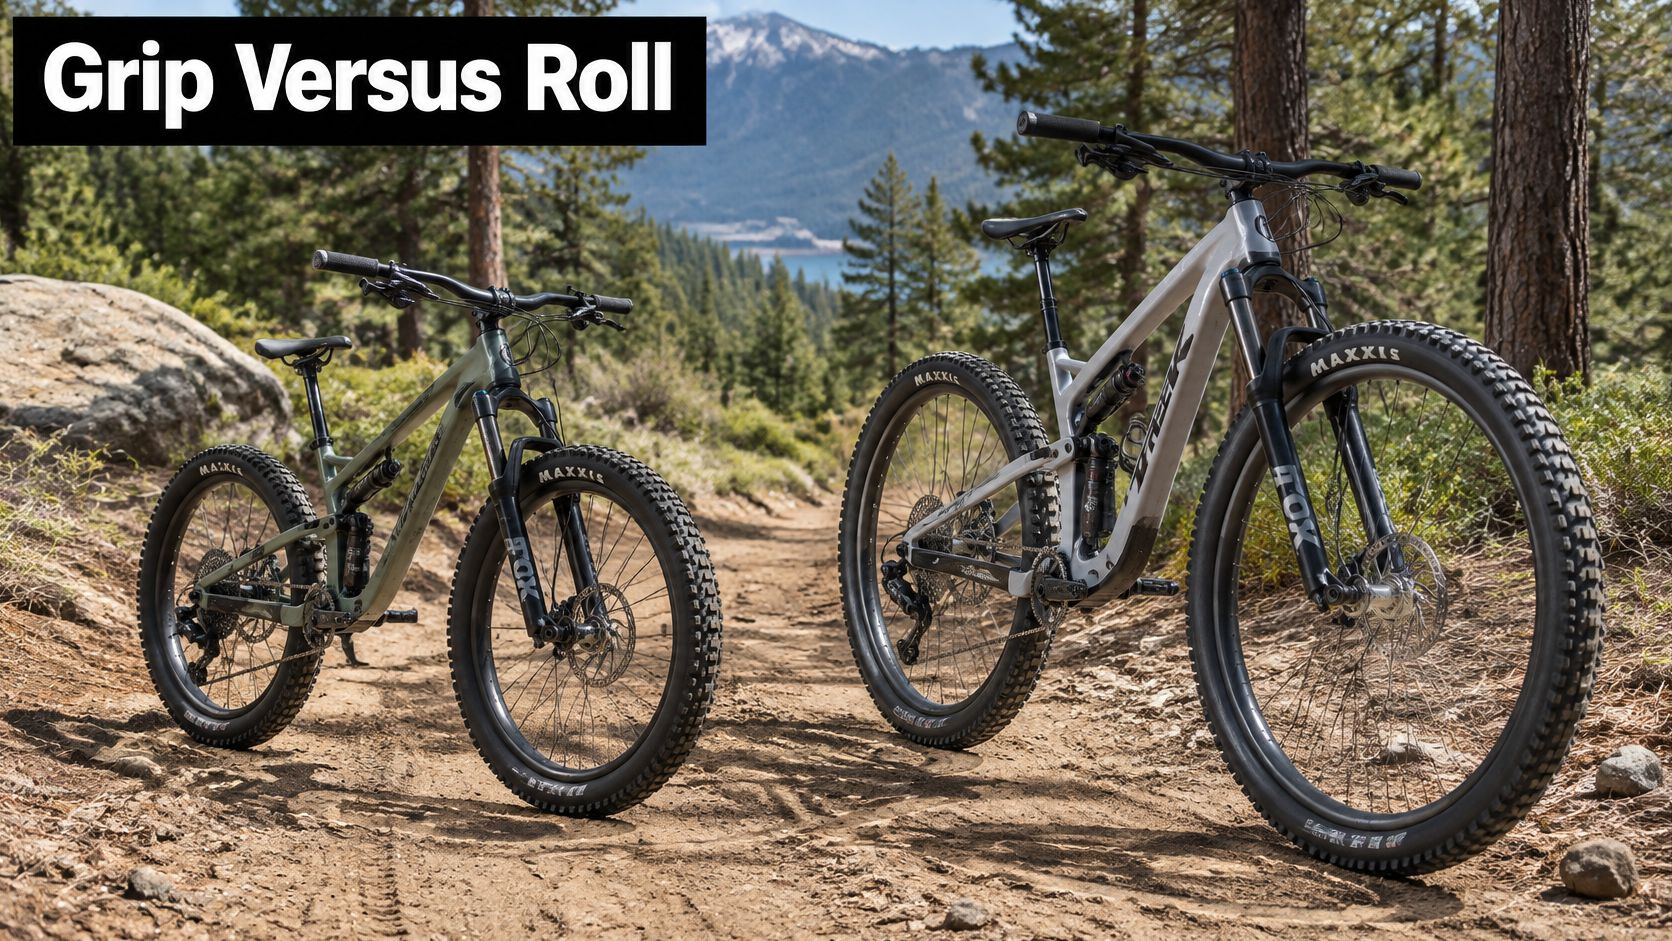
The two bikes below sit on the kind of mixed dirt where those choices matter. Loose corners punish a weak front tyre, and wet roots punish poor suspension set-up.
27.5-Inch or 29-Inch Wheels
29-inch wheels roll over roots, rocks, and holes more easily and hold speed once you're moving. That makes them a strong default for trail riding, longer distances, and taller riders. The trade-off is slower acceleration and handling that can feel less quick to change direction.
27.5-inch wheels accelerate and turn more quickly. Some riders prefer that feel on tight, steep, technical trails, and smaller riders often find the fit easier to manage. Neither size is automatically better. Your frame decides which size you can run, so check frame and fork clearance before you treat wheel size as a shopping choice.
Hub spacing and axle standard still rule the purchase. A wheel in the right diameter with the wrong hub spacing won't fit safely, and adapters don't fix every spacing or brake alignment problem.
Tyre Width, Casing, and Pressure
Trail tyres commonly sit around 2.3 to 2.6 inches wide. Wider tyres can run lower pressure for a larger contact patch and more grip. Narrower tyres may feel more precise and roll with less drag on firmer surfaces. Frame, fork, and rim width set the safe range, so don't choose width from a product photo alone.
Casing strength matters more as terrain gets rougher. A light casing suits smoother cross-country trails, while stronger casings suit enduro and downhill use where sidewall cuts and rim strikes are likely. On an e-bike, extra system weight and torque make that casing choice even less forgiving, and a torn sidewall on a heavier bike usually means a walk out, not a plug. If you're matching tyres to local conditions, start with the guidance on choosing MTB tyres for New Zealand trails and then confirm bead diameter and clearance on your own rims.
A tubeless set-up with sealant lets you run suitable pressures without an inner tube and seals many small tread punctures as you ride. It isn't maintenance-free. Sealant dries out, valves clog, and rim tape fails. Check and top up sealant before a remote ride, because sealant that has dried out will not seal a puncture when you need it.
Use roughly 20 to 30 psi as a starting range, then adjust for rider weight, e-bike weight, casing, rim width, and terrain. Too low risks rim damage and tyre squirm. Too high reduces grip and makes the wheel deflect off roots and rocks. Change pressure in small steps and note what you rode, or you'll chase your tail.
Rear Tyre Choice and Trail Damage
Wet and unconsolidated surfaces need a different way of thinking. The Department of Conservation review of mountain bike impacts on soil explains that rear-wheel torque creates significant shear forces, and when wet soil exceeds its shear strength, wheel slip produces smearing and deformation instead of simple compaction.
In practice, that means aggressive rear-tyre tread, appropriate tyre pressure, and smooth torque application help reduce slip and trail damage while preserving traction. On an e-bike, feed power in smoothly instead of stamping on the pedals in a high assistance mode. Component choices help, but they can't fully offset soil-strength limits. If the trail is saturated, the correct equipment decision is not to ride it.
The video below is useful for checking how your set-up choices look in motion, especially body position over the wheels. Watch it after you've set pressure and sag, then compare what you feel on your next ride.
Suspension Travel and Sag
As a general guide, 100 to 120mm of travel suits cross-country hardtails and light trail bikes, while 130 to 160mm suits trail and enduro bikes built for rougher descents. More travel isn't better if the frame wasn't designed for it, and it won't fix poor tyre choice or worn brakes.
A Massey University study using accelerometers on the bicycle and rider found that full suspension significantly reduced total vibration exposure compared with a hardtail, although it did not significantly change lap time or power output on the tested cross-country circuit. Treat suspension as a comfort and control factor rather than a speed upgrade. Less vibration can mean better control late in a long descent, even if it doesn't guarantee a faster time.
Set sag around 25 to 30 percent of travel as a starting point. Sag is how much the suspension compresses under your riding weight, including pack and water. Too little sag makes the bike harsh and reduces traction. Too much leaves too little travel for impacts and can unbalance the frame geometry. Set sag in your riding gear, cycle the suspension to settle it, then record the pressure you used.
Servicing keeps that set-up honest. Worn seals, old oil, and dry bushings make expensive suspension feel cheap. If your fork or shock feels harsh despite correct sag, suspect service condition before you shop for a replacement. Mountain bike parts rarely perform to spec when they're overdue for basic care.
Sizing Cockpit and Contact Parts
Start with the clamp diameter. It's the first hard limit on the cockpit, and it's the question riders ask after they've already bought the wrong bar.
31.8mm or 35mm Bar Clamp
31.8mm is the long-standing handlebar clamp standard. 35mm bars are stiffer at the clamp area and are widely used on trail and enduro bikes. Neither fits the other's stem. If you change bar standard, you're usually changing the stem too, so budget for both or keep the standard you have.
Stiffness isn't always a win. Some riders prefer the feel of a 31.8mm set-up on rough trails, while others want the direct steering feel of 35mm. Fit comes first, then feel. For a deeper look at rise, sweep, and width choices, work through the options for mountain bike handlebars and cockpit sizing with your current stem measurements in hand.
Cockpit sizes and fit rules
| Part | Common sizes | Fit rule |
|---|---|---|
| Handlebar clamp | 31.8mm or 35mm | Stem clamp and bar diameter must match |
| Handlebar width | 720mm to 800mm | Wider for steep technical trails; narrower for tight singletrack |
| Stem length | 35mm to 50mm | Sets reach and steering response |
| Seatpost diameter | 30.9mm, 31.6mm or 34.9mm | Must match the frame seat tube; dropper posts allow saddle drop on descents |
| Grips | Lock-on or slip-on | Lock-on resists rotation on rough descents |
| Pedals | Flat or clipless | Flat for easy foot placement; clipless for a firmer pedalling connection |
Width, Stem Length, and Reach
Bar width commonly ranges from 720mm to 800mm. Wider bars give more control and cornering stability on steep, technical trails. Narrower bars suit tight singletrack, smaller riders, and anyone clipping trees on overgrown local tracks. You can usually trim a wide bar down. You can't add width back, so measure twice and cut once.
Stem length, often 35mm to 50mm on modern trail bikes, changes reach and steering response. A shorter stem brings the bar closer and can make steering feel quicker. A longer stem stretches your position and puts more weight over the front wheel. Change one thing at a time. If you fit a wider bar and a shorter stem together, you won't know which change helped.
Seatposts, Grips, Pedals, and Handguards
Seatpost diameter must match the frame seat tube exactly. Common sizes include 30.9mm, 31.6mm, and 34.9mm, and close enough isn't safe here. A dropper post lets you lower the saddle for descents at the push of a lever, which improves body movement on steep trails. Before ordering one, check diameter, insertion depth, cable routing, and total travel against your leg length and frame. A dropper that fits the diameter can still be too long for the frame or rider.
Lock-on grips clamp to the bar and resist rotation on rough, wet descents. Slip-on grips are simpler and can feel softer, but they need a secure fit so they don't twist or slide. Grip diameter matters for hand fatigue, so riders with smaller hands shouldn't default to the thickest option.
Flat pedals offer easy foot placement and let you dab a foot quickly on technical trails. Clipless pedals give a firmer pedalling connection and keep your feet located on rough ground, but they need matching cleats and practice. Neither choice makes you a better rider on its own. Match the pedal to your confidence, terrain, and the shoes you own.
Handguards mount to the bar and shield your hands from branches, cold wind, and wet foliage. They're useful on overgrown trails and in cold or wet conditions, and they can deflect light knocks that would otherwise catch your fingers. Check clearance around brake levers, shifter, and dropper remote before you ride. A guard that interferes with your brakes is worse than no guard at all.
Check the manufacturer's sizing for every cockpit part before ordering. A tape measure and calipers at home beat a returns parcel later, especially with components that have been clamped, cut, or fitted.
Failure Signs and When to Replace Parts
Equipment failure isn't rare enough to ignore. The 2025 New Zealand Great Rides evaluation recording almost 2.58 million trips in the year ending June 2025 found that six percent of surveyed users reported equipment failure and five percent reported an injury. Inspection and spares are part of riding, not an afterthought for pessimists.
Most failures announce themselves early. The skill is recognising the warning sign and knowing whether it's a home repair, a workshop job, or a replacement you shouldn't argue with. That judgement matters more the further you are from assistance, and it matters on an e-bike where extra weight and torque load the same mountain bike parts harder.
Failure signs, first action and when to replace
| Failure | Warning sign | Action |
|---|---|---|
| Bent or cracked derailleur hanger | Chain skipping or ghost shifting | Replace if cracked; carry a spare for the model |
| Worn brake pads | Squealing or lever travel increasing | Replace when the lining is close to the backing plate |
| Warped or cracked rotor | Pulsing braking or visible cracks | Replace; do not straighten or weld |
| Tubeless tread puncture | Air loss with sealant unable to seal | Plug at home if small and in the tread |
| Tubeless sidewall cut | Sealant and air loss from the sidewall | Fit a tube or a replacement tyre; plugs will not hold |
| Stretched chain | Skipping on the cassette | Replace at 0.5 to 0.75 percent stretch on a chain checker |
| Fork seal leak | Oil on the stanchions or sag change | Take to a workshop for seal service |
Reading the Warning Signs
A bent derailleur hanger often shows up as ghost shifting or a chain that skips in gears that shifted fine last week. The hanger is designed to bend or break to protect the frame and derailleur. If it's cracked, replace it. Don't keep bending a weakened hanger back and expecting it to hold alignment.
Worn brake pads squeal, feel weak, or make the lever travel further before the bike slows. Look at the pad material, not just the noise. When the lining is close to the backing plate, replace the pads before metal scores the rotor. Wet grit accelerates pad wear sharply, so check pads after muddy rides rather than on a fixed schedule.
A warped rotor pulses through the lever. A cracked rotor is finished. Replace it, and don't straighten or weld a cracked rotor back into service. Brakes are the wrong system for creative repairs.
If a part controls stopping or steering and you can see a crack, the decision is already made. Replace it and inspect whatever it bolts to.
Tyres, Chains, and Fork Seals
Tyre plugs suit small punctures in the tread where sealant almost holds. They don't fix a sidewall cut. The sidewall flexes constantly, so a plug works loose and sealant escapes. Fit a tube with a tyre boot to get home if you must, then replace the tyre. Riding a cut sidewall until it fails completely risks a sudden loss of air in a corner.
Chains give you a measurable decision. Use a chain checker and replace the chain at 0.5 to 0.75 percent stretch, depending on the drivetrain and the tool maker's guidance. Leave it longer and the worn chain reshapes the cassette and chainring to match, so a cheap chain replacement becomes a cassette and chainring replacement too. That's the clearest case in the workshop of a small part protecting expensive ones.
Oil on fork stanchions or a sudden change in sag points to a seal leak or service problem. Wipe the stanchions clean, cycle the fork, and check again. Fresh oil means the fork needs a workshop seal service. Riding on leaking seals lets dirt in and oil out, and the damage spreads to bushings and stanchion coatings.
A Spares Kit That Matches the Failure Table
Carry spares for failures you can realistically fix on the trail. A sensible kit for New Zealand backcountry and Great Rides routes includes the following.
- Spare derailleur hanger: It must suit your exact frame model, because hangers aren't universal.
- Chain tool and quick link: Match the quick link to your chain speed count and practise using it at home.
- Tyre plugs and a spare tube: Plugs handle tread punctures, and the tube covers sidewall damage and failed rim tape.
- Brake pads: Carry the correct shape and compound for your calipers, plus the tool needed to fit them.
- Multi-tool and pump: Choose tools that fit your axle, rotor bolts, and cockpit bolts, not just the smallest tool in the shop.
Check the kit before each big ride. A quick link for the wrong speed count and a hanger for your old frame won't help anyone.
E-Bike Limits and Pre-Order Checks
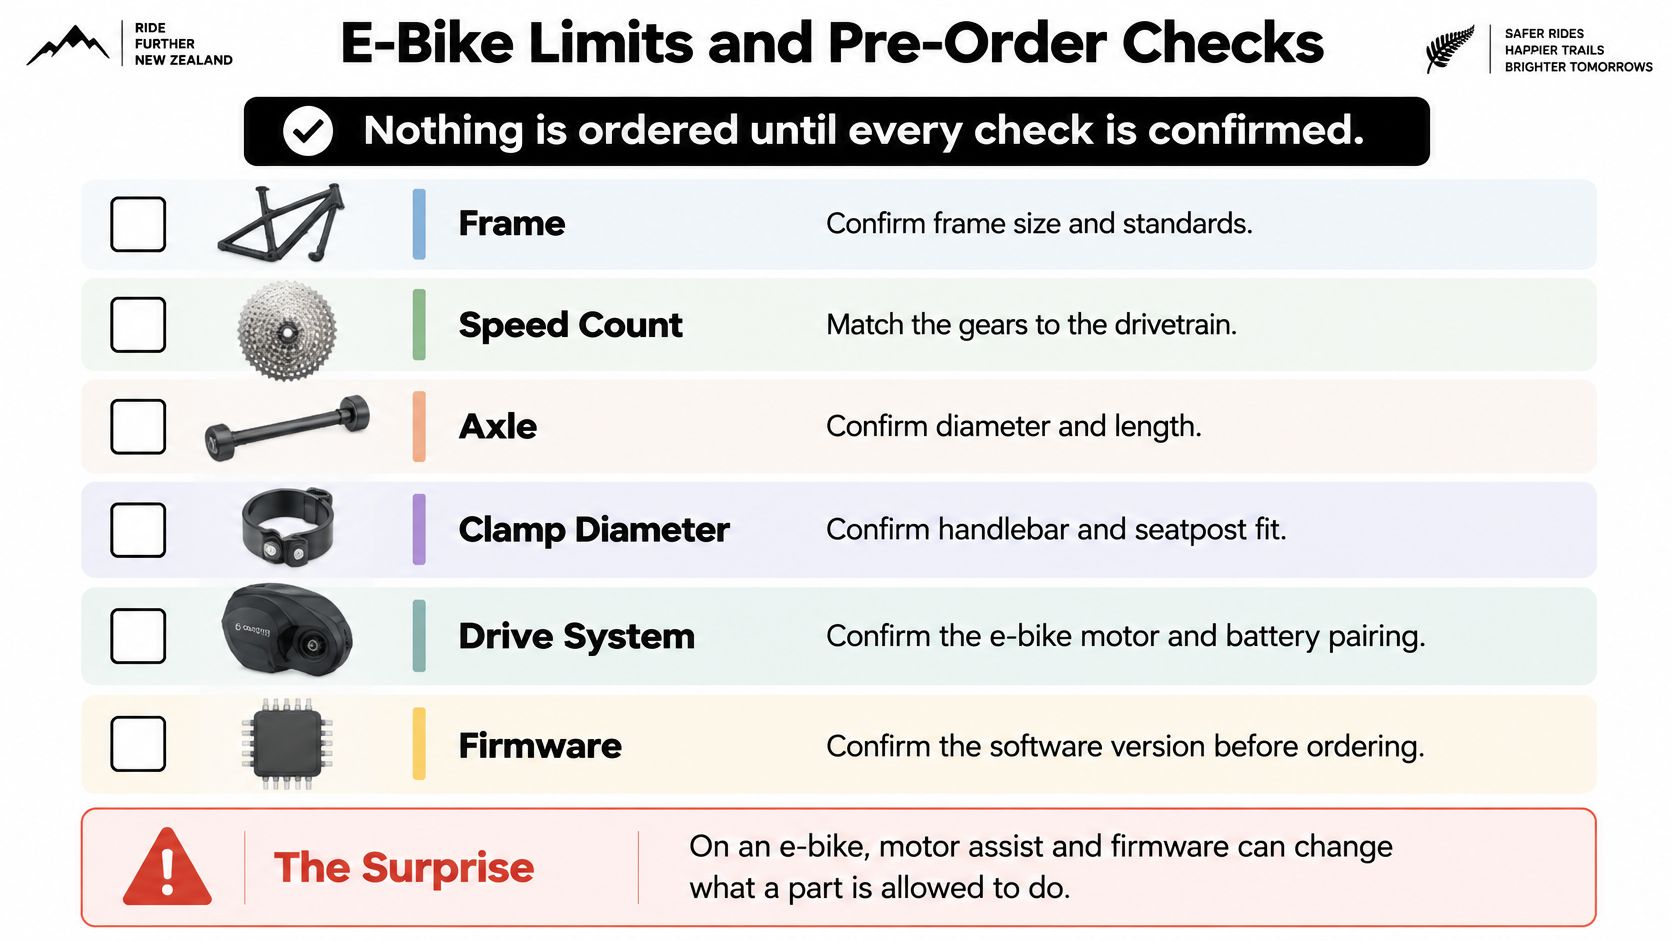
Nothing gets ordered until the frame, speed count, axle, clamp diameter, and, for e-bikes, the system and firmware are confirmed. That sounds slow. It's faster than returning fitted parts, diagnosing error codes, or discovering a battery connector doesn't match.
The surprise with e-bikes is that the cheapest-looking part can be the costliest to replace. Motors, batteries, displays, and controllers are linked by proprietary electronics and firmware. A display, sensor, or battery that looks physically similar may not communicate with your system. When that happens, a nominally simple replacement becomes uneconomic, even if the part itself was a bargain.
Event Limits for E-Bike Systems
If you race or enter organised events, legality is a fit check too. The Cycling New Zealand MTB technical regulations for e-bike events specify systems rated at no more than 250 watts, assistance only up to 25 km/h, and pedal assistance only apart from limited start-up assistance.
That affects parts choices directly. A replacement motor, controller, battery, or tuning device that changes rated output or assistance behaviour can put the bike outside event rules, whatever the product listing promises. It can also affect how the bike may be used elsewhere, so don't treat electronic parts as generic hardware. Record the exact system fitted to your bike and buy parts specified for that system.
Road use and trail access rules sit outside event regulations, so confirm the requirements for where you ride. The practical point for parts shopping is the same. If a component changes assistance, speed cut-off, battery behaviour, or braking capacity under e-bike loads, it's not a casual swap.
Why New Zealand Depends on Imported Parts
Supply is the other local reality. Modern New Zealand servicing depends heavily on imported drivetrains, suspension components, wheels, and brakes rather than locally manufactured equivalents, a shift traced in the Te Ara history of bicycles in New Zealand, where locally made bicycles represented about 90% of all bicycles sold during the 1970s before import restrictions were lifted in the late 1980s.
That history has a workshop consequence. You're choosing across multiple international standards, and the correct part may need to be ordered against a model year, freehub standard, or firmware version. The World Bank trade record for New Zealand bicycle frame, fork, and parts imports in 2023 put that category at about US$4.11 million and 60,900 kilograms, which underlines how much of the repair ecosystem sits in frames, forks, and components rather than complete bikes. Accurate identification before ordering isn't bureaucracy. It's how you avoid waiting twice for the same repair.
Three Buckets for Every E-Bike Part
Sort the job before you sort the shopping cart. Most parts fall into one of three buckets.
DIY-safe parts are mechanical, measurable, and reversible. Tyres, grips, pedals, saddles, and brake pads usually sit here, provided you've matched bead diameter, clamp size, pedal thread, saddle rails, and pad shape. You still need the right tools and torque settings. DIY-safe doesn't mean guess-safe.
Workshop-only parts involve the drive system or safety systems that need specialist tools and checks. Motors, batteries, controllers, internal wiring, firmware updates, brake bleeding, and press-fit bearing work belong here. A workshop can run diagnostics, confirm connector and firmware compatibility, and check that the replacement works with the display and sensors already on the bike.
Never-mixed parts should stop the purchase outright. Don't mix batteries or chargers across different systems. Don't combine non-matched rotors and caliper set-ups outside their specified range. Don't mix brake fluids. Physical fit isn't proof of electrical or hydraulic compatibility, and a connector that can be forced together is a warning, not encouragement.
On an e-bike, ask whether the part talks to the system, not only whether it bolts to the frame. Firmware is a fit measurement now.
The Pre-Order Checklist
Work through these steps in order and write the answers down. Photos help, especially of labels, splines, axle markings, and connectors that are hard to describe.
- Note the frame model and year: Photograph the frame labels and serial number area, because standards change between model years with the same name.
- Measure the fixed fit points: Record hub axle diameter, length and thread pitch, bottom bracket type, seatpost diameter, and bar clamp diameter.
- Count the drivetrain: Count cassette sprockets, identify the freehub type, and note whether the crankset is 1x or 2x.
- Read the brake hardware: Record rotor diameter, rotor mount, caliper adaptor, pad shape, and the fluid named on the lever or reservoir.
- Record the e-bike system: Write down motor model, battery voltage and model, connector type, display model, and firmware version if the display shows it.
- Decide who fits it: Send any job needing bleeding, pressing, firmware, diagnostics, or motor-side work to a workshop before you buy the part.
That last step protects your wallet. Fitted or used parts usually can't be returned, so the time to discover a mismatch is before the old part comes off. Bring the bike's model and serial information, plus the failing part if it's removable, when you talk to a mechanic.
Shops such as Rider 18 can check drivetrain, brake, wheel, and e-bike component compatibility against the bike before parts are ordered, which is one option when the checklist leaves a doubt. The useful thing to send any workshop is the checklist itself, not a photo of the whole bike from three metres away. Frame model and year, speed count, freehub, axle markings, rotor and fluid labels, and the motor and battery details answer most questions before anyone picks up a tool.
Apply the same discipline to non-electric bikes and most mountain bike parts become straightforward. Identify the standard, match the system, confirm the measurement, and only then compare price and performance. Upgrade shopping comes second. Fit, failure mode, and repairability decide whether the upgrade survives the trails you ride.
Bring your checklist, frame details, and the part that's giving you trouble to Rider 18 in Nelson or get in touch online before you order, and the team can confirm fit for drivetrain, brake, wheel, tyre, suspension, and e-bike parts against your exact bike. That check costs you a conversation now and saves you a return, a second wait for imported stock, and a ride cut short later.


Please upload banner from store admin blog pages