

Bicycle Drivetrain Parts Explained: Compatibility and Care
- by Nigel
-

A chain that skips on a wet school run is rarely one bad link. The parts that turn your legs, or a motor, into forward motion wear together, and a spare that looks right can still leave the bike parked.
Why Drivetrain Parts Matter
In 2024, New Zealand imported approximately NZ$2.04 million of bicycle pedals, crank-gear and associated parts, weighing 45,048 kilograms, according to World Bank WITS trade records. Those crates are how crank assemblies and pedals reach local workshops. Almost none of that hardware is made here, so a wrong order means waiting on the next shipment.
Picture a torque-heavy e-bike commute, a mud-caked trail bike, or a family bike on the school run. The drivetrain is every part that turns pedalling, or motor torque, into forward motion: shifters, derailleurs, crankset, chain, cassette, bottom bracket and pedals.
Shared names matter. You order the right spare, you describe the fault in one sentence, and you skip a cassette that will not sit on the freehub. Wet winters, coastal salt and gritty gravel are the baseline for every check below. If you only need a part name today, use the chart and stop there.
Every Drivetrain Part and What It Does
A groupset such as Shimano Deore or XT, or SRAM NX or Eagle, bundles these drivetrain parts as a matched set. Mix them only when the standards line up. The chain is the fastest-wearing piece, so it is the one you measure first. The fit-note column is what you check before you pay.
| Part | What it does | Common types and standards | Fit note |
|---|---|---|---|
| Shifter | Sends your shift command to the derailleur via cable or electronics | Flat-bar trigger, drop-bar STI, electronic Di2 and AXS, friction | Must match the derailleur's pull ratio or electronic system |
| Rear derailleur | Guides the chain across the cassette and takes up slack | Clutch designs for 1x; long or medium cage | Cage capacity must cover the cassette range |
| Front derailleur | Pushes the chain between front chainrings | Braze-on, band clamp or direct mount; 2x and 3x setups | Chainring count and chainline must match |
| Crankset and chainrings | Convert leg power into chain pull | 1x narrow-wide 30-38 t, road compact 50/34 t, BCD or direct mount | Bolt pattern and chainring width must suit crank and chain |
| Bottom bracket | Connects crank to frame and lets it spin freely | BSA 68/73 mm, T47, PressFit, PF30 | Must match frame shell and spindle standard |
| Chain | Carries power from chainring to cassette | 8- to 12-speed, outer width about 7.1 mm down to 5.3 mm | Speed count must match cassette and chainrings |
| Cassette | The stack of rear gears | MTB 10-52 t, road 11-34 t | Freehub splines and smallest cog must match |
| Freehub body | Ratcheting interface the cassette slides onto | Shimano HG, SRAM XD/XDR, Micro Spline | Cassette standard must match the body |
| Jockey wheels | Guide the chain through the derailleur | 11 t or 12 t, bushing or bearing | Worn teeth cause noisy, vague shifting |
| Pedals and crank interface | Where rider power enters the drivetrain | Flat, SPD and road cleats; square taper, Hollowtech II, GXP, DUB spindles | Spindle must match the bottom bracket |
How to use the fit note
Read the row for the part in your hand, then the row it meshes with.
Shifters and derailleurs talk in a pull ratio, or in an electronic protocol. A Shimano trigger will not index a SRAM rear derailleur, and Di2 will not talk to AXS.
The rear derailleur has to swallow the biggest cog and take up the slack when you are in the small cog. A medium cage on a 10-52 t cassette runs out of room. The chain then hangs slack or the cage hits the cog.
Cranks, chainrings and the bottom bracket are a stack. Shell type, spindle and bolt pattern all have to agree. A direct-mount ring will not bolt to a 104 mm spider, and a DUB spindle will not spin in a square-taper cup.
Cassettes care about splines more than brand logos. Count the cogs, read the lockring, and match HG, XD, XDR or Micro Spline before you order.
You can now point at any part on the bike and name its standard. That is the whole job of the chart.
How Power Flows From Pedal to Tyre
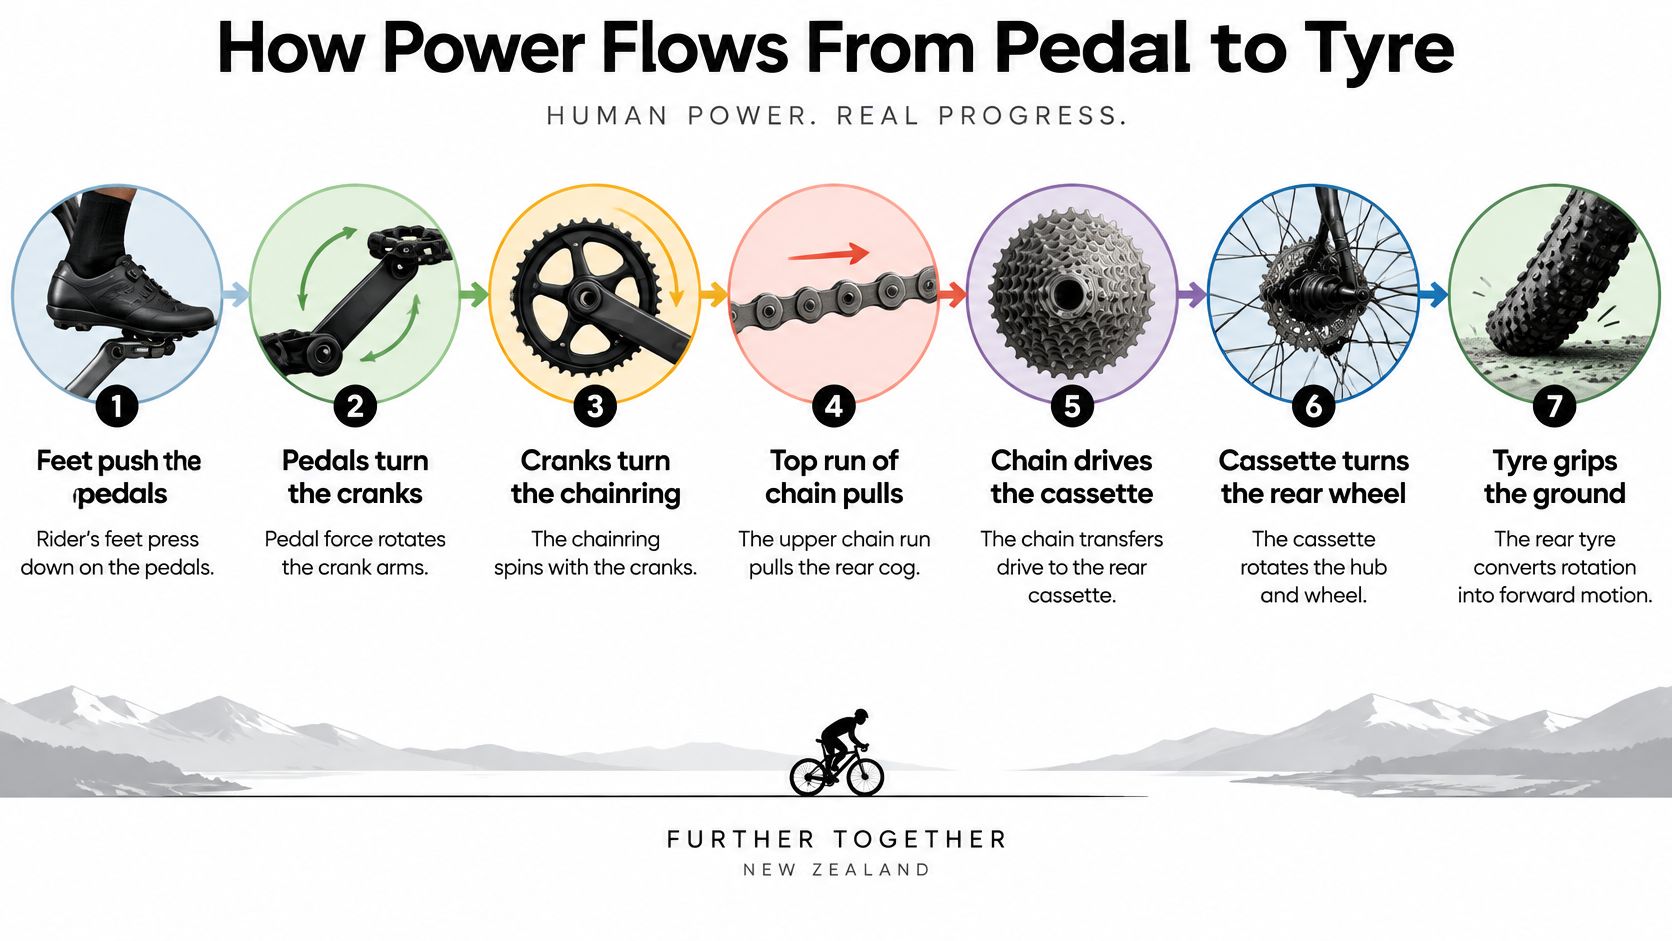
Trace it on your own bike. Your feet push the pedals. The pedals turn the cranks. The cranks turn the chainring. The top run of chain pulls a cog on the cassette. The freehub ratchet locks to the hub. The hub turns the wheel, and the tyre grips the ground.
One ratio, two layouts
Say the chainring has 32 teeth and the cog has 16. That is 2:1. The wheel turns twice for each pedal revolution. A bigger rear cog slows that ratio and makes the climb easier. A smaller cog buys speed and asks more of your legs.
A 1x layout with a wide cassette is simple. There is no front derailleur to knock out of adjustment, and mud has fewer places to pack in. A 2x or 3x layout gives smaller steps between gears and a taller top end, at the cost of a second shifter and more cross-chaining to avoid.
Where a motor changes the load
A mid-drive motor adds torque at the crank. Chain, chainring and cassette then carry rider plus motor. A hub motor drives the wheel and leaves the chain lightly loaded, so the same "11-speed" label hides two very different jobs.
The links that see motor torque are the ones that skip first. Gear count does not tell you that. Where the torque enters does.
Compatibility Rules That Prevent Wasted Orders
New Zealand has been living on imported drivetrain parts for a long time. Te Ara notes that by the 1950s bicycle parts were no longer being made here, and that the late 1980s lifting of import restrictions ended large-scale local bicycle manufacturing even after 90% of bikes sold in the 1970s were locally made. You match what is on the bike to what a factory overseas still ships. Guessing is how a spare sits in a box.
Work these pairings in order. A part that fits on paper still fails if one of them is wrong. If you are choosing between Microshift and Shimano on a budget build, read the Microshift and Shimano comparison before you mix levers and mechs.
| Pairing | What must match | Common standards | Quick check |
|---|---|---|---|
| Chain to cassette and chainrings | Speed count | 8-speed about 7.1 mm wide, 12-speed about 5.3 mm | Count the cogs and buy the matching chain speed |
| Cassette to freehub body | Spline standard | Shimano HG, SRAM XD and XDR, Micro Spline | Check the spline pattern and lockring |
| Shifter to derailleur | Pull ratio or protocol | Shimano and SRAM cable pull differ; Di2 and AXS are ecosystem-locked | Keep one brand within a mechanical system |
| Derailleur to cassette | Capacity | Long cage for wide ranges such as 10-52 t | Add the cog range and ring difference, compare to capacity |
| Crank to frame | Bottom bracket standard | BSA 68/73 mm, T47, PressFit, PF30 | Identify the frame shell and spindle diameter |
| Chainring to crank | Mount interface | 104, 94 or 110 mm BCD, or direct mount | Count bolts and measure the bolt circle |
| Motor to drivetrain (e-bike) | Torque rating and chainline | OEM mid-drive specifications and approved chains | Use manufacturer-approved parts and record the motor model |
The checks that actually save the courier fee
Speed first. An 8-speed chain is too wide for a 12-speed cassette. It will sit badly, skip, or shift like the cable is full of grit.
Splines second. HG, XD, XDR and Micro Spline do not share a lockring trick. Look at the freehub, not the catalogue photo.
One brand per mechanical system. Cable pull is not a universal language. Electronic groupsets are locked to their own batteries, shifters and software.
Cage, shell, bolts, then motor. A 10-52 t cassette wants a long cage. A BSA 73 mm shell will not take a PressFit cup. Count chainring bolts or confirm direct mount. On an e-bike, keep chainline and wiring clearance, and write down the motor model before you click buy.
Count the cogs, read the stamped markings, and measure the shell. Five minutes with a ruler beats a week waiting on a return.
Drivetrain Choices for Mountain, E-Bike and Family Riders
The trail bike
A Nelson trail bike that sees clay and roots is happier as 1x 12-speed, SRAM Eagle 10-52 t or Shimano 12-speed, with a clutch derailleur and a narrow-wide ring. The clutch stops the chain slapping itself to death. The narrow-wide teeth keep it on the ring when the rear wheel leaves the ground.
The habit that saves the expensive bits is dull. Rinse and relube after every muddy ride, and carry a quick link plus a spare derailleur hanger. A bent hanger will not be indexed away.
The e-bike
Motor torque piles into the one or two cogs you use under power. eBike Team's workshop guidance describes Shimano's LINKGLIDE cassette as using thicker-based teeth and a chamfered profile so those teeth deform more slowly and chain skip arrives later. Treat chain and cassette as a pair. Chain geometry is cut for its cassette and chainring, so a new chain on a hooked cog shortens the life of both.
NZTA's 2025 research found that e-bike programmes needed routine servicing, roadside assistance, and professional troubleshooting for mechanical and electrical faults. A cassette that bolts on can still be the wrong part under sustained motor load.
Can you fit standard MTB chain, cassette and derailleur? Often yes, if speed count, cassette standard and derailleur capacity match, and the motor maker's approved list does not forbid them. Non-approved parts can void a warranty. Book a workshop when the display shows error codes, when chainline moved after a crank or bottom bracket change, or when the part is motor-specific.
Before you order, write down motor model, cassette standard, speed count, chainline, crank interface, derailleur capacity and battery-drive brand. Mixed brands and thin stock outside the main centres both add days. An incorrect parcel leaves a commuter bike unusable.
The family bike
Most school-run and commuter bikes still run a 7- or 8-speed freewheel. Replacing the whole cluster is often cheaper than chasing a single worn cog, and the groups are easy to find. Lube the chain weekly. On a single-speed kids' bike, check chain tension. A slack chain drops. A bar-tight chain wears the sprocket into hooks.
The 15-Minute Maintenance Routine
Salt, rain and trail grit do more damage than kilometres. Do this after wet, muddy, dusty or coastal rides, and more often on an e-bike, where motor load speeds the same wear.
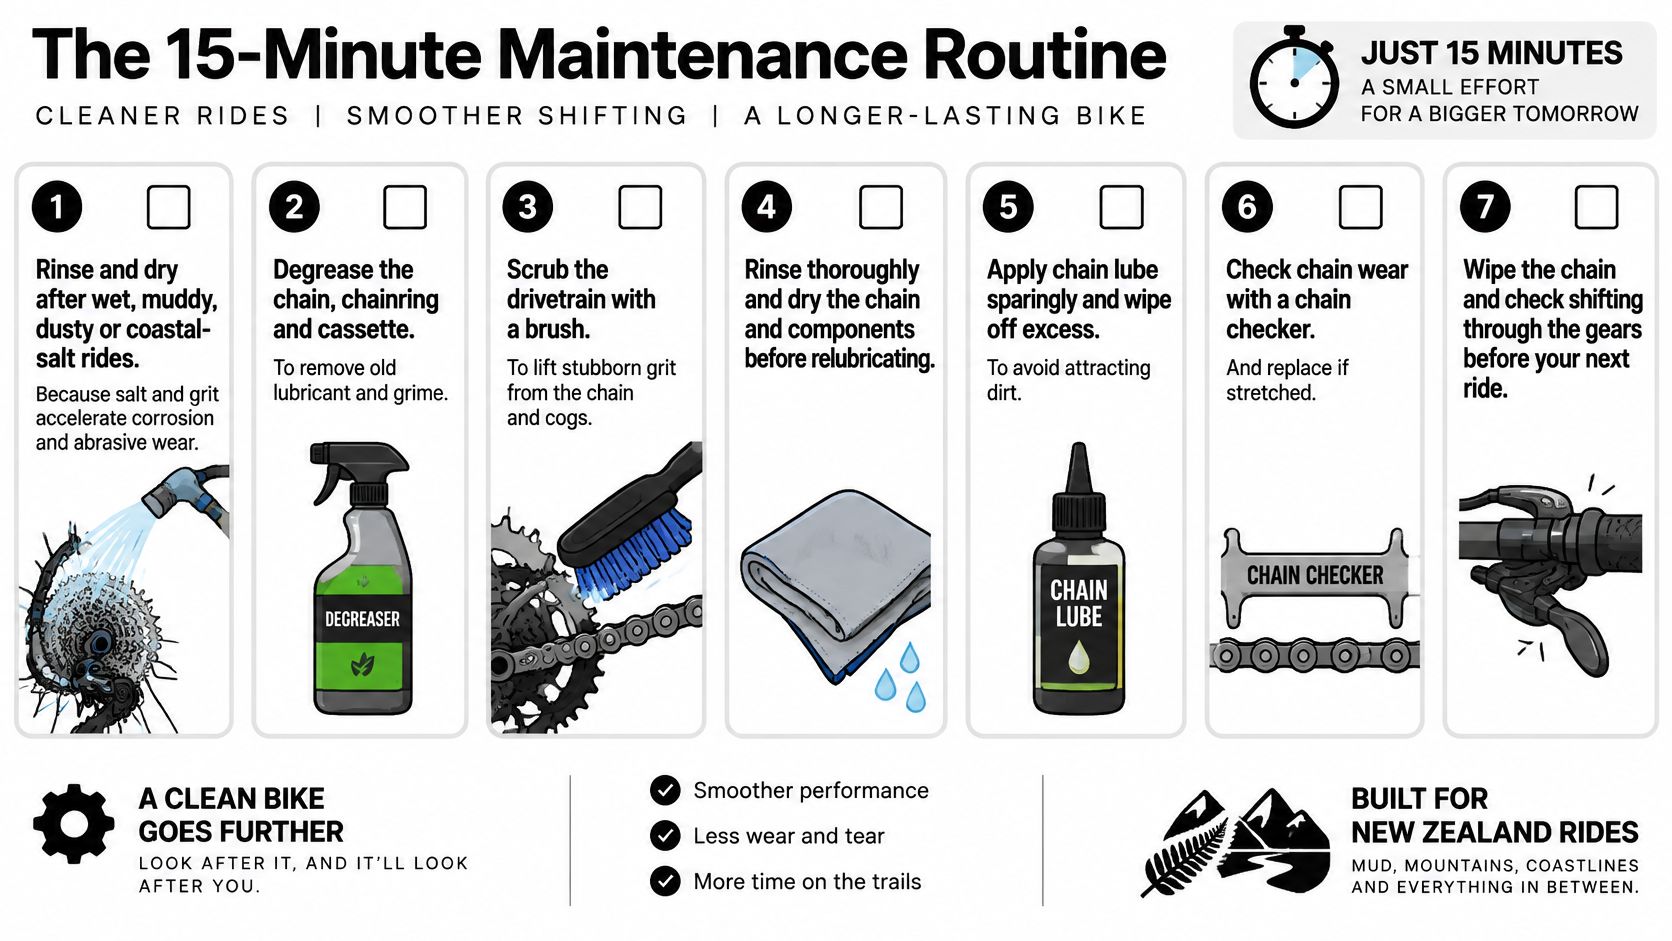
eBike Team's servicing notes pass on Shimano's advice that a metal chain should be kept clean and lubricated, and that excess lube should be wiped off because it attracts dirt. The symptoms of a neglected or rusting chain are squeaking, jumping and heavier pedalling. That is grit and old oil grinding the rollers, not a bike that "just sounds like that".
- Rinse and dry. Salt and grit keep working after you park. A dripping chain left wet overnight starts the rust you will chase next weekend.
- Degrease when the chain is black. Old lube plus grit is a grinding paste around pins and rollers. A quick wipe of the plates does not reach it.
- One drop per roller. Wet lube for rain and mud, dry lube for dust. Choosing between those is covered in our chain lube guide. Flooding the chain is the usual slip-up.
- Wipe every visible drop. Oiled outer plates collect the next ride's sand. The rollers stay wet. The plates should look almost dry.
- Measure with a chain-wear gauge. Compare the reading with the limit your chain maker publishes for that speed. Replace at the limit, not because the calendar says six months.
- Look for shark-fin teeth on cassette and chainring. Hooked teeth mean the old chain has already recut the profile.
- Re-index and sight the hanger. A straight hanger and fresh cable tension fix more "worn derailleur" complaints than a new mech does.
Skipping during assisted acceleration is a warning, not a quirk. If a new chain still skips on the old cassette, the cog teeth have been reshaped and the cassette goes too.
The clip below shows a simple clean-and-lube pass you can copy in the garage.
Fifteen minutes, done before the next ride, protects the cassette and chainrings that cost more than the chain.
Which Drivetrain Part to Replace First
The chain slips when you stand on the pedals. That is the case that fools people into the cheapest fix. New Zealand's bicycle safety standard covers drive-chain design, fasteners and maintenance instructions. It does not give you a wear threshold, and it does not say how salt or mud should change the repair. You measure, then you choose.
A new chain on a hooked cassette often skips, shifts badly, and earns a second workshop visit. Replacing the cassette while a worn chainring keeps eating chains wastes the other half of the money. Measure chain wear, inspect tooth shape, and separate orange salt corrosion from ordinary polished wear. Do not replace on a calendar.
| Symptom | Likely worn part or cause | What to do |
|---|---|---|
| Squeaking, stiff links or rust | Dry or contaminated chain | Clean, relubricate and wipe excess; replace if corroded through |
| Chain slips under hard pedalling | Worn chain or cassette teeth | Measure the chain; fit a new chain and replace the cassette too if it still skips |
| Hooked shark-fin teeth | Worn chainring or cassette cogs | Replace the worn ring or cassette together with the chain |
| Slow or vague shifting | Stretched cables, dirty housing or bent hanger | Re-index the cable first and check hanger alignment |
| Noise only in certain gear combos | Cross-chaining or worn jockey wheels | Avoid extreme combinations and replace worn pulleys |
| Clicking under e-bike acceleration | Torque wear concentrated in the chain and cassette | Inspect both together and replace as a matched set |
What I would buy first
I would start with the chain, but only after the gauge says it is done. If the new chain runs well, stop. If it skips in the cogs you use, add the cassette, and add the chainring only when its teeth are hooked. Vague shifting gets a cable and a hanger check before any new derailleur. Our chain replacement guide walks through the fitting if the gauge has already made the decision.
Replacing several matched parts once is often cheaper, and safer, than replacing one part twice.
DIY Care or a Workshop Service
Home work covers cleaning, lubing, indexing and a straightforward chain swap when you already know the speed and the cassette standard. Book the workshop for a bent hanger, a press-fit bottom bracket, skipping that returns after a new chain, e-bike error codes, or any job that touches a warranty.
In our Nelson workshop, with shipping nationwide, three jobs cover most of this. A Safety Check is $69 and includes lubrication of the chain, derailleur pivots and springs, plus basic gear and brake tuning. General Service and Drive Clean is $99. We take the drivetrain off for ultrasonic cleaning, straighten the hanger and adjust the derailleurs. E-General Service adds diagnostics, updates where required, an error-log and wear check, and a test ride.
This week, measure the chain, note the cassette standard and the speed count, then either order that matched part or send those details in with the bike.
Rider 18 stocks chains, cassettes, derailleurs and chainrings for mountain bikes, e-bikes and family bikes, and the Nelson workshop can measure wear and fit the matched parts when a home fix is the wrong call. If the chain is skipping or you are about to order a cassette, bring the speed count and the motor or freehub standard with you. Visit Rider 18 to book the service or order the part that fits.


