

MTB Brakes NZ: How to Choose, Set Up and Maintain
- by Nigel
-

New Zealand records 4,152 accepted mountain-biking injury claims in a single year, at a treatment and recovery cost of about NZ$21 million, according to ACC figures reported by the NZ Herald. That works out at roughly NZ$5,058 per claim. Those numbers don't tell us how many riders lost braking, but they do tell us where the margin for error sits on steep, loose, wet ground. Brakes are the one component that turns a mistake into a claim.
I've spent enough time behind a workstand to know that most brake problems arriving at a shop aren't exotic. They're a worn pad, a stretched cable, a glazed rotor, or a rider who bought a bigger disc when they needed a lesson in lever control. This guide covers the whole system: which brake family suits your bike, how heat moves through it, how to size rotors to your weight, what the e-bike rules now require, and how to brake so the hardware lasts.
Mountain Bike Brake Types Compared for NZ Trails
Most riders know which brake family is on their bike. Fewer know what that choice costs them in upkeep. The table below is the short version, and the paragraphs after it explain the trade-offs that matter on New Zealand dirt.
| Brake type | Stopping feel | Maintenance demand | Best fit |
|---|---|---|---|
| Rim brakes | Moderate, weaker in wet mud | Pad and rim wear checks | Older or budget bikes |
| Mechanical disc | Moderate, cable stretch over time | Cable tension and pad checks | Light trail riding |
| Hydraulic disc, two-piston | Firm and progressive | Fluid bleed every 1-2 years | Cross-country and trail |
| Hydraulic disc, four-piston | High and controllable under heat | Bleed plus pad and rotor checks | Enduro, downhill and heavy e-bikes |
Rim brakes still turn up on older and budget bikes. The rim surface does the braking, so mud and wet rock cut performance sharply, and a long descent can heat a rim wall to the point where a tyre bead loses grip on it. They're cheap and simple, and fine for a gravel path or a flat commute.
Mechanical disc brakes pull a cable to squeeze pads onto a rotor. Adjustment is a barrel turn and a pad swap, which makes them the friendliest system for a rider learning maintenance. They suit light trail riding and they don't care about fluid type.
Hydraulic disc brakes push fluid through a sealed line. The lever feels firmer, power builds progressively, and cable stretch disappears from your life. Two-piston calipers cover cross-country and trail. Four-piston calipers are the ones to fit for enduro, downhill and heavy e-bikes, where heat has to go somewhere.
Pick the row that matches your riding, then read the rotor and servicing detail before you buy or upgrade anything. If you're still deciding between families, this guide to hydraulic bike brakes covers the practical differences in more depth.
How Disc Brakes Turn Speed into Heat
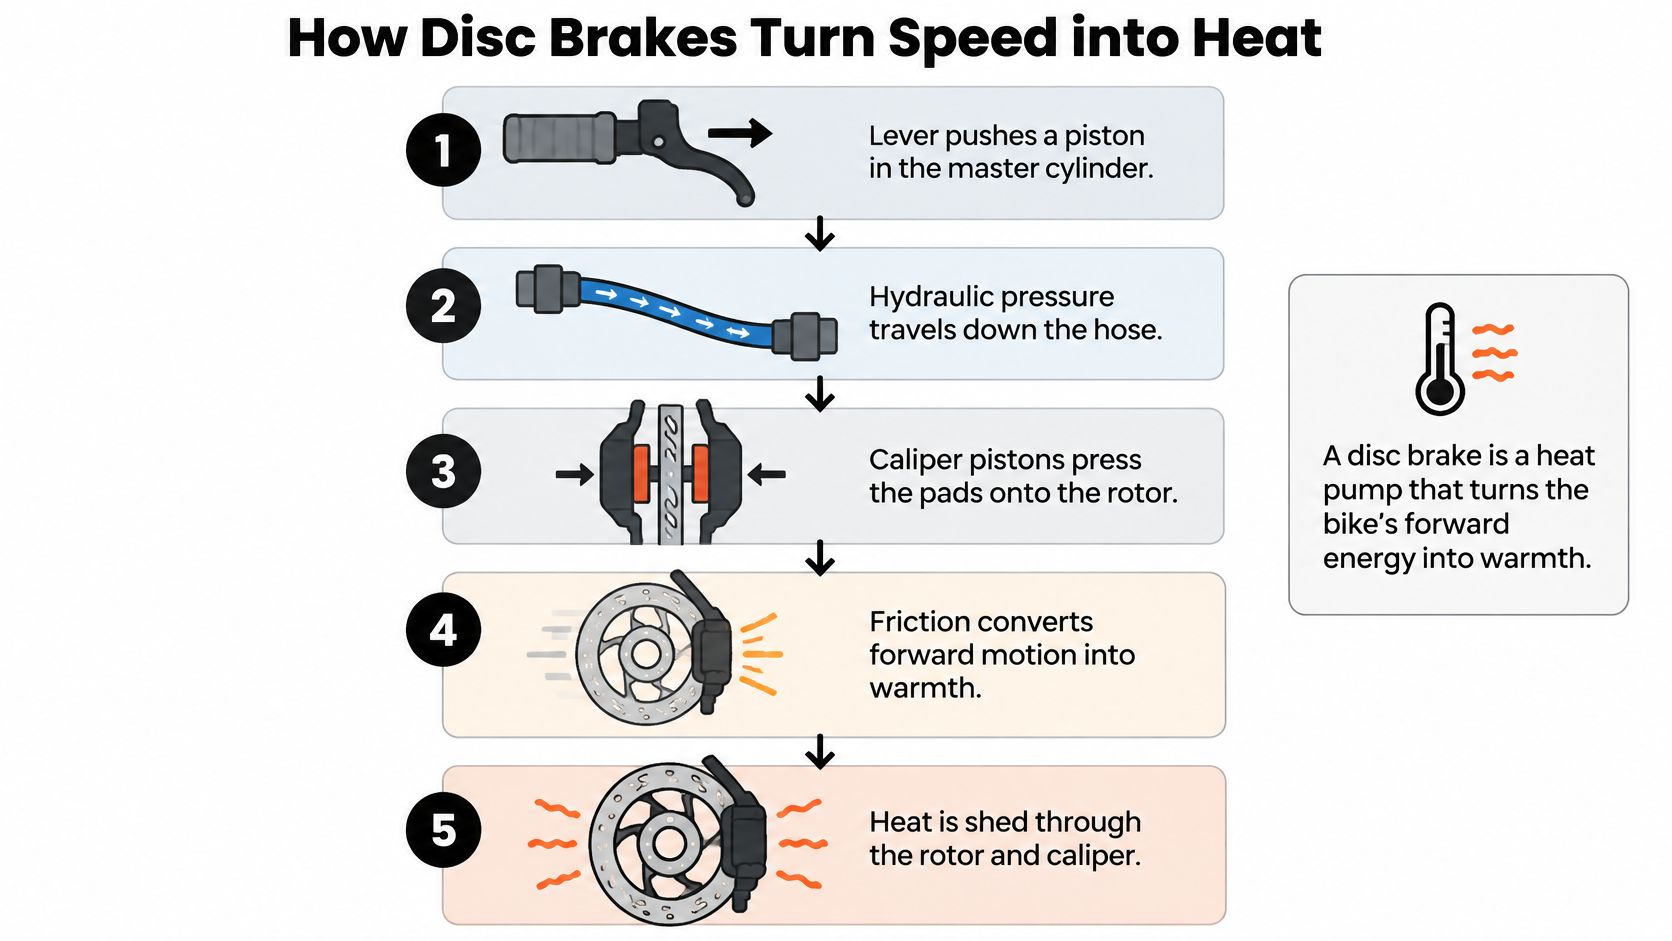
A disc brake converts your bike's forward energy into heat. Everything downstream of the lever exists to move that heat out of the pad contact zone and into the air, and every failure mode is a failure to do it fast enough.
The chain runs in order. The lever pushes a piston in the master cylinder. That piston sends fluid down the hose, or, on a mechanical system, pulls a cable. Caliper pistons press the pads against the rotor. Friction slows the wheel, and the rotor sheds the heat into passing air.
On a long descent the heat build-up is relentless, and pad compound decides how much of it the system survives. Sintered pads tolerate heat and hold up through sustained braking on steep ground. Organic pads bite cleanly in cold, dry conditions but fade sooner under load. If you ride Nelson hills in winter, sintered is the sensible default.
Fade is the point where pads glaze or fluid overheats. The lever goes long and soft, and stopping power drops even though you're pulling harder. Heat resistance is a design test under the ISO 4210-2:2015 framework that applies to mountain bicycles, as the Standards New Zealand listing sets out. Passing a bench test still leaves two seasons of grit, oil mist and hard use to get through.
Field test: ride a long descent, then squeeze the lever at the bottom. If it feels different from the top, the system is running hot. Check pads, rotor and fluid before the next ride.
Bicycle rotors are almost always stainless steel, chosen for corrosion resistance in wet conditions as much as for heat capacity, which is why rotor thickness and fin design matter more than exotic alloys at this scale. Disc metallurgy gets far more involved at higher thermal loads, though. Riders curious about how surface treatments and heat cycling change disc behaviour can compare cast iron disc treatments used on performance automotive discs, where the same physics of heat soak and dissipation applies at a much bigger scale.
Rotor Size and Pads for Your Weight and Terrain
Rotor size is a braking force and heat-capacity decision, not a power switch. Start with weight and terrain, then adjust.
| Rider or bike case | Front rotor | Rear rotor | Reason |
|---|---|---|---|
| Light trail rider, under 80 kg | 180 mm | 160 mm | Enough for gentle descents |
| Trail rider, 80-100 kg | 180-200 mm | 180 mm | Common all-round setup |
| Enduro or downhill rider | 200-220 mm | 180-200 mm | Sustained heat on long runs |
| Heavy e-bike, 25 kg or more | 220 mm | 200 mm | Extra mass adds thermal load |
Bigger rotors add heat capacity and stopping power. They suit heavier riders, enduro and downhill riding on sustained gradients, and heavy e-bikes where the bike itself is a large fraction of the mass being slowed. Smaller rotors save weight and suit light trail riding, and a 160 mm front on a 100 kg rider doing steep descents is a choice you'll feel in your hands by the bottom.
Match the compound to the rotor's job. Sintered for long descents and wet conditions. Organic where dry, cold rides make bite more important than longevity.
Here's where I'd push back on the upgrade instinct. A larger rotor will not fix poor stopping. A rider who brakes late, grabs both levers abruptly, or runs contaminated pads will still struggle with a 220 mm disc. Size amplifies a working system and exposes a broken one.
Practical rule: if your brakes feel weak, clean and bed them before you spend anything on diameter.
The setup steps that matter more than size:
- Bed in new pads and rotors with a series of firm stops from moderate speed, letting the system cool between them, so pad material transfers evenly to the rotor face.
- Clean the rotor with isopropyl alcohol after any oil contact, then re-bed. Don't touch the braking surface with fingers.
- Square the caliper so both pads contact evenly. A caliper sitting at an angle gives you one pad doing all the work and a rotor that sings.
- Check the mount standard on both frame and fork, IS or post mount, and confirm the rotor diameter the frame or fork allows before ordering.
Use an adaptor only when the mount needs one. Each adaptor changes the braking geometry and can move the caliper closer to the stays or the tyre. Match the caliper to the lever system: hydraulic levers and calipers should come from the same brake system or be specified as compatible by the manufacturer. Use only the fluid type the brake specifies, because mixing DOT and mineral oil destroys seals.
The order of assembly matters. Mount the caliper, tighten the bolts to the frame's listed torque, then fit the rotor and its lock ring. Confirm the rear rotor size against the rear mount before buying, because a mismatched size or adaptor is the most common reason a rotor rubs on the stays. When it's time to replace worn pads, we stock a full range of brake pads for NZ riders.
E-Bike Brake Compliance Under NZ Rules
New Zealand's Electricity (Safety) Amendment Regulations 2025 bring e-bikes into the electrical-safety framework, applying EN 15194:2017+A1:2023 to electrically power-assisted cycles up to 0.5 kW and setting a transitional period that runs to 13 November 2026. That cutoff gives riders and sellers a defined window to work inside, and it makes any brake advice written before the amendment worth rechecking against the current requirements.
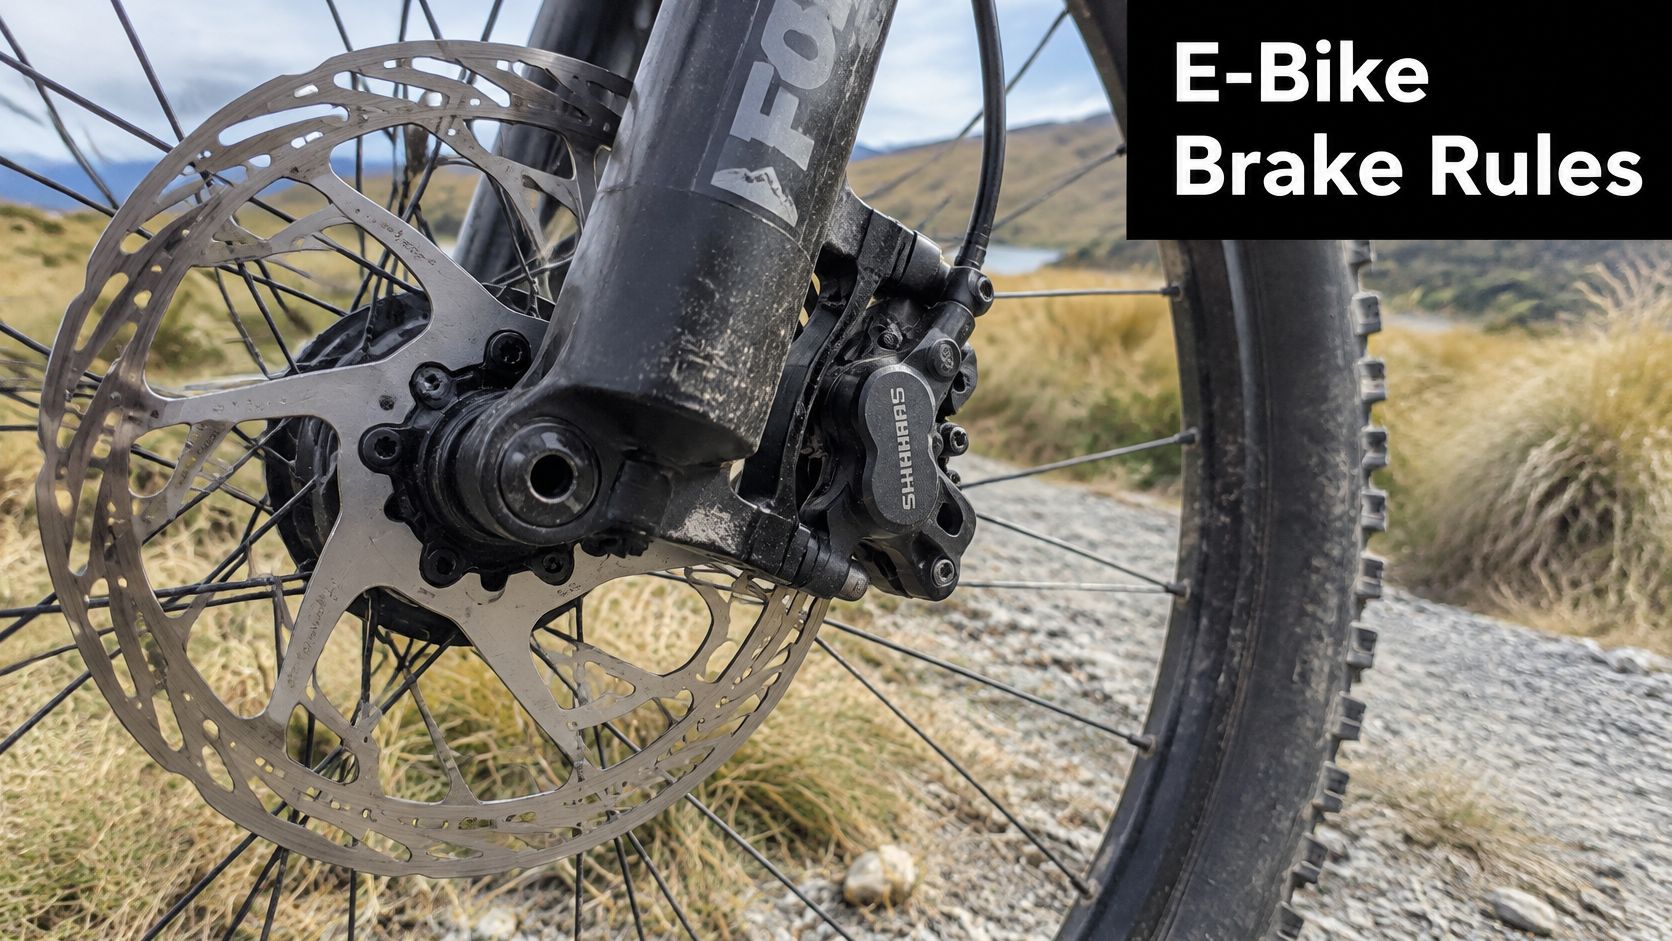
The practical split on the bench is between mechanical work and electrical work.
- Routine mechanical maintenance leaves the electrical system untouched: replacing pads, bleeding fluid, adjusting levers, cleaning rotors, swapping a like-for-like rotor.
- Electrical system changes can affect certification and warranty: a new cut-off switch, brake sensors, wiring alterations, a motor controller change, or a conversion.
Stopping power is only half the test on an e-bike. An incompatible sensor or a poorly integrated conversion can undermine the whole system even when braking force rises. A brake that stops harder but no longer cuts motor assist when you pull the lever is a worse brake on an e-bike, and it strips out a layer of protection on steep descents where the bike's extra mass already works the system hard.
For a pre-purchase or post-upgrade check, confirm the brake sensors and cut-off switch are original or certified, keep the owner's manual with the bike, record every change with its date and part numbers, and ask the seller in writing how an upgrade affects the warranty. If a business can't answer that in writing, that's your answer.
How to Brake Well on Steep, Loose Descents
Technique shows up in the numbers. A Massey University study from Palmerston North measured braking on an off-road turn with a brake-power meter, and the full Massey braking study found a clear gap between experienced and inexperienced riders.
| Measure | Experienced riders | Inexperienced riders |
|---|---|---|
| Relative brake work | 33.36 J/kg | 37.16 J/kg |
| Time on the brakes | 2.46 seconds | 4.53 seconds |
| Relative brake power | 13.57 W/kg | 8.21 W/kg |
| Trial time | 14.08 seconds | 15.87 seconds |
Read that carefully. The inexperienced group did more total brake work and stayed on the brakes about 84% longer, yet generated less brake power and took longer through the turn. They also relied more on the rear brake. More braking, less control, slower. That's the lesson.
Turn each finding into a rule:
Brake before the corner, not through it. Get the speed down while the bike is straight and traction is predictable, then release as you tip in.
Use both brakes progressively. Grab one lever and you either lock a wheel or upset the chassis. Build pressure through the stroke.
Ease off as grip drops. Loose gravel, roots and wet clay all cut traction. A wheel that's still rolling steers. A locked one goes where momentum points.
Stop dragging. Long, light pressure heats the system without adding control. It's the worst of both outcomes.
There's a trail-side cost too. Locked wheels skidding down steep sections cut furrows into trail surfaces, and rainwater then enlarges those furrows into ruts. That's erosion, and it can make tracks difficult or impossible to ride or walk. Good modulation protects the trail as much as the bike.
Practice drill: find a gentle slope. Brake early, build pressure smoothly, and feel how the bike settles as the fork compresses. Repeat until the timing is automatic.
Why Brake Checks Matter on New Zealand Trails
Those 4,152 accepted claims and the roughly NZ$21 million in treatment and recovery costs describe the scale of harm, not a brake failure rate. The ACC data doesn't separate out how many injuries involved brake failure, poor adjustment or weak technique. What it does show is the volume of harm on trails where steep descents, loose surfaces, sudden obstacles, wet conditions and repeated braking loads are all normal.
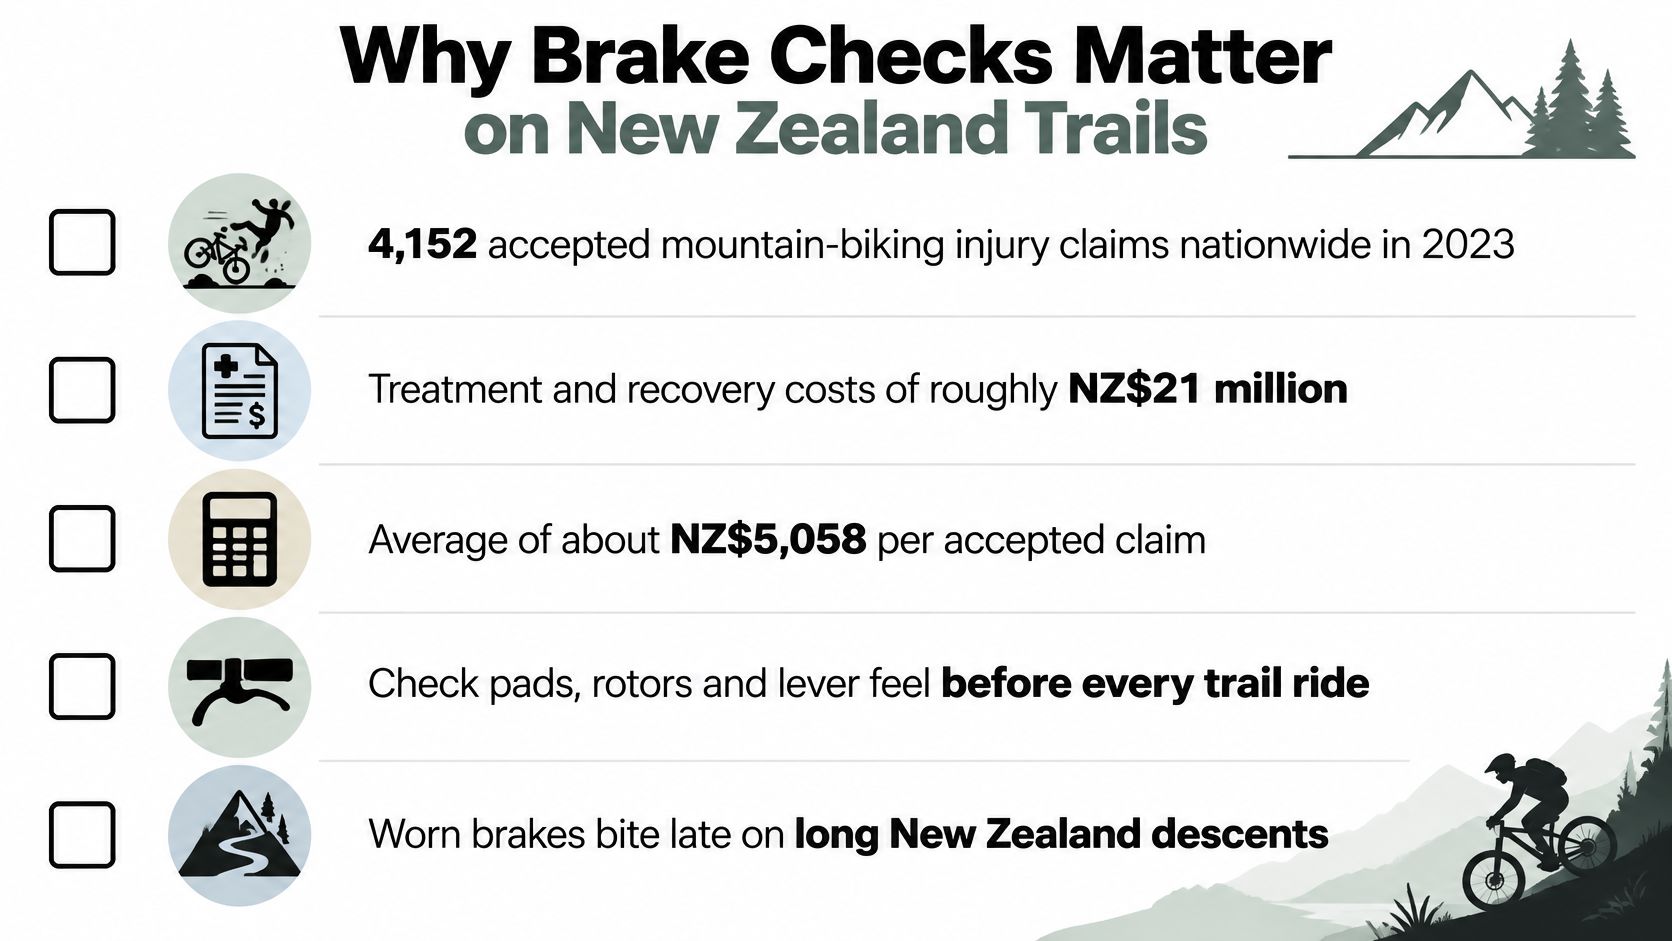
ACC's pre-ride guidance puts brakes in the basic "ABC" check alongside tyre pressure and the chain. Confirm both brakes work, then ride. That's the floor, not the ceiling.
Run this minute-long check before every ride:
- Squeeze each lever and confirm it stops firmly well before the bar.
- Check pad material through the caliper gap with a torch. Metal-on-metal means stop now.
- Look for leaks at the lever, hose joints and caliper, and check cables for fraying or splits.
- Spin the wheel and watch the rotor run true and clean.
- Check caliper bolts are snug, and that the rotor lock ring is tight.
Repeat it after transport, storage, wet rides, or any workshop change. Bikes shift in a rack, and a lever that was fine on Friday can be soft on Sunday.
Brake Symptoms, Causes and Fixes
The most common complaint is a spongy or soft lever. That's air in a hydraulic line, and the fix is a proper bleed with a funnel and fresh fluid.
| Symptom | Likely cause | Fix |
|---|---|---|
| Spongy lever | Air in hydraulic line | Bleed the brake with a proper bleed funnel |
| Lever pulls to the bars | Low or worn fluid, worn pads | Top up, bleed and replace worn pads |
| Squeal or grab | Oil or grease on pads or rotor | Clean rotor with isopropyl alcohol, replace pads |
| Fade on long descent | Glazed pads or overheated rotor | Rest brakes, re-bed or replace pads |
| Brake rubs at one spot | Bent rotor or misaligned caliper | Straighten rotor and realign caliper |
| Long lever travel on cable | Stretched cable | Adjust tension or replace cable |
A lever that pulls to the bar tells you the fluid is low or the pads are worn thin enough that the pistons have travelled too far. Top up, bleed, and fit new pads. If the fluid is dark or the lever has been soft for weeks, a full flush is the honest fix rather than a top-up.
Squeal and grab come from contamination every time. Oil or grease on pads or rotor, usually from a chain lube overshoot or a careless hand. Clean the rotor with isopropyl alcohol and replace the pads if they've absorbed anything. Pads are cheap. A crash isn't.
Fade on a long descent means glazed pads or an overheated rotor. Stop, let everything cool, then re-bed or replace the pads. A rub at one spot on the rotor points to a bend or a misaligned caliper, which needs straightening or realignment.
On cable systems, long lever travel is a stretched cable. Adjust tension at the barrel, or replace the cable if it's frayed inside the housing.
Timing matters when you're planning around a ride. A bleed or a clean is a same-day job. Rotor and caliper replacement takes longer, and if the part isn't in stock you're waiting. Doing the bleed yourself is straightforward enough with a proper kit, and our guide to bleeding MTB brakes walks through the sequence.
Non-negotiable: if a lever fails completely or fades badly on the trail, stop riding. A brake that comes back after cooling is still a brake with a problem.
Choose Your Brake and Book a Check
Three steps, then you're done deliberating.
Match the brake to the riding and the bike's weight. Two-piston hydraulic for cross-country and trail, four-piston for enduro, downhill and heavy e-bikes. Don't buy four-piston for a bike that never sees a sustained descent.
Check rotor size against your body weight and terrain using the sizing table. If you're at the top of a weight band and ride steep ground, go one size up on the front before you go up on the rear.
Confirm any e-bike upgrade keeps the electrical system and warranty intact. Mechanical maintenance is fair game. Sensors, cut-off switches and wiring need the compliance checklist.
Then keep the routine boring. Run the pre-ride check before each ride, and log every change, part and date in a note on your phone. Next workshop visit starts from a known record instead of a diagnosis.
If you'd rather hand it over, we can do the work. Basic brake adjustments start from $25.00 per brake, and a hydraulic brake bleed or service costs $45.00 per brake, with oil charged as an extra. We ship nationwide across New Zealand, so distance from Nelson isn't a barrier to parts or advice.
Rider 18 is a Nelson bike shop that stocks brake pads, rotors, adapters and bleed kits for Shimano, SRAM, Magura, Tektro and TRP systems, and our workshop handles everything from a basic adjustment to a full hydraulic service. If your levers feel soft, your rotors are worn or you're weighing up an e-bike brake upgrade, tell us the bike model, the brake type and the symptom you've noticed, and we'll quote the work and book you in. Visit Rider 18 to browse the brake range or get in touch with the team.


