

Bike Brakes Hydraulic: A Practical Guide for NZ Riders
- by Nigel
-

You're halfway down a steep, wet Nelson trail when the brake lever feels softer than it did at the start. You pull harder, the lever comes closer to the handlebar, and the bike takes longer to slow. That moment is unsettling, but it becomes easier to manage once you understand what the system is doing.
Hydraulic bike brakes aren't a black box. They're a chain of simple parts, from your hand at the lever to the fluid in the hose, the pistons in the caliper, and the pads gripping the rotor. The important questions are practical: why does a hydraulic lever feel different, what causes a loss of braking power, which checks can you safely do at home, and when should a qualified mechanic inspect the bike?
For riders in New Zealand, those questions matter on wet roads, steep descents, loaded e-bikes, and family bikes that may be shared or outgrown quickly. This guide treats bike brakes hydraulic as a complete safety system, not just a component choice.
The Moment You Realise Your Brakes Need Attention
A soft lever can begin with something subtle. You're riding down a wet hill outside Nelson, using both brakes progressively, and notice that the rear lever doesn't feel as firm as usual. It still stops the bike, but your fingers travel farther before the pads grip. On a dry, flat path, you might ignore that change. On a long descent, it deserves attention.
A hydraulic brake can feel different from a cable brake because your hand isn't pulling a wire. Your lever is moving fluid through a sealed hose, and that pressure moves pistons inside the caliper. If air enters the system, fluid leaks, pads wear, or contamination reaches the rotor, the familiar firm response can change.
Practical rule: A sudden change in lever firmness is a reason to stop and inspect the bike, not a reason to squeeze harder and continue downhill.
The next question is usually whether the problem is simple. You may be able to clean a rotor, check a hose, inspect pad seating, or replace worn pads yourself. You shouldn't treat a leaking hose, damaged fitting, uncertain fluid type, or poorly bled system as a casual home adjustment.
New Zealand's bicycle safety framework requires most new pedal bicycles with a wheelbase of at least 640 mm to meet braking design and performance requirements under AS/NZS 1927:1998. The standard requires a front and rear braking arrangement, although children's bicycles can use a back-pedal brake as one of the two brakes. Hydraulic discs are one technical way to meet that architecture, but compliance applies to the complete, roadworthy bicycle, not just the caliper. NZTA's research on regulations and safety for electric bicycles and other low-powered vehicles provides the wider context.
How Hydraulic Bike Brakes Actually Work
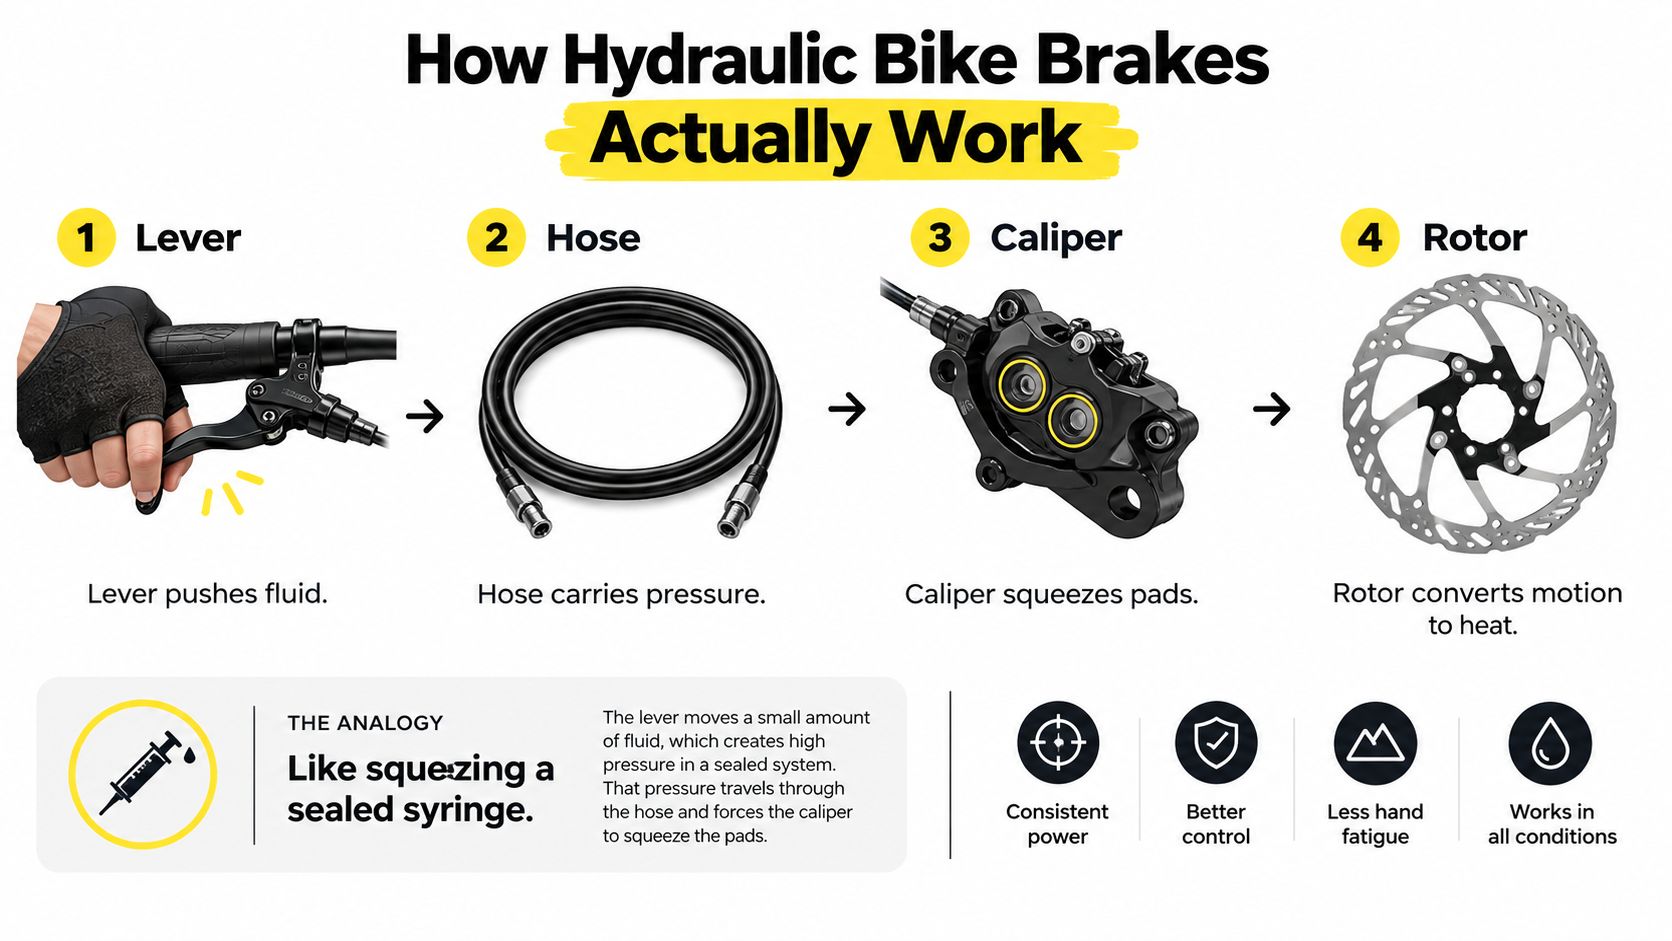
A hydraulic brake turns a small movement at your fingers into pressure at the wheel. Think of a sealed syringe filled with fluid. Push the plunger at one end and pressure travels through the fluid to the other end. A bicycle brake uses the same basic idea, with a lever piston, a hose, and caliper pistons replacing the syringe parts.
From your hand to the rotor
- The lever pushes fluid. When you squeeze the lever, a small piston moves inside the master cylinder. That movement creates pressure in the brake fluid.
- The hose carries pressure. The sealed hose transfers pressure to the caliper. Hydraulic fluid is effectively incompressible, so the pressure moves through the system instead of being absorbed by cable stretch.
- The caliper moves the pistons. Pressure pushes one or more pistons towards the rotor. Those pistons press the brake pads against both sides of the disc.
- The rotor converts motion to heat. Friction between the pads and rotor slows the wheel. The bike's movement becomes heat at the braking surfaces.
The fluid type matters. Some systems use mineral oil, while others use DOT brake fluid. They aren't interchangeable. Seals, hoses, and caliper materials are designed around a specified fluid, so adding the wrong fluid can damage the system and create a safety problem. Check the marking on the lever or caliper and follow the manufacturer's instructions before buying a bleed kit or fluid.
If you want a broader explanation of fluid pressure and component behaviour, MA Hydraulics' guide for UK design engineers offers useful engineering context. Bicycle brakes are smaller and more rider-focused, but the underlying pressure principle is the same.
Stopping power describes how strongly the brake can slow the bike. Modulation describes how easily you can control the space between light braking and maximum braking. A good hydraulic system gives you a predictable increase in power as you pull the lever, which helps you slow on loose gravel, wet tarmac, or a technical trail without immediately locking a wheel.
Hydraulic Versus Mechanical Brakes in Real Conditions
The right brake depends on how and where you ride. A commuter on mostly flat paths may value simple cable adjustment, while a rider descending a wet alpine road or carrying extra e-bike mass may value low hand effort and stable control.
Consumer NZ describes hydraulic disc brakes as smooth, powerful, effective in wet and dry conditions, and low-maintenance, while rim brakes perform less effectively in wet conditions. Consumer NZ's bicycle safety guidance also sits within the wider New Zealand product-safety framework.
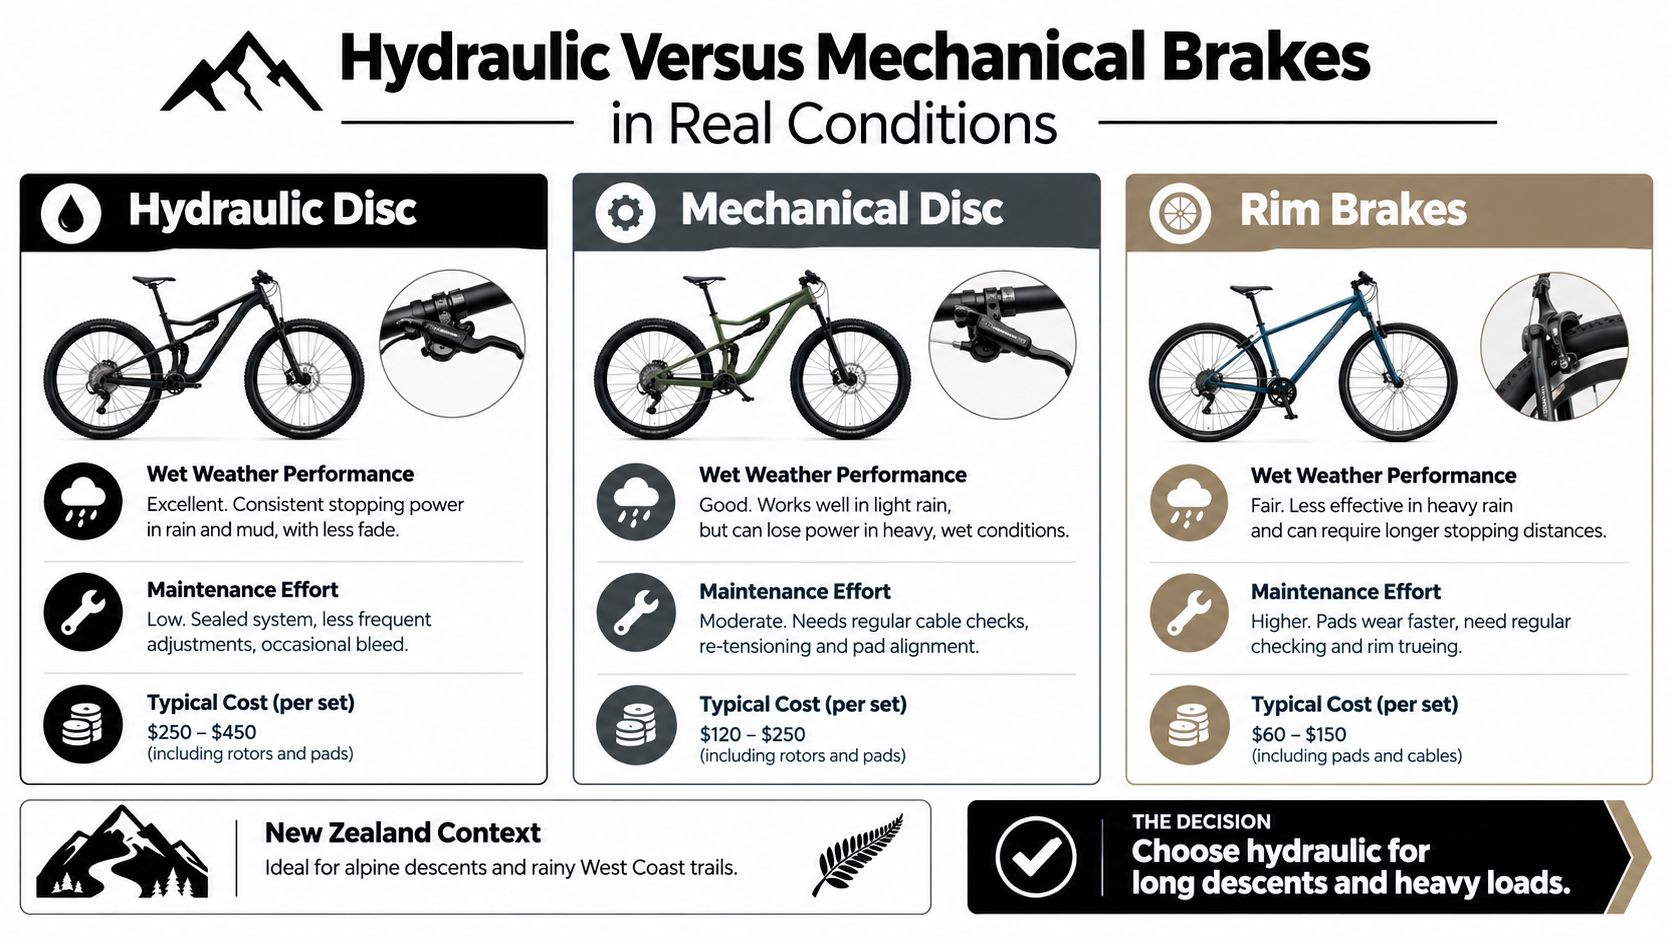
| Brake Type | Wet Performance | Hand Effort | Modulation | Maintenance Load |
|---|---|---|---|---|
| Hydraulic disc | Consistent in wet and dry conditions when clean and correctly set up | Low | Smooth and progressive | Lower routine adjustment, but bleeding needs correct tools and fluid |
| Mechanical disc | Generally dependable in wet conditions, with performance affected by cable condition and setup | Moderate to higher | Predictable when adjusted well | Cable and pad adjustments are straightforward |
| Rim brake | More affected by water and grit at the rim | Moderate to higher | Varies with rim and pad condition | Simple access, but pads and rims need regular inspection |
Where hydraulic discs earn their place
Hydraulic discs are useful when you brake frequently, ride steep terrain, or need to control a heavier bike with less finger force. They also keep the braking surface away from the rim, which helps when the rim is wet, gritty, or slightly out of true. That doesn't make them maintenance-free. Pads still wear, rotors can become contaminated, and hoses can be damaged.
Mechanical discs remain a sensible choice for riders who want accessible adjustments and easy cable replacement. A well-maintained mechanical system can provide reliable braking for commuting, family riding, and recreational paths. The trade-off is that cable tension, housing condition, caliper alignment, and pad position need more direct attention.
Rim brakes can still suit light, dry-weather riding, especially on simple bikes where low cost and familiar servicing matter. Their braking surface is exposed on the wheel rim, though, so water and road grime can reduce consistency. For a wet West Coast commute, a loaded e-bike, or repeated trail descents, disc brakes usually offer a more suitable starting point.
Heat, Load, and Braking on Long Descents
A long descent tests more than the lever and pads. Each time you slow the bike, movement becomes heat in the rotor, pads, and caliper. A heavy e-bike, cargo, rider, or loaded pannier setup gives the system more work to do, particularly when the descent includes repeated corners and stops.
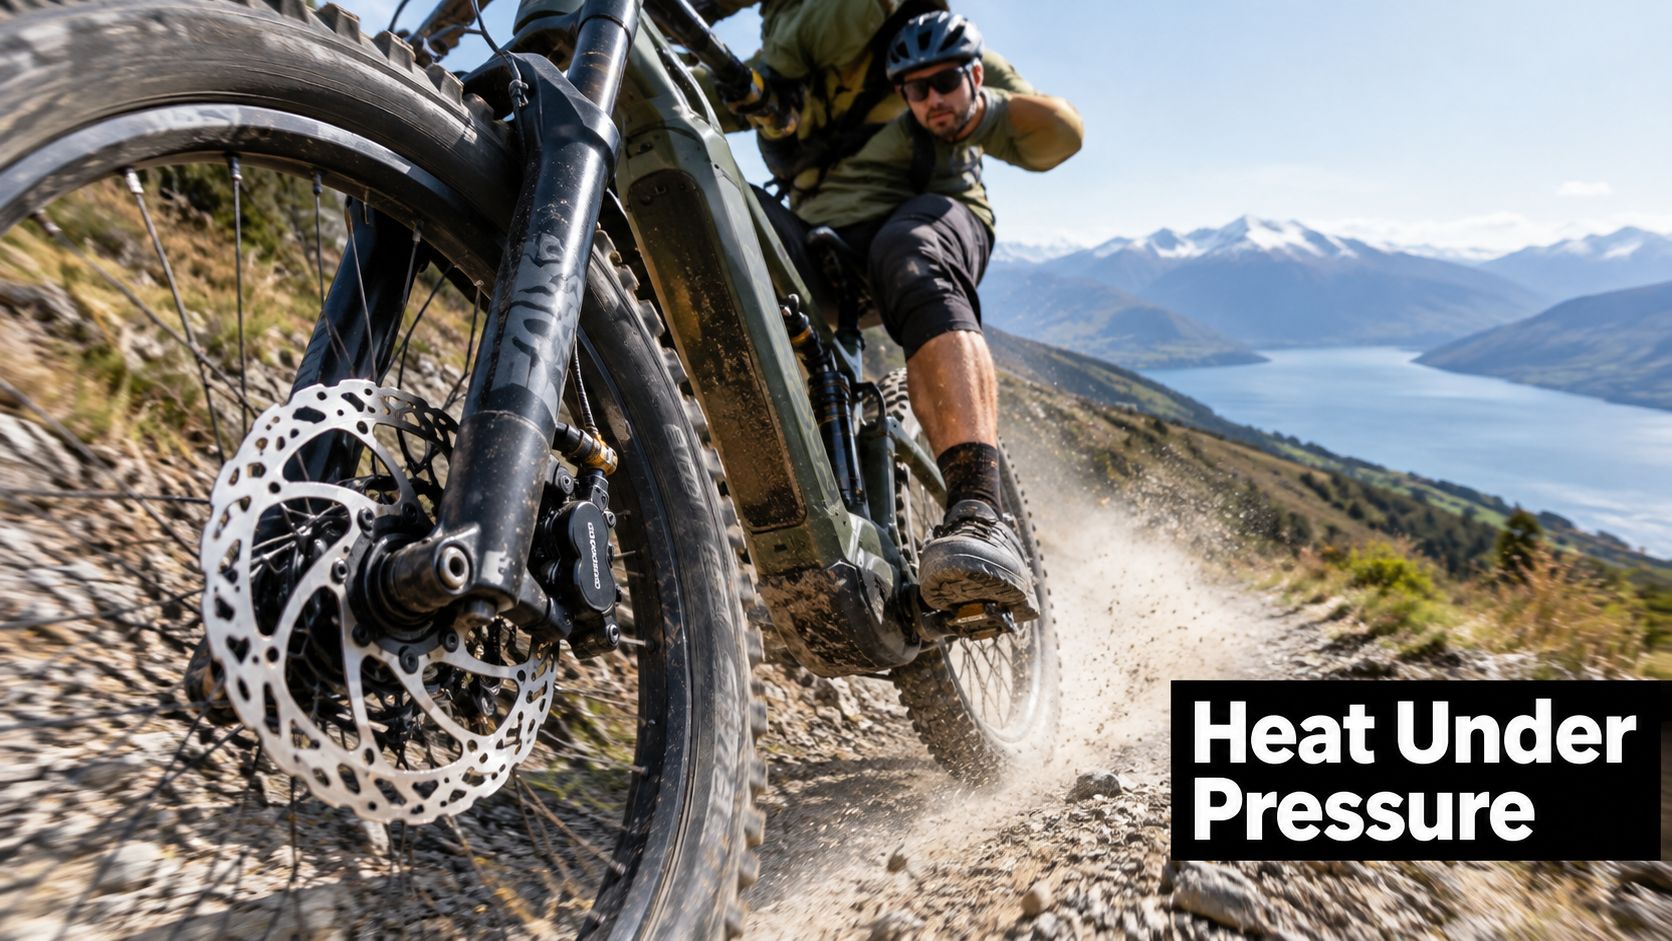
Dragging the brakes continuously keeps the friction surfaces hot. As temperature rises, braking can feel less consistent, pads may glaze, and fluid or seals can suffer if the system is pushed beyond its intended use. The lever may still move normally while the bike loses some of its expected stopping response.
Use both brakes firmly and progressively. Reduce speed decisively before a corner or steep section, then release briefly when the surface and traffic allow. That gives the rotor and pads an opportunity to shed heat instead of asking them to maintain constant light pressure throughout the descent.
Rotor diameter and pad compound also affect how a brake handles load. A larger rotor can provide more leverage and a greater heat-management surface, but it must match the fork, frame, hub, caliper, and manufacturer's approved hardware. Pad compounds have different behaviour in wet, gritty, quiet, or high-temperature conditions, so choose them for the system and riding rather than treating all pads as interchangeable. A practical buying reference is this guide to brake pads for NZ riding.
ISO 4210-4 includes tests for hand-operated-system strength, pad security, heat resistance, drag, and braking performance after heating. Those test areas show why heat isn't just a racing concern. It's part of how bicycle braking performance is evaluated. The Standards New Zealand listing for ISO 4210-4 outlines that testing scope.
Here's a short visual explanation of how downhill braking loads build through the system:
Never mix mineral oil and DOT fluid. They have different chemical properties and require different seals and service procedures. If you don't know which fluid your brake uses, stop before opening the system and check the manufacturer's documentation or ask a workshop.
Common Hydraulic Brake Problems and What They Mean
Brake symptoms often tell you more than a visual glance. A clean-looking caliper can still contain air, a contaminated pad can still have plenty of material, and a rotor that looks straight can rub because the caliper isn't centred.
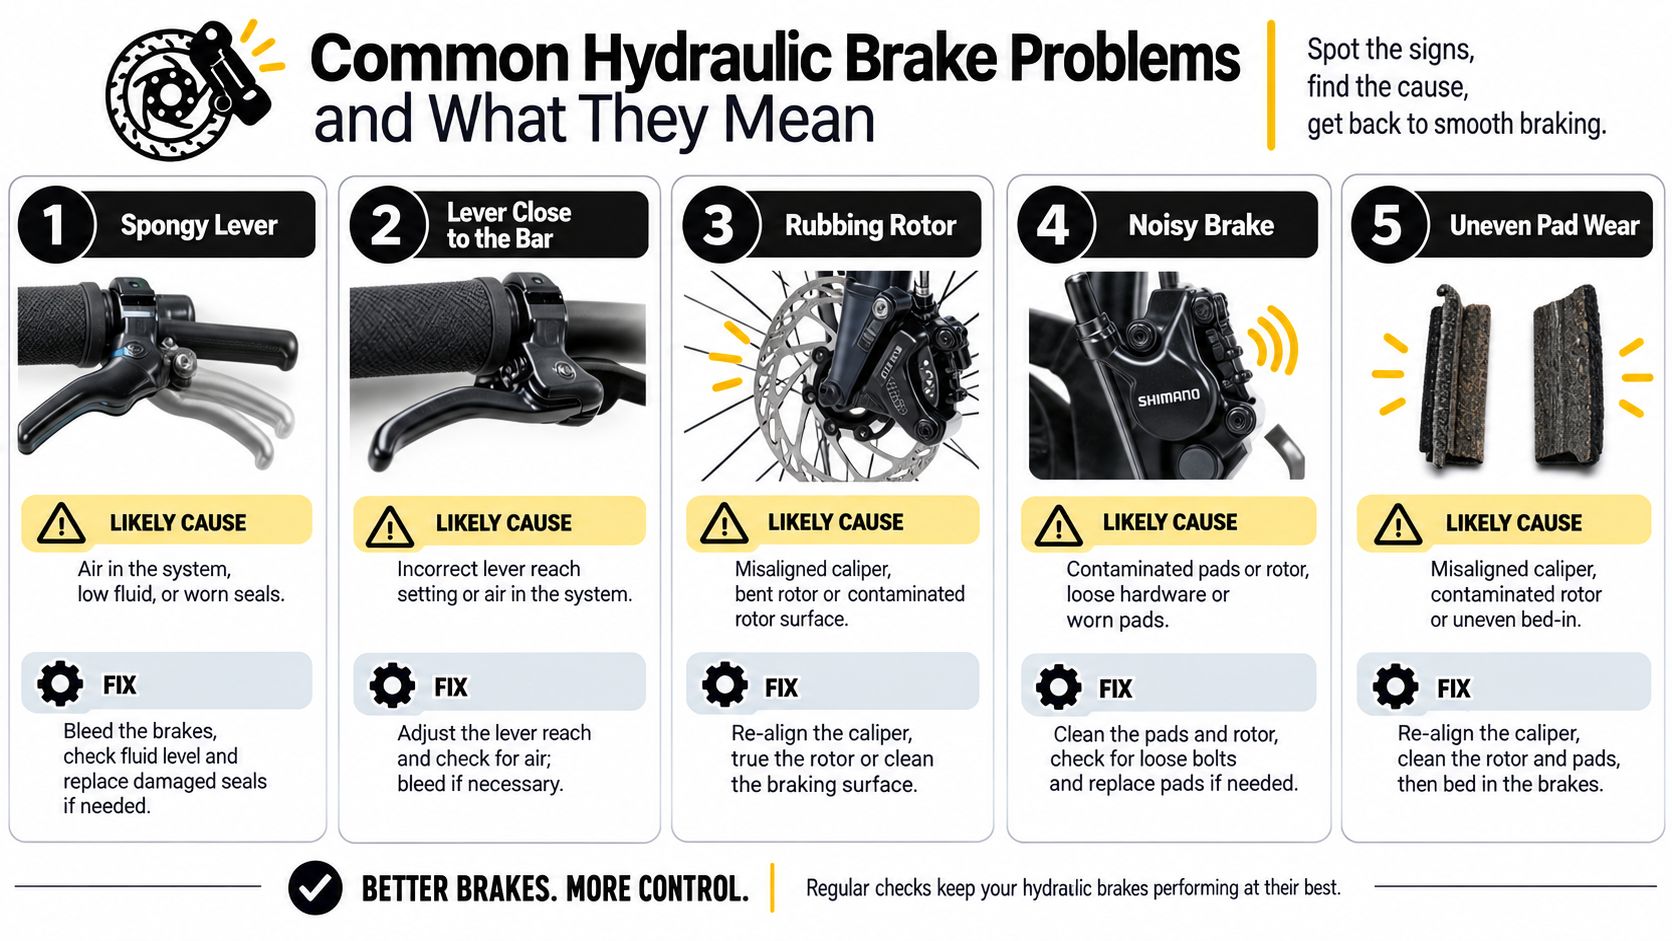
Read the symptom before reaching for a tool
- A spongy lever usually points to air or moisture in the system. Don't try to cure it by tightening an external adjuster. Hydraulic systems generally don't have the cable-tension adjustment found on mechanical brakes, so the system may need inspection and bleeding.
- A lever that approaches the handlebar needs prompt attention. Possible causes include worn pads, fluid loss, air, a damaged hose, or incorrect setup. If the change happened suddenly, stop riding until the cause is clear.
- A rubbing rotor may have a simple alignment cause. Check that the wheel is seated correctly and look for a bent rotor, loose caliper hardware, pad movement, or a piston that isn't retracting evenly. Light periodic noise can come from rotor run-out, but continuous heavy rubbing shouldn't be ignored.
- Squealing or scraping can indicate contamination or glazing. Oil, cleaning products, dirty fingers, water, grit, and overheated pads can change the friction surface. Cleaning the rotor with an appropriate disc-brake cleaner may help, but contaminated pads often need replacement.
- Uneven pad wear can point to alignment or piston movement problems. Replacing the pads without checking the caliper may leave the underlying issue in place.
NZTA research involving 215 South Island students aged 8–12 found poorly maintained bicycles, including worn brake pads, in approximately 40% of the sample. The finding highlights how brake issues can remain unnoticed, particularly when a rider adapts gradually to weaker braking. The NZTA cycling safety research provides that evidence.
A safe home inspection includes lever travel, hose and banjo connections, caliper fasteners, rotor condition, pad seating, and visible fluid leakage. If you find fluid around a fitting, see a damaged hose, or can't explain a sudden change in feel, park the bike and book an assessment.
Pad Replacement, Rotor Alignment, and the Bleeding Question
These jobs sit on a sliding scale. Pad replacement is often a realistic home task, rotor alignment needs a careful touch, and bleeding becomes risky when you don't know the fluid, fittings, or correct procedure.
Start with the pads
Remove the wheel only as the manufacturer permits, then inspect the pads without touching the friction material. If the pad material is thin, cracked, glazed, soaked with oil, or wearing unevenly, replace it with the correct shape and compound. Keep greasy fingers away from the rotor and pads, because even a small amount of contamination can reduce braking.
After installing pads, make sure the retaining pin, spring, clip, and pad orientation are correct. Refit the wheel securely, check that the rotor sits between the pads, and spin the wheel before squeezing the lever several times to bring the pads back into position. New pads need controlled bedding-in, using repeated progressive stops in a safe area. Avoid one long continuous drag, which can overheat the new surfaces.
Centre the caliper carefully
For a minor rub, check wheel seating first. If the caliper is loose enough to move, centre it over the rotor according to the brake manufacturer's procedure, tighten the bolts evenly, and check that the rotor rotates without sustained contact.
A slightly bent rotor can sometimes be corrected with a rotor-truing tool and a very small adjustment. If the rotor is badly bent, cracked, heavily scored, or contaminated, replacement is safer than trying to force it straight.
Decide whether bleeding belongs at home
Bleeding removes air and old or contaminated fluid, then replaces it with the specified fluid. The process sounds simple, but it involves the correct bleed block, hose, syringe or funnel, fittings, torque, fluid, and disposal method. A mistake can introduce more air, damage a seal, spill fluid onto pads, or leave the lever feeling worse.
If you're new to hydraulic servicing, read a detailed guide to bleeding MTB brakes, then consider having your first bleed demonstrated by a mechanic. Bleeding is a workshop job when the hose is damaged, the lever remains soft after service, fluid type is uncertain, or the bike is used for steep or loaded riding.
Hydraulic Brakes on Family, Kids, and E-Bikes
Children often notice a brake problem later than an experienced adult because they may not recognise what a firm lever should feel like. A child may also lack the hand strength or reach to operate a lever comfortably, even when the brake is working correctly.
Before a ride, ask the child to squeeze each lever while the bike is stationary. The lever should feel firm and shouldn't pull close to the grip. The child should be able to apply both brakes without stretching or twisting the hand. Check that the wheel stops when you hold the brake and push the bike gently forward.
A practical family check
- Look at the pads and rotor. Check for obvious wear, oil, deep scoring, or dirt that could affect contact.
- Inspect the hose and fittings. Look for cuts, kinks, crushed sections, dampness, or a hose pulled tight near the handlebar.
- Listen during a wheel spin. Light intermittent noise can occur, but heavy continuous rubbing deserves investigation.
- Ask about feel, not just noise. A child may report that a brake feels “weird” before an adult sees a visible fault.
Hydraulic brakes can reduce hand effort, but that advantage can also hide gradual deterioration. Air, contamination, piston drag, and pad wear may not be obvious until braking performance has already changed. Second-hand bikes and fast-growing children's e-bikes deserve particular care because the bike may have been ridden hard before the family acquired it, or the child may have outgrown the lever position.
Inspect more often after wet, gritty, muddy, or heavily loaded riding rather than relying on one universal kilometre interval. Book a workshop assessment after a crash, a hose impact, a bent lever, or any fluid leak. For broader preparation around clothing, protection, and equipment, PADL's Florida adventure bike gear guide offers useful context, although local weather and terrain still determine what your family needs.
Choosing, Sizing, and When to Book the Workshop
Choose a hydraulic brake as a complete system. Rotor diameter, caliper design, pad compound, lever reach, hose length, fork clearance, wheel specification, and intended load all need to work together.
A lighter recreational bike may not need the same heat capacity as an e-bike used on steep roads. A Nelson trail rider may prioritise modulation and repeated downhill control, while a family commuter may value easy pad access and comfortable lever reach. Bigger rotors can support demanding braking, but they must be approved for the fork and frame. Don't install a larger rotor with an improvised adapter or assume that every caliper and lever combination is compatible.
Fluid and component compatibility matter just as much. Mineral oil and DOT systems aren't interchangeable, and hydraulic hose fittings can vary between brands and models. If you're upgrading a caliper, lever, hose, or rotor, check the manufacturer's specifications rather than matching parts by appearance.
Book the workshop when
- The lever approaches the handlebar. This can indicate wear, air, leakage, or a setup problem.
- Firmness changes suddenly. A rapid change is more concerning than a familiar lever characteristic.
- You see fluid. Fluid around a lever, hose, banjo, or caliper requires proper diagnosis.
- The rotor or hose took an impact. A crash can damage parts that still look usable from a distance.
- Pads are contaminated. Cleaning the rotor won't restore an oil-soaked pad.
- You're uncertain about bleeding. The correct fluid, bleed method, and fitting procedure are safety-critical.
The bike servicing guide can help you decide when routine inspection is due. In Nelson, a workshop assessment is especially sensible before committing to long descents, wet trail rides, or heavily loaded e-bike trips. Home checks build confidence, while professional servicing provides the safety net when the fault sits inside the hydraulic system.
Rider 18 supplies hydraulic brake components, hoses, bleed kits, fluids, and workshop support for hydraulic-brake servicing in Nelson. If your lever feels soft, your rotor keeps rubbing, or you're unsure whether your family or e-bike setup is ready for wet hills, visit Rider 18 for parts advice and a professional inspection.


