

Bike Rack Wall Mount Guide: How to Choose and Fit One
- by Nigel
-

You're trying to get the car into the garage, but a handlebar catches the door and the kids' bikes are blocking the tools. A bike rack wall mount looks like the obvious fix. Before buying one, though, check what's behind the wall lining. A strong rack attached to a weak wall is still an unsafe installation.
The right setup must suit the bike, the person lifting it and the structure carrying it. In New Zealand homes, that also means thinking about earthquake movement, shared-building permissions and whether the bike will remain restrained when someone knocks it.
Wall Mount Styles Compared at a Glance
| Style | Best for | Bikes suited | Wall and space needs |
|---|---|---|---|
| Single J-hook | Narrow wall, single bike | Road and light hybrid bikes within the hook's rating | Verified stud fixing; clearance for handlebars and loading |
| Wheel-hang rail | Garage with several bikes | Road, hybrid and kids' bikes with compatible wheels | Rail secured to framing; spacing for independent retrieval |
| Pivot or swing arm | Tight garage used often | Mountain and wide-tyre bikes with compatible wheels | Studs or suitable masonry; unobstructed swing arc |
| Two-tier horizontal rack | Family with several bikes | Mixed bikes with compatible frame contact points | Structural rail fixings; lifting space and a clear lower aisle |
| Frame-support bracket | Heavy e-bikes stored off the floor | E-bikes with suitable frame geometry | Verified structural fixing; clearance for lifting and projection |
Read the bike column as a compatibility filter, not a weight certificate. The actual capacity comes from the particular product and its approved installation. The wall column identifies the structural support and clearance to investigate before shopping.
A J-hook is the simplest choice for a light bike, but lifting is its main drawback. A wheel-hang rail keeps family storage organised, although crowded handlebars can make retrieval awkward.
Pivot arms help tuck bikes away but need room while turning. Two-tier racks use height effectively, yet the upper positions can be impractical for children. Frame-support brackets avoid wheel hanging, but their contact points must suit the frame.
For a broader layout comparison, use our bike storage rack guide. For a heavy e-bike, start by assessing the wall and your lifting ability, then choose between compatible frame-support, wheel-hanging or floor-supported options.
Matching the Mount to Your Bike and Space
Take the bike to the proposed position before ordering. A rack can fit the wall perfectly while the bike blocks the doorway.
The NZTA cycle-parking planning and design guide recognises vertical hooks and wall racks as relatively low-cost storage options, while recommending hooks wide enough for fat tyres and spacing and mounting heights suited to the expected cycle mix.
Use this buying checklist:
- Bike mass: Weigh the bike in its stored configuration, including the battery if it stays fitted. Check both individual-hook and total-rail capacities.
- Tyre width: Measure the widest part of the tyre against the hook's stated opening. Check rim compatibility too.
- Overall hanging height: Include mudguards, suspension forks and the wheel position required by the rack.
- Handlebar width: Allow room to manoeuvre the bike, not merely park it beside another.
- Pedal projection: Check that cranks and pedals won't strike the lining or neighbouring frames.
- Available aisle: Open nearby doors and test the complete loading movement.
If lifting is awkward, compare a vertical bike stand before committing to wall storage.
For background on bracket selection, XTREME EDEALS INC.’s resource can help you select brackets for secure wall mounting. Use it alongside the rack manufacturer's instructions, not as proof of bicycle compatibility.
Where others can access the storage area, plan a separate locking anchor that lets you secure the frame. A hanging hook alone isn't a theft restraint.
How a Wall Mount Carries a Bike's Weight
A bike projecting from a wall behaves like a heavy book held out on a shelf bracket. Moving the book farther out makes the bracket harder to hold, even though the book hasn't become heavier.
The load path runs from bike to rack, through the bracket and fasteners, into framing or suitable masonry, then into the building structure. Wall lining may sit between those components, but it isn't automatically a structural support.
New Zealand's guidance on secondary structural and non-structural elements explains that connection capacity is commonly governed by the weakest of the fixing into the mounted element, the connector body or the fixing into the structure.
For example, consider a hypothetical e-bike mounted on an extended bracket. Bringing that same bike closer to the wall reduces the prying effect; extending it increases outward tension at the upper fixings. Those fasteners must resist more than a simple downward pull.
Practical rule: A rack's advertised capacity doesn't establish the capacity of your installed wall connection.
Colorado Art Services' explanation of why you should check drywall capacity before hanging artwork offers useful background on wall-lining limitations. For a bicycle, add the demands of repeated loading and unloading, rather than treating it like a static picture.
Bike weight, bracket offset and fixing arrangement belong in the same installation decision.
Wall Types and the Fixings They Need
| Wall type | Fixing approach | Suits e-bike | Key check |
|---|---|---|---|
| Timber stud | Structural screws or lag screws into verified studs, using an appropriate rail or backing member | Yes, with a suitable connection | Confirm stud centres and condition |
| Plasterboard without stud | Install structural backing or choose floor storage | Not on lining alone | Anchors don't establish framing capacity |
| Solid concrete or block | Anchors designed for the actual masonry substrate | Yes, when verified | Sound material, hole preparation and anchor suitability |
| Brick veneer over timber | Designed connection to structural backing, with appropriate stand-off detailing | Only after assessment | Don't treat veneer or mortar as structural backing |
| Fibre-cement garage wall | Fix through the sheet into verified framing | Potentially | Sheet condition and framing access |
| Apartment partition | Obtain approval and confirm construction before specifying fixings | Only if structure is verified | Lightweight framing and building requirements |
Timber framing is usually the most straightforward starting point. Use a stud finder to locate both edges, mark the centre and verify the result safely. Where the rack holes don't align with suitable framing, use a properly specified backing member rather than adding random lining anchors.
Concrete and block aren't interchangeable. Hollow block requires an anchor system suitable for its construction, while masonry drilling demands the specified hole diameter, embedment and cleaning procedure.
Walls that need extra investigation
Brick veneer introduces a gap and a non-structural outer layer. A long screw through the brick isn't automatically a sound solution, because tightening can load or damage the veneer.
Don't drill unfamiliar fibre-cement sheets until you've considered whether they may contain asbestos. Cracked sheets, damp framing and concealed services also need attention before work starts.
Mark the available structural fixing positions before buying the rack. The mounting-hole pattern must work with the building, not just the bike.
Seismic and Shared-Building Checks in New Zealand
A rack that feels solid when stationary hasn't necessarily been assessed for earthquake movement. Consider the consequences of a bike coming loose, particularly above a child's play area, a parked car or an escape route.
The Gore District Council explanation of earthquake-prone buildings describes a system in which building location and type affect assessment and remediation requirements. That doesn't mean every domestic rack needs engineering approval, but an older shared or commercial building deserves more investigation than an ordinary sound garage wall.
Get permission before altering shared walls
- Rented home: Obtain the landlord's written agreement and confirm any conditions before drilling.
- Apartment storage room: Ask the body corporate or building manager about structural, fire-rating and common-property restrictions.
- Older commercial premises: Confirm whether structural work or existing seismic assessments affect the proposed installation.
- Cracked or unknown masonry: Have a suitably qualified professional assess it rather than choosing larger anchors.
Use the rack's intended retention features and consider an appropriate supplementary restraint against dislodgement. Frame support alone doesn't guarantee earthquake restraint, and wheel support isn't automatically unsuitable.
If the wall is old, damaged, shared or unknown, resolve that uncertainty before loading it. After a strong shake, unload and inspect before returning the rack to service.
How to Install a Wall Mount Safely
This process applies to a compatible rack on a verified timber-framed wall. Masonry, concealed structural issues and shared-building restrictions need their own installation specification.
The illustrated sequence shows the main preparation stages.
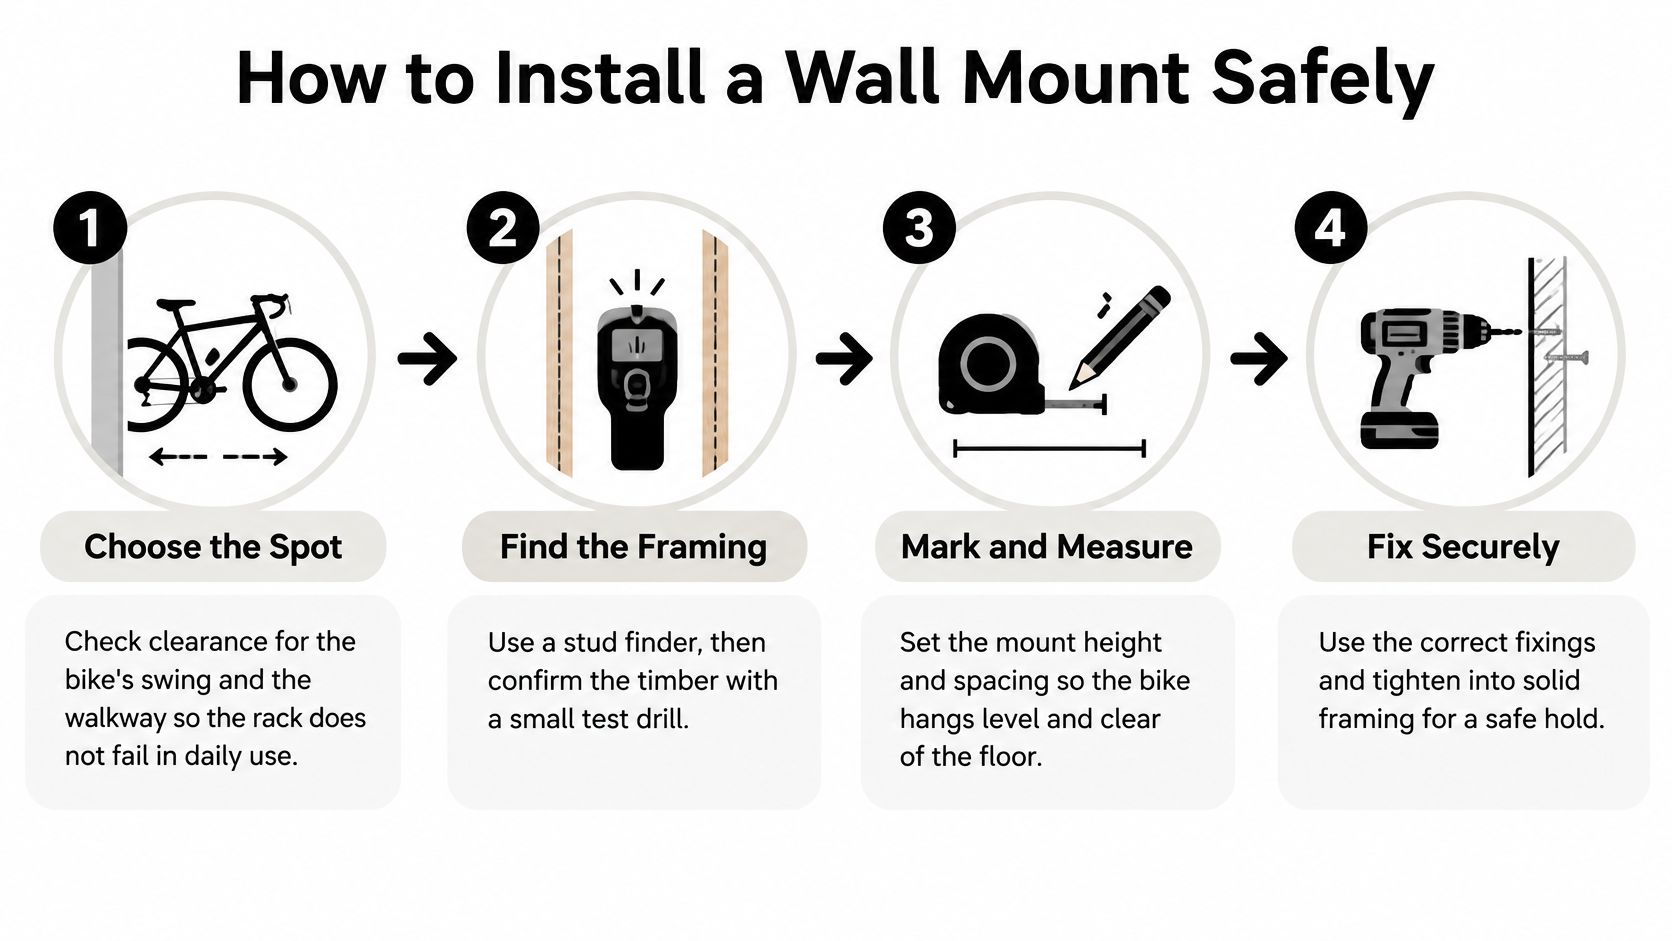
- Choose the spot. Hold the bike in its intended stored position and rehearse taking it down. Check garage-door tracks, vehicle doors and the route you'll use while carrying it.
- Locate and verify the framing. Scan for studs and concealed services, then confirm timber where it's safe to do so. Don't make exploratory holes near suspected wiring or plumbing.
- Mark the mounting position. Use the rack's template and a spirit level, setting height from the actual bike and the manufacturer's required geometry. Handlebar height alone isn't a reliable hook-height rule.
- Prepare the fixing holes. Select pilot-hole diameter and depth for the specified fastener and timber connection. Keep the drill square so the bracket seats evenly.
- Secure the bracket or rail. Fit any designed backing member, washers and spacers, then tighten using the fastener instructions. Stop if the lining crushes, a screw spins or the bracket won't seat correctly.
- Load progressively. Place a compatible bike on the rack while keeping control of it, then inspect for unexpected movement. Add other bikes individually without exceeding either the component or system rating.
- Install the security anchor. Position it so a suitable lock passes through the frame without obstructing retrieval. Its connection needs suitable structural support too.
A loading check isn't a proof test of structural capacity. If anything moves unexpectedly, unload rather than tightening blindly.
Inspect again after the initial period of use, when repeated handling may reveal looseness that wasn't apparent during installation.
Signs a Wall Mount Is Failing and What to Do
Unload the rack before investigating a suspected failure. Support each bike as you remove it, and keep people away from the area beneath an unstable installation.
| Warning sign | Immediate response |
|---|---|
| Rail sags or tilts | Remove the bikes and inspect the rail, backing and connections |
| Screw heads pull outward | Stop use and investigate loss of embedment or substrate failure |
| Cracks appear around fixings | Unload and establish whether the lining or underlying structure has failed |
| Hook bends or padding splits | Replace the affected component with a compatible approved part |
| Bikes shift into each other | Correct retention or spacing before using the arrangement again |
A pulled-out plasterboard anchor shouldn't be pushed back into filler and reused. Relocate the load to verified framing or install suitable structural backing.
A crack through masonry near an anchor warrants professional assessment. Cosmetic patching won't establish whether the anchor still has sound material around it.
A bike rubbing its neighbour is a layout problem, not a reason to force the bracket tighter against the wall.
Set a recurring inspection reminder based on usage and the manufacturer's guidance. Record checks beside the mount, including the condition of the rail, fixings, contact padding and locking anchor.
Three Home Setups Worked Through
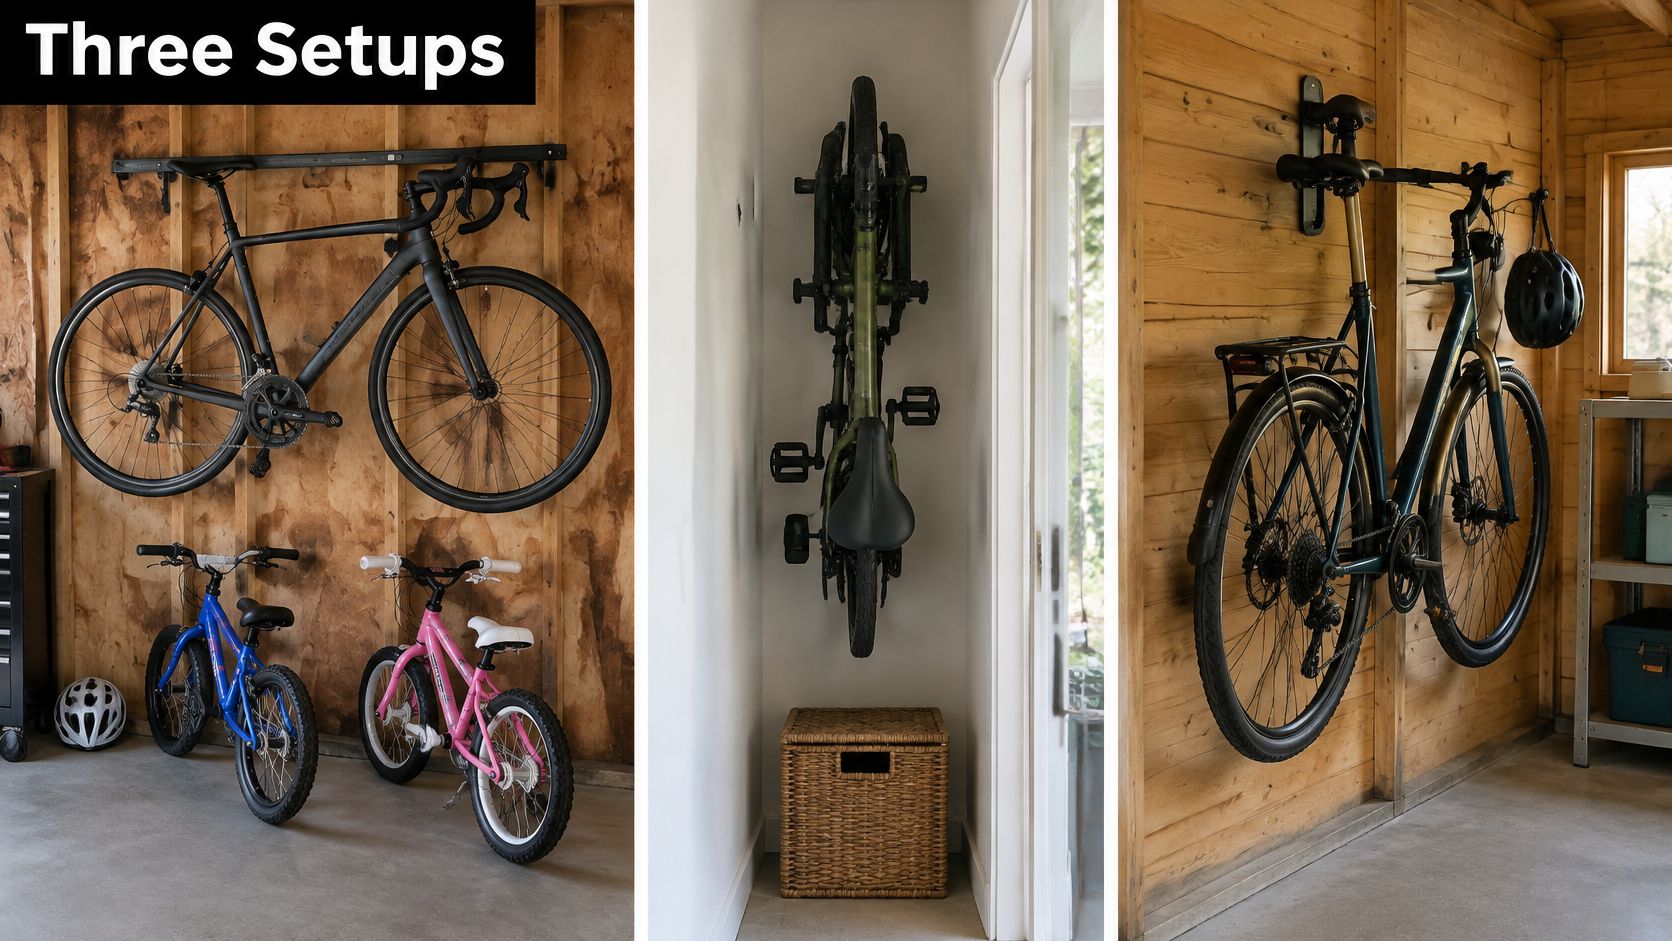
These hypothetical homes show how the same storage goal can lead to different choices.
Different rack arrangements suit different bikes and rooms.
A Nelson family garage
A family wants to store kids' bikes beside an adult road bike on a timber-framed wall. A wheel-hang rail suits the collection, with children's positions set low enough for supervised handling. The near mistake is putting every hook at adult height.
Decision: Use a framing-fixed rail with accessible positions and room to retrieve each bike.
A townhouse e-bike
An owner proposes hanging a heavy e-bike from a brick-veneer garage wall. The installer doesn't accept the veneer as the structural fixing surface and investigates the backing and connection detail first. A compatible frame-support bracket remains an option, but floor storage wins if lifting or the connection proves impractical.
Decision: Resolve the building connection before selecting the bracket.
This video provides an additional visual reference for bike-storage planning.
A flat with a narrow hallway
A road-bike owner likes a J-hook, but the chosen partition has no verified fixing point and the hanging bike would obstruct the passage. A freestanding option works only in a different position that preserves access.
Decision: Compare a bike stand for your New Zealand home rather than forcing a wall-mounted solution.
Choose and Confirm Your Mount Before You Buy
Buy the mount only after you can describe the installation, not merely the bicycle. A product listing can confirm tyre compatibility and rated capacity, but it can't identify hidden framing, damaged masonry or permission requirements in your home.
Choose a style you can load comfortably, then confirm its fixing pattern works with the structural support available. If either remains uncertain, pause the purchase and get the wall assessed.
Keep this decision sheet with your measurements:
- Bike: Record its stored weight, wheel and tyre dimensions, and approved support points.
- Position: Record the bracket projection and usable loading space, including door movement.
- Structure: Identify verified framing or masonry, required permissions and any unresolved defects.
For delivery budgeting, our large-item shipping charge for bike racks is $29.00 NZD per item. Include the cost of suitable fixings, backing and any professional installation in your comparison, rather than choosing on rack price alone.
Today, measure the bike and proposed storage position, then photograph the wall and mark what you know about its construction.
We have a workshop and can help you talk through your bike and storage options before you commit to a wall mount. Bring your measurements and wall photos, and visit Rider 18 to discuss a setup that suits your bike, available space and everyday handling.


