

Bike Storage Rack Guide for NZ Homes and Riders
- by Nigel
-

You've probably got the same problem as plenty of NZ households. The mountain bike is leaning against the garage wall, the e-bike is parked beside the recycling bin, and a child's small-wheeled bike keeps catching jackets on the way through the hallway. Add a mower, kayaks, tools, and a car that still needs to fit, and choosing a bike storage rack becomes a household layout decision, not a simple accessory purchase.
The right answer depends on the whole fleet. You need to account for e-bike weight, kids' wheel sizes, step-through frames, mudguards, baskets, panniers, and child seats, as well as where batteries charge and how often each bike comes out. A rack that works neatly for one bare mountain bike can be a daily nuisance once the family bikes arrive.
Why Bike Storage Is a Household Decision
A two-adult household with one child rarely owns three identical bikes. One bike may be a heavy electric commuter, another a full-suspension mountain bike, and the child's bike may have a low frame, a basket, or training wheels. Those shapes don't load onto a rack in the same way, and they don't occupy the same amount of usable space.
Start by listing the bikes in order of weight and frequency of use. The bike used every morning deserves the easiest loading position. A heavy e-bike shouldn't be stored high above shoulder level just because that location saves floor space. A child's bike needs to be reachable without a parent dragging an adult wheel or frame out of the way first.
Map the real obstacles
Measure the wall, floor, and access route rather than guessing from the rack's product photograph. A narrow hallway can look suitable until handlebars meet the gib, a rear child seat pushes the bike into a doorway, or a mudguard rubs against a skirting board.
The same applies in a garage. A rack may fit on paper but still interfere with a car door, workbench, hot water cylinder, lawn equipment, or the route to the outside. Storage should make the household easier to use, not turn every ride into a small dismantling job.
Practical rule: Design around the widest and least convenient bike in the fleet, then check that the frequently used bikes are easy to reach.
NZ guidance uses a standard bicycle envelope of about 0.7 m wide by 1.8 m long, with at least 0.9 m clearance to walls or barriers and 1.0 m between stands in lower-density layouts. Auckland guidance identifies 1.2 m spacing as desirable for easier use and manoeuvring, so squeezing racks together can reduce practical capacity even when every advertised slot appears to fit. See the NZ cycle-parking guidance for the underlying layout figures.
Buying one cheap hook at a time often creates a crooked collection of compromises. Plan the fleet first, decide which bikes must be immediately accessible, and then choose a rack system that leaves room for changing family needs.
The Main Types of Bike Storage Rack
Every rack category solves a different space problem. Choose the loading method first, then worry about appearance and finish.
Floor-standing racks
A floor rack needs no permanent wall or ceiling fixing, which makes it useful for renters, shared garages, and households still experimenting with a layout. Single-bike stands are simple, while multi-bike rails hold bikes by the tyres and keep frames separate.
They're generally the easiest option for children and heavy e-bikes because the bike stays on the floor. The trade-off is that the rack consumes floor area and may be moved or tipped if it isn't weighted or positioned properly.
Horizontal wall racks
A horizontal wall hook or cradle supports the bike across the frame or by contact points near the wheels. It suits a garage wall where the bike can project into otherwise unused space, but the frame shape matters. Step-through frames, unusual top tubes, full-suspension layouts, and bikes with accessories may not sit securely on a narrow hook.
Check the contact points carefully. Rubber or plastic sleeves should protect the frame, and the rack should keep pedals, bars, and cables away from the wall.
Vertical wall racks
A vertical system stores the bike with the front or rear wheel against the wall. It can work well in a narrow garage or corridor because the bike's length runs up the wall rather than across the room. The downside is loading effort, particularly for heavier e-bikes, and the need to allow room for handlebars, saddles, mudguards, and rear-mounted accessories.
A vertical design also needs a strong wall fixing. Read this guide to vertical bike stands before choosing one for a mixed fleet.
Ceiling systems and pivot arms
Ceiling hooks and hoists free up floor and wall space. They're useful in high garages or older homes with accessible ceiling framing, but lifting a heavy e-bike overhead is awkward and increases the chance of dropping the bike or damaging the battery.
Pivot arms and wall towers provide dense storage while allowing bikes to swing sideways. They can be excellent in tight spaces, provided the wall is strong and the pivot path doesn't clash with doors, shelves, or neighbouring bikes.
| Rack Type | How the Bike Sits | Typical Capacity | Best For |
|---|---|---|---|
| Floor-standing | Wheels sit in rails or cradles | Single or multiple bikes | Renters, families, heavy bikes |
| Horizontal wall rack | Frame or wheels supported sideways | Usually one bike per mount | Garages with spare wall depth |
| Vertical wall rack | Wheel held against the wall | Multiple mounts possible | Narrow walls and compact storage |
| Ceiling hook or hoist | Bike lifted by wheel or frame | One or more bikes | High ceilings and occasional-use bikes |
| Pivot tower | Bike stored vertically and swung aside | Multiple bikes | Dense storage with controlled access |
The rack's advertised capacity only tells you how many bikes it can hold. It doesn't tell you whether the household can load, remove, and manoeuvre those bikes without collisions.
Matching Racks to E-Bikes and Kids' Bikes
Weight ratings get attention, but geometry decides compatibility. A rack may safely support an e-bike yet still fail as a household solution because the tyre cradle is too narrow, the bars hit the wall, or the child seat needs more clearance than the layout provides.
NZ guidance recommends 1.5 m minimum spacing for cargo bikes and trikes, compared with 1.0 m plus or minus 0.2 m for standard cycles, because wider and longer bikes require more lateral room and turning clearance. Auckland Transport's practical benchmarks include a 0.5 m minimum bay width per bicycle, 1.8 m minimum bay length, and 1.8 m minimum access aisle width. These figures show why compressing rack centres isn't a proper space plan. Review the NZTA cycle-parking design guidance before laying out multiple bikes.
E-bikes need low-effort loading
An e-bike with its battery fitted can be awkward to lift, especially onto a high wall hook or ceiling hoist. Remove the battery for transport or storage when the manufacturer allows it, but don't choose a rack that only works if everyone in the household lifts perfectly every time.
Look for a broad tyre cradle, generous mudguard clearance, and frame support that doesn't press against cables or delicate components. Two-bike systems need extra care because the heavier bike can make the upper or rear position difficult to access.
Kids' bikes change the layout
Kids' bikes vary sharply in wheel size and frame height. Balance bikes, bikes with training wheels, and small frames may not engage an adult-oriented hook properly. A child also needs a loading height they can use safely, otherwise the rack becomes decorative and the bike ends up on the floor.
Child seats, rear racks, panniers, and baskets extend the bike beyond its bare frame. Check the complete bike, not a stripped catalogue image. A useful NZ discussion of wall-rack fit highlights why frame shape, add-ons, and actual lifting effort matter alongside the formal load rating.
| Rack Type | E-Bike Suitability | Kids' Bike Suitability | Key Limitation |
|---|---|---|---|
| Floor-standing | Strong choice for heavy bikes | Usually easiest | Uses valuable floor space |
| Horizontal wall rack | Good if frame and tyre fit | Mixed, depending on frame | Frame contact can be awkward |
| Vertical wall rack | Suitable at low loading height | Works with the right wheel support | Lifting and accessory clearance |
| Ceiling hook or hoist | Poor choice for frequent heavy bikes | Poor for unsupervised use | Overhead lifting |
| Pivot tower | Good when designed for weight | Can work across mixed sizes | Needs careful spacing and wall strength |
For a mixed household fleet, choose the rack around the e-bike and the least conventional frame first. Standard adult bikes are usually the easy part.
Materials, Weatherproofing and Mounting
A rack installed in Nelson's dry interior garage lives a different life from one mounted in a coastal shed. Powder-coated mild steel offers a practical balance of strength and cost, while galvanised steel gives better protection where moisture is persistent. Aluminium resists corrosion and reduces weight, but the rack still needs sound joints and suitable fixings. Stainless hardware helps in exposed or salty locations.
Contact points deserve attention. Rubber and plastic sleeves protect paint and reduce slipping, but they can harden, split, or trap moisture against a frame. A wet e-bike left in a cheap hook can develop corrosion at the contact area even when the rack itself still looks sound.
Match the fixing to the wall
Concrete, brick, timber framing, and gib are not interchangeable mounting surfaces. A concrete slab may suit concrete screws or appropriate expansion anchors. Brick needs fixings placed into sound masonry rather than weak mortar. A timber-framed gib wall requires the main load to reach a stud or properly supported nog, not just the plasterboard.
Toggle fixings can help with hollow walls for lighter loads, but don't use them as a shortcut for a heavy, frequently loaded e-bike rack unless the system is specifically designed for that application. The fixing, wall, and rack must work together.
Check the bike contact points
Disc brake calipers, thru-axles, wide tyres, mudguards, and suspension components can all affect how the bike sits. A hook that contacts a brake rotor or presses against a caliper is poorly matched, regardless of its steel thickness.
| Rack Material | Best Mounting Surface | Fastener to Use | NZ Climate Rating |
|---|---|---|---|
| Powder-coated mild steel | Interior timber studs or sound masonry | Structural timber screws or masonry fixings | Good indoors, limited in exposed salt |
| Galvanised steel | Garages, sheds, and masonry | Galvanised or stainless-compatible fixings | Better for damp locations |
| Aluminium | Sound framing or masonry with suitable brackets | Manufacturer-specified structural fixings | Good corrosion resistance |
| Stainless hardware | Any compatible structural backing | Stainless screws or bolts | Strong choice near coastal air |
| Plastic or rubber contact parts | Used with a properly fixed rack | Not a structural fixing | Protects bikes, needs inspection |
Keep wet bikes from sitting against unprotected metal. Wipe salt and grit away, allow the bike to dry where possible, and avoid storing a battery-equipped e-bike in a position where water can collect around the rack contact points.
Price Ranges and What You Get for Your Money
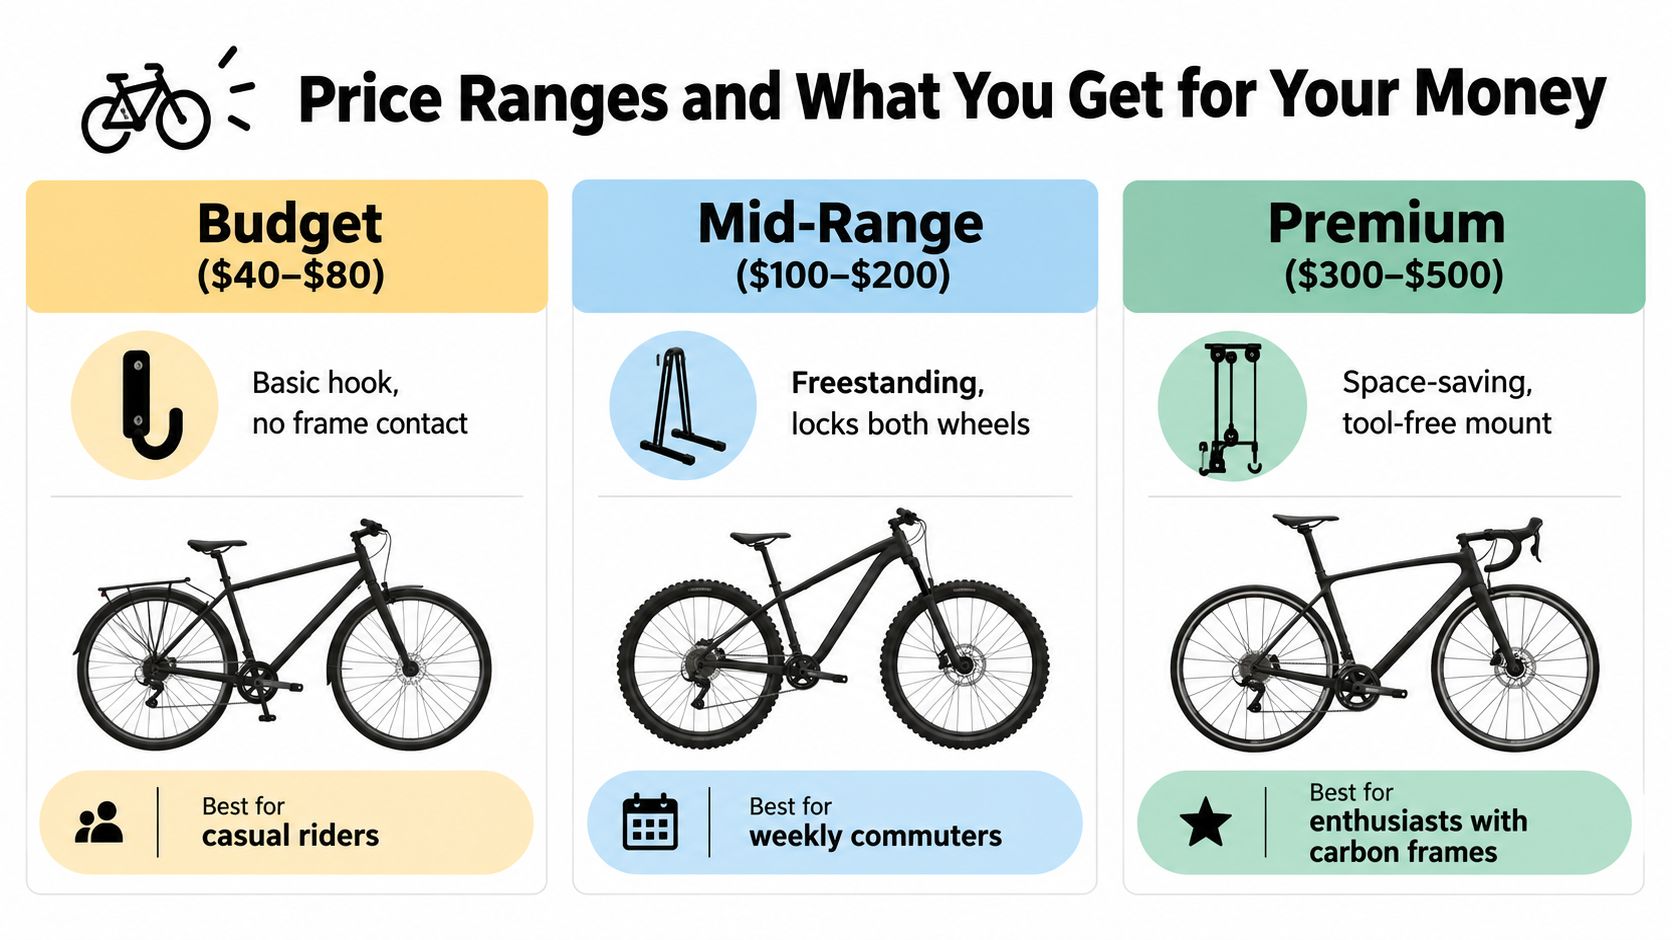
A cheap hook and a multi-bike vertical system solve different problems, so comparing them by price alone is misleading. In NZ, a simple wall hook or basic floor stand may sit around $40 to $80, a more substantial family or commuter setup around $100 to $200, and a premium space-saving or lifting system around $300 to $500. Treat those as practical buying bands, not guarantees of quality.
What each band should deliver
At the entry level, expect a basic hook, single-bike stand, or straightforward floor rail. This suits a dry hallway or one lightweight bike, provided the frame contact and wall fixing are appropriate. Don't stretch a budget hook into a role it wasn't designed to fill.
Mid-range racks usually buy you better stability, more usable spacing, stronger finish, or easier access for multiple bikes. That's the sensible zone for many households with a commuter, mountain bike, and kids' bikes, especially when floor-standing storage avoids heavy lifting.
Premium systems earn their price when space is truly limited or the household needs controlled lifting and dense storage. Look for strong welds, protected contact points, smooth pivots, locking features where relevant, and a clear warranty. A polished box or clever hinge isn't a substitute for good load transfer.
Budget for the installation, not just the rack
The rack price may not include suitable anchors, structural bolts, rubber matting, or accessories needed to clear a child seat or rear rack. A wall system can also require extra time to locate framing and position multiple mounts accurately.
Don't buy a rack priced too cheaply to carry a heavy e-bike safely over years of use. If the bike is expensive, frequently used, or difficult to lift, spend on the parts that control safety and daily convenience: steel quality, welds, contact protection, fixing hardware, and access.
Installation Tips and Ongoing Maintenance
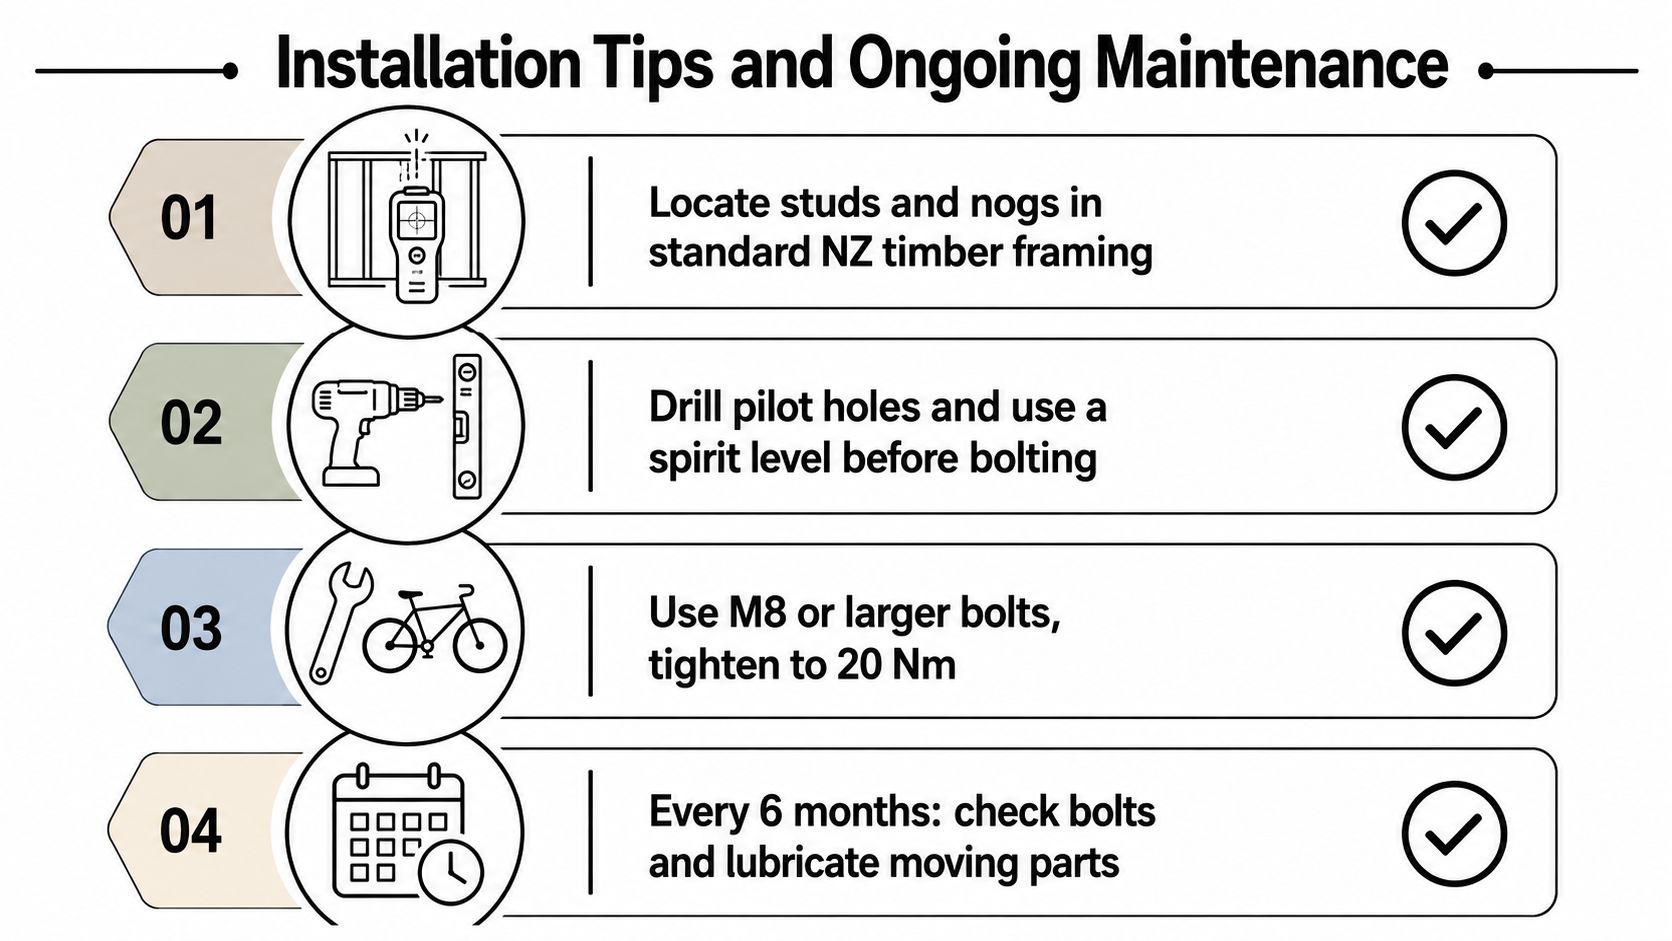
A sound rack starts with the structure behind the wall. In NZ timber framing, studs and nogs may not land where the product diagram assumes, so find the actual framing before drilling. A stud finder, small inspection hole, tape measure, and spirit level are more useful than confidence.
Fit the rack in the right order
- Mark the bikes' full envelopes. Include handlebars, pedals, saddles, mudguards, child seats, and rear bags.
- Locate structural support. Confirm studs, nogs, concrete, or sound brick before selecting the final position.
- Level the bracket. Hold the rack in place, mark holes, and use pilot holes suited to the fixing.
- Tighten without damaging the structure. Use the manufacturer's torque guidance. Over-tightening can strip timber or crush a bracket.
- Test with the heaviest bike. Load it slowly, check movement, and confirm that doors and walkways remain clear.
Concrete screws, timber structural screws, bolts, and hollow-wall toggles have different jobs. Use the fixing specified for the surface and load, rather than treating a plastic plug as a universal answer. If wiring or plumbing may run behind the wall, stop and investigate before drilling.
Keep the contact points clean
Wipe salt, mud, and grit from hooks and wheel trays. Inspect rubber sleeves before they crack, and check that moving pivots still swing smoothly. A bike rack isn't a clothes rail, shelf, or place to hang wet gear, because extra loads can work the fixings loose.
Check the rack after the first few weeks of use, then include it in your normal bike-care routine. Remove an e-bike battery when appropriate for storage or transport, and check that the bike remains stable without the battery fitted. The scheduled maintenance guide gives a useful reminder to deal with small issues before they become failures.
A short installation demonstration is useful before you begin:
Don't hang a heavy bike from a weak plasterboard fixing, don't force a tyre into a narrow cradle, and don't ignore a rack that rocks under load. Those are installation problems, not quirks to live with.
Getting Local Help and Making the Final Call
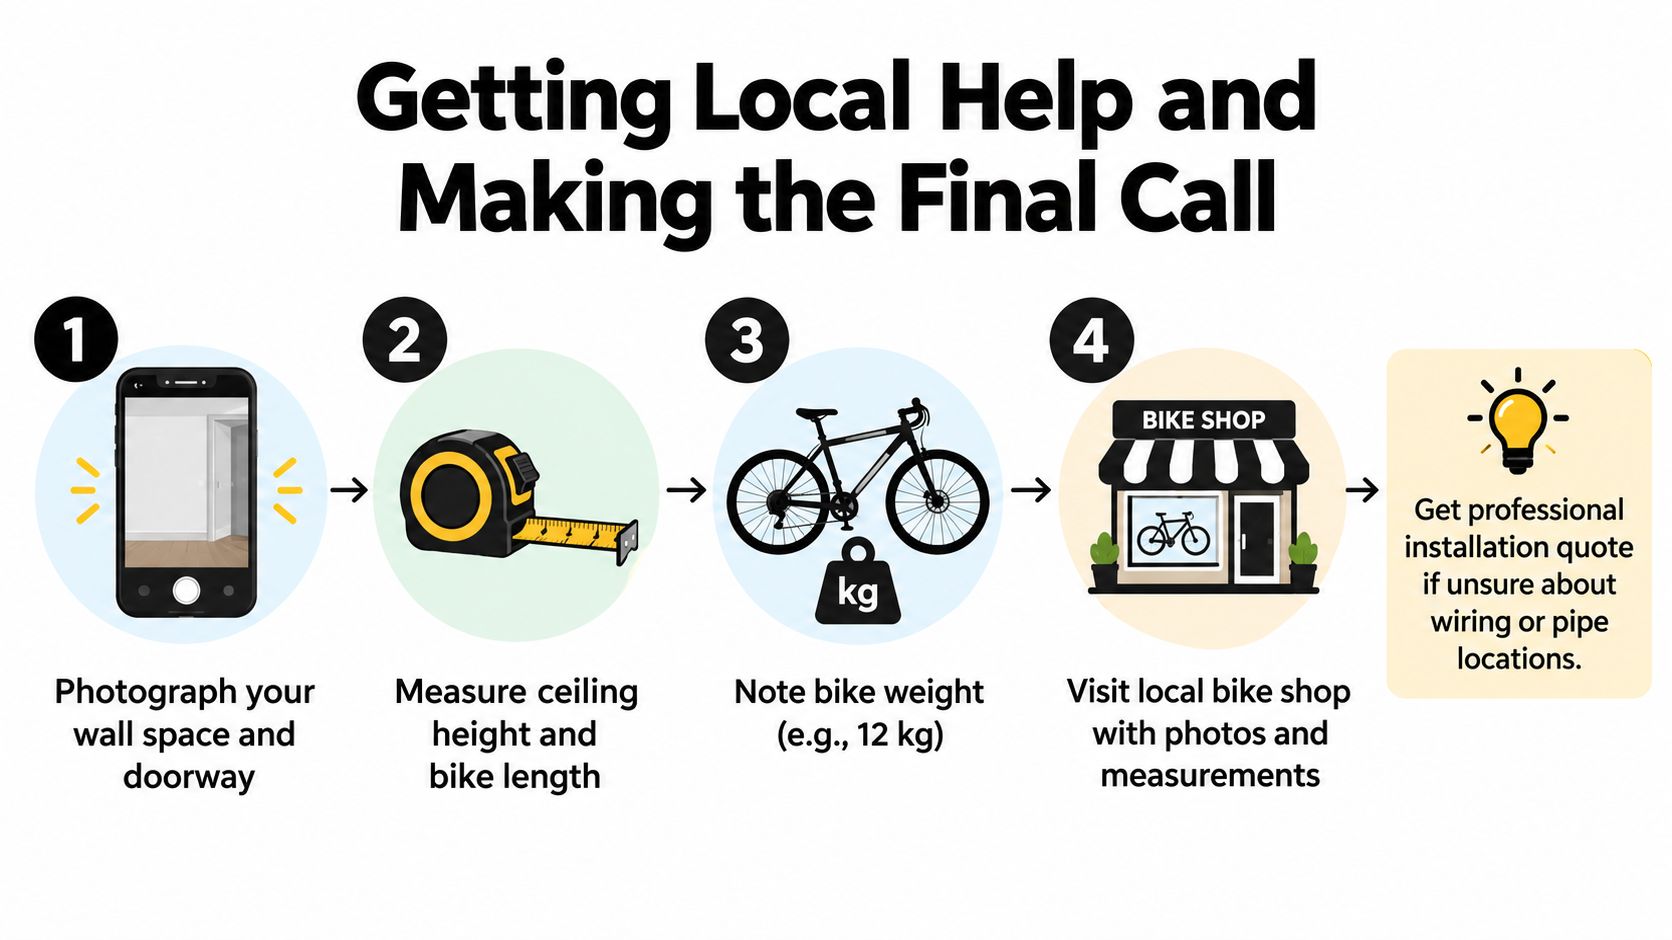
A workshop can usually recommend a rack more accurately when you bring evidence from the house. Photograph the proposed wall and doorway, show the bikes as they're equipped, and include nearby benches, shelving, pipes, power points, and the garage door.
Write down which bike is heaviest and which one leaves the house most often. Measure the available wall length, the approach to the rack, the ceiling height, and the bike length with accessories fitted. This information prevents a rack choice based on a clean product photo that bears little resemblance to the actual installation.
Use a simple shortlist
- Rank the fleet: Put the heaviest and most frequently used bikes first.
- Measure access: Check the doorway, turning path, wall projection, and nearby storage.
- Choose the loading direction: Floor storage suits heavy or frequently used bikes, while wall storage preserves floor area.
- Check the structure: Identify studs, nogs, concrete, or masonry before ordering fixings.
- Test the complete bike: Include mudguards, child seats, racks, baskets, panniers, and batteries.
A proper workshop fitting should confirm the wall structure, rack height, bike clearances, and fixing hardware. It should also identify problems before installation, such as a child seat hitting the wall, an e-bike being too heavy for comfortable overhead lifting, or multiple stands leaving no usable access aisle.
Rider 18 can help with bike-related gear, workshop advice, and Nelson-based support for households choosing between floor, wall, and ceiling storage. The team can look at the bikes and the proposed space together, which is far more useful than guessing from a rack's load rating.
A good final choice is the rack that makes the household's most-used bikes easy to load while keeping the whole fleet secure, accessible, and out of the car's way. If you're still unsure, take the photos and measurements to a local workshop before buying.
Bring your bike photos, measurements, and the details of your wall or garage to Rider 18, where the Nelson team can help match a bike storage rack to your e-bikes, kids' bikes, and everyday layout. Ask about suitable equipment, workshop fitting, and follow-up support so you can get the bikes off the hallway floor this week.


