

MTB Tyre Boot: When and How to Fit One Safely
- by Nigel
-

You're halfway down a rocky descent near Nelson when you hear a hiss, then feel the rear tyre squirm. There's a split along the sidewall, sealant on the frame, and more trail between you and the car park than you'd like. An MTB tyre boot might get you out, but the condition of the casing and the route to the nearest exit matter more than whether you can make the tyre hold air.
What a Tyre Boot Does and Whether It Will Hold
A tyre boot is a strip of tough material, usually purpose-made or cut from an old tyre casing, placed between the damaged casing and the inner tube so the tube can't push through the cut. It contains the opening; it doesn't reconnect torn casing threads or restore the tyre's original strength.
Find your damage in the first column before reaching for tools.
Which damage a tyre boot can hold
| Damage found | Boot suitable? | Action |
|---|---|---|
| Small tread puncture, no sidewall involvement | Yes, temporarily, if reinforcement is needed | Fit a tube and boot if needed; inspect the tyre before normal use |
| Sidewall cut that does not reach the bead | Yes, temporarily, if it stays contained | Fit boot and tube, choose an appropriate pressure, and take the nearest easy exit |
| Cut exposing casing threads that bulges under pressure | Only if the finished repair holds without bulging at riding pressure | If any bulge remains, replace the tyre before further riding |
| Split reaching the bead or a torn valve area | No | Replace the tyre; walk or arrange collection |
| Tubeless hole that sealant can close, no large cut | No boot needed | Let sealant work, top up if necessary, and reinflate |
Judge the structure before the distance
The bead, the reinforced edge that locates the tyre on the rim, must remain intact. A boot can cover an opening in the casing, but it can't secure a damaged bead or correct a tyre that no longer seats properly.
Exposed casing threads deserve close attention. Some fraying around a contained cut is different from a tear that lengthens or changes shape as pressure rises. Singletracks' tyre-repair guidance makes the useful distinction between emergency repairs and longer-term repair work: getting air into a tyre isn't the same as restoring its structure.
Distance isn't permission to ride an unsafe repair. A short exit down sharp rocks may be less suitable than a longer, smooth access road. Walk technical descents, avoid hard cornering, and don't use a successful inflation test as a reason to finish the planned loop.
Ride-home rule: Choose the nearest practical exit, not the most convenient way to complete the ride.
What holding actually means
Fit a tube where practical and inflate gradually. Reducing pressure can ease stress on the damaged casing, but dropping it until the tyre folds or strikes the rim creates another problem. You need enough support for controlled, gentle travel within the tyre and rim's permitted limits.
Say you're well beyond walking distance of the car park and find a sidewall cut clear of the bead. If a properly supported repair stays flat under pressure and gentle loading, a cautious exit may be reasonable. If the only route involves repeated rock impacts, walking those sections remains the better decision.
Carrying repair equipment makes sense in an established riding community: Sport New Zealand's Cycling Sport Profile recorded mountain-bike participation among 8.8% of adults aged 16 and over in 2013/14. That describes participation, not the likelihood of a tyre failure.
The final verdict comes from the tyre itself: if the cut opens or bulges under pressure, stop and replace it.
Alternatives to a Boot and When Each Wins
For a tubeless wheel, sealant is the first response, not an internal boot. Stop with the damaged section facing down so liquid can collect around the hole, then rotate the wheel and try reinflating. Don't immediately unseat a tyre that may still seal.
Maintenance affects whether that works. Michelin's tyre-sealant guidance gives a typical starting volume of 90–120 ml for trail and enduro systems, with checks at least every few months and more frequently in hot conditions or when air loss increases. Use a quantity compatible with your tyre volume and sealant product rather than treating that range as universal.
Repair options compared by situation
| Option | Best for | Main limit |
|---|---|---|
| Sealant and reinflation | Small tread punctures on tubeless wheels | Dried or insufficient sealant won't work; large cuts remain open |
| Tube and plug | A tube for an internal puncture, or a tubeless plug for a suitable small tread hole | They're different repair methods; a plug can't bridge a structural casing cut |
| Spare tube alone | A puncture where the surrounding casing remains sound | The tube can protrude through an unsupported cut |
| Tyre boot | A contained casing cut that needs internal reinforcement | Emergency containment only |
| Tyre replacement | Structural casing or bead damage | Requires a replacement tyre and somewhere suitable to fit it |
Match the repair to the leak
A tubeless plug fills a hole from outside. A tube holds air inside the tyre. Don't drive a plug through a tyre with a tube fitted, because the insertion tool can puncture the tube.
A boot performs another job altogether: it supports the damaged casing. Don't expect it to make a large cut airtight without a suitable air-holding system behind it.
Our tyre puncture repair guide helps distinguish an ordinary puncture from damage that needs more than a patch. Carry a spare tube and boot even when running tubeless, alongside levers and a reliable inflation method. Sealant can save a stop, but it can't solve every trail failure.
Materials to Carry and How to Size the Boot
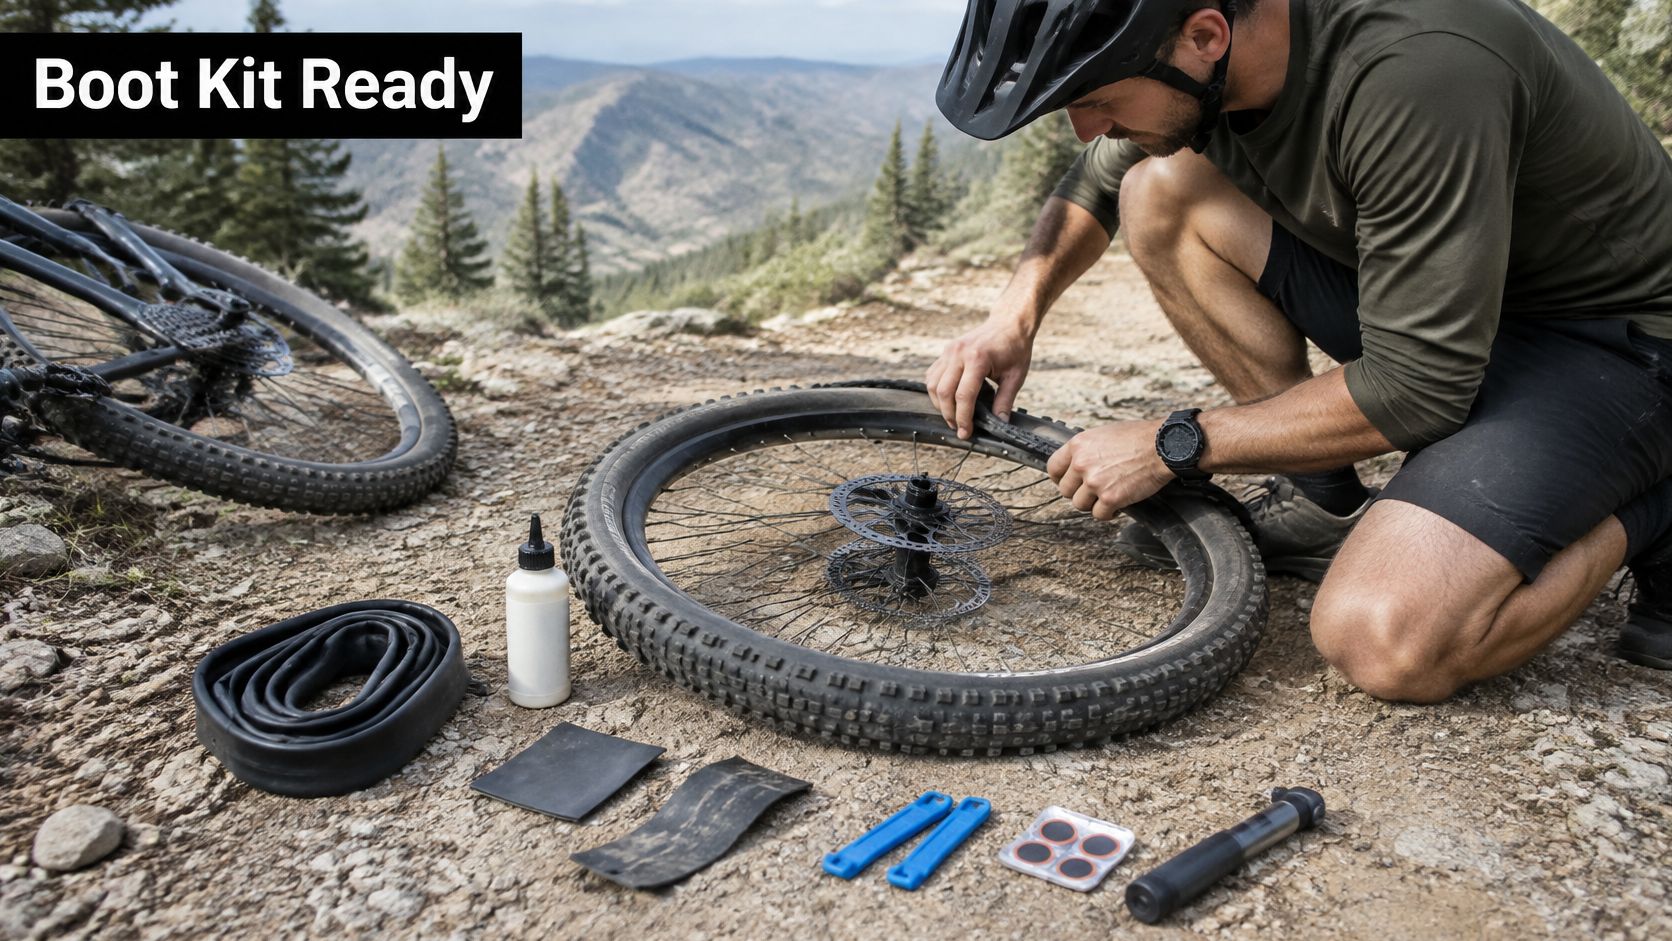
- Casing reinforcement: A purpose-made tyre boot or a prepared strip of sound old tyre casing with smooth edges.
- Spare inner tube: The correct wheel diameter, suitable tyre-width range, and accessible valve length.
- Tyre levers: Strong plastic levers that suit your rim and tyre combination.
- Inflation: A pump, or a compatible CO₂ inflator with a backup plan if the first attempt fails.
- Patch kit: Patches and adhesive compatible with your tube material.
- Tubeless supplies: Compatible sealant and a plug tool for repairable tread holes.
Keep those items together so you aren't emptying your pack into wet gravel.
Size for sound casing around the cut
Measure the whole damaged area, including frayed or weakened material beyond the visible opening. Choose a boot that bears against sound casing on every side, not one that only just covers the slit.
There's no universal cut-length allowance that makes a damaged tyre safe. Boot construction, cut shape and the available space inside the tyre all affect the result.
Boot length and overlap by cut size
| Cut length | Minimum boot length | Overlap past each edge |
|---|---|---|
| Short, localised cut | Long enough to cover the opening and surrounding weakened material | Generous overlap onto sound casing |
| Longer cut, clear of the bead | A compatible boot that remains flat beyond the entire damaged area | Sound casing beyond both ends and sides |
| Large cut, clear of the bead | Consider riding out only if fully contained at riding pressure | Reject if adequate overlap won't fit |
| Reaching the bead or valve area | Not suitable, replace the tyre | Overlap cannot make this repair suitable |
Width matters too. A boot that curls, rolls at an edge, or extends into the bead seat isn't properly fitted.
Enduro's tubeless repair guidance explains why a larger casing cut can require internal reinforcement and a tube rather than another plug. For a loaded e-MTB, I'd favour a purpose-made boot over improvised packaging.
Folded banknotes and cardboard are last resorts, not equivalent materials. Before leaving home, check your boot's dimensions and condition against the tyres you run, using our ride-packing checklist to organise the rest of your kit.
How to Fit a Tyre Boot Step by Step
Move off the riding line onto stable ground before taking the wheel out. Keep loose parts and the open tyre away from grit, especially if you're working beside a gravel road.
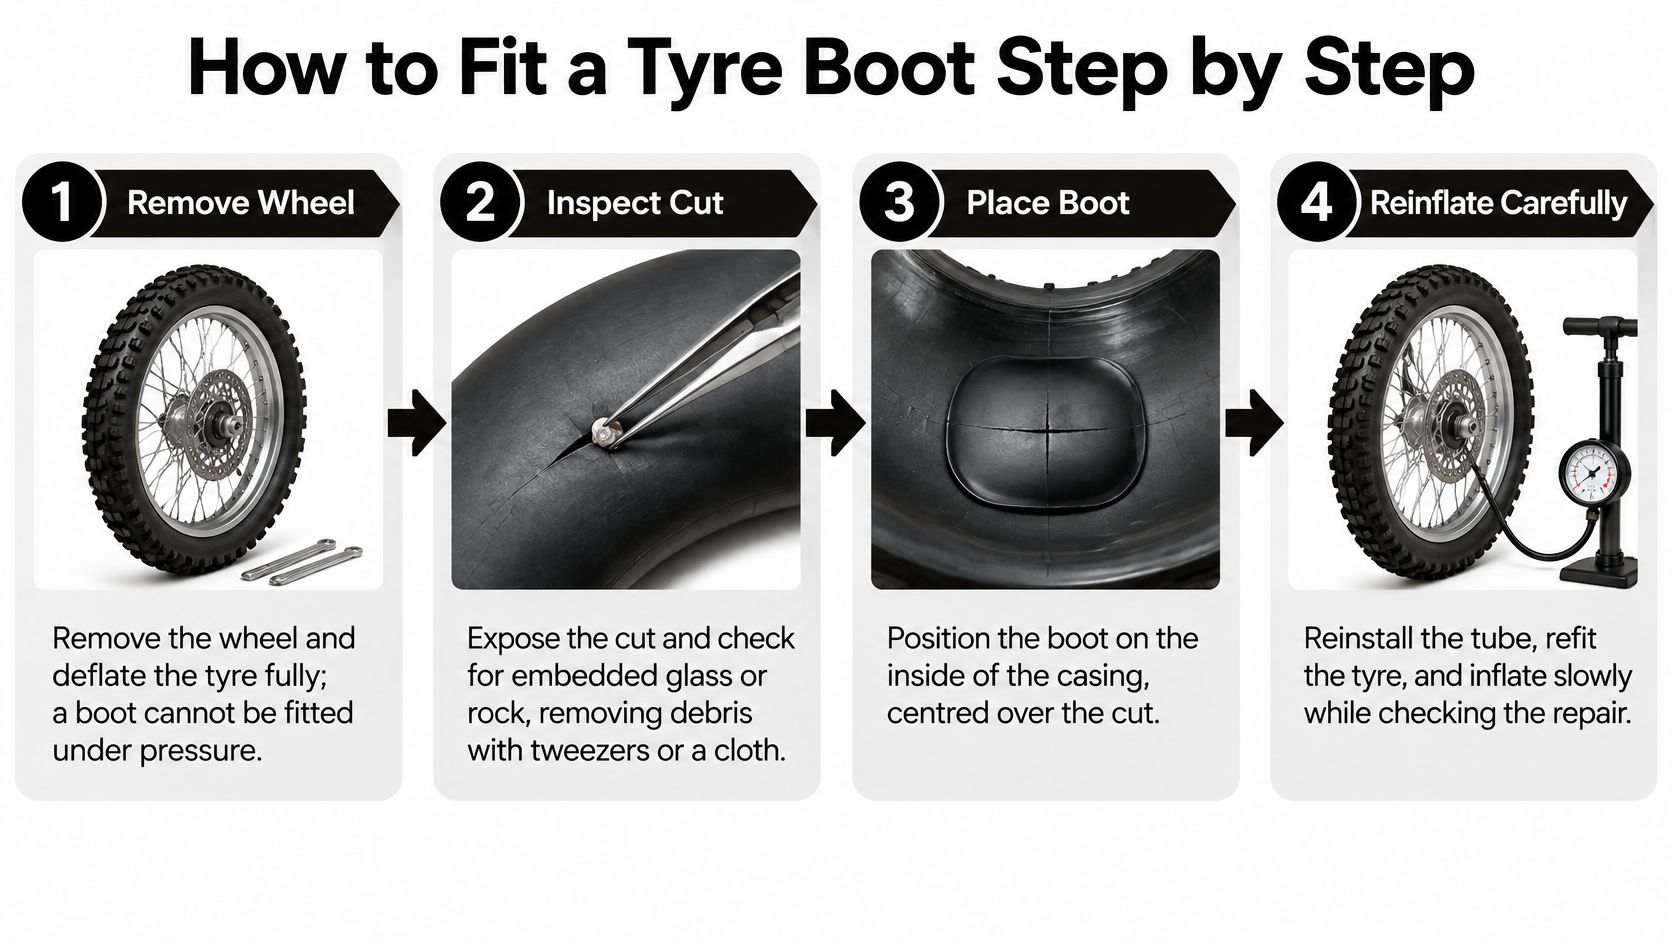
Use this fitting sequence to keep the repair centred while the tyre goes back together.
Open, inspect and reinforce
- Remove the wheel and fully deflate the tyre. Release all remaining pressure before lifting a bead, because residual pressure keeps the casing loaded. Don't start levering against a partly inflated tyre.
- Expose the cut by unseating the bead on the damaged side. Inspect the inside and outside for glass, sharp stone and loose casing material, removing embedded debris with tweezers or a cloth rather than sweeping bare fingers across it. Leaving the original sharp object behind can puncture the replacement tube immediately.
- Clean and dry the contact area. Wipe away sealant and dirt until the boot can sit against the casing without sliding. Applying an adhesive boot over wet sealant is a common reason it won't stay positioned during assembly.
- Centre the boot over the entire damaged area, with its edges extending onto sound casing. Smooth it into the tyre's curve and check that no hard corner faces the tube. Don't put the overlap only along the cut while leaving its sides unsupported.
Reassemble without moving the boot
- Refit the tube with just enough air to give it shape. If converting from tubeless, remove the tubeless valve first, then settle the tube evenly inside the casing and refit the bead. Don't trap a fold of tube beneath the tyre edge.
- Check that the boot hasn't migrated towards the bead while you worked. Inspect its position before closing the final section, keeping the reinforcement flat against the casing. Forcing a tight bead into place without checking underneath can dislodge the repair.
- Inflate gradually to an appropriate riding pressure. Pause to inspect the damaged area, rotate the wheel, and gently load the repaired section by hand. Don't inflate to the sidewall maximum merely to prove that the repair is strong.
- Reject the repair if the cut spreads, the tube protrudes, the boot shifts, or air escapes. Deflate and reassess rather than adding more pressure or covering an unstable bulge with another improvised layer. Never boot a damaged bead, a split reaching the bead, or a torn valve area.
For a moving demonstration, use the video alongside the physical checks rather than treating a completed fitting as proof of safety.
Sharp rock remains a relevant hazard when choosing a replacement casing, as Michelin's bicycle-tyre advice explains. On rocky Nelson routes, Rotorua trails or alpine terrain, don't take a booted tyre back into demanding riding just because the initial fitting worked.
Pre-Ride Checks Before the Wheel Goes Back On
A tyre that looks round on the ground still needs testing. Complete the off-bike checks first, then secure the wheel correctly and check its operation on the bike before putting your weight on it.
New Zealand's NZQA bicycle-repair unit standard 20185 requires repaired components to be tested, not merely refitted. Treat your field repair with the same discipline, without confusing it with a completed workshop repair.
Check each part, not just the pressure
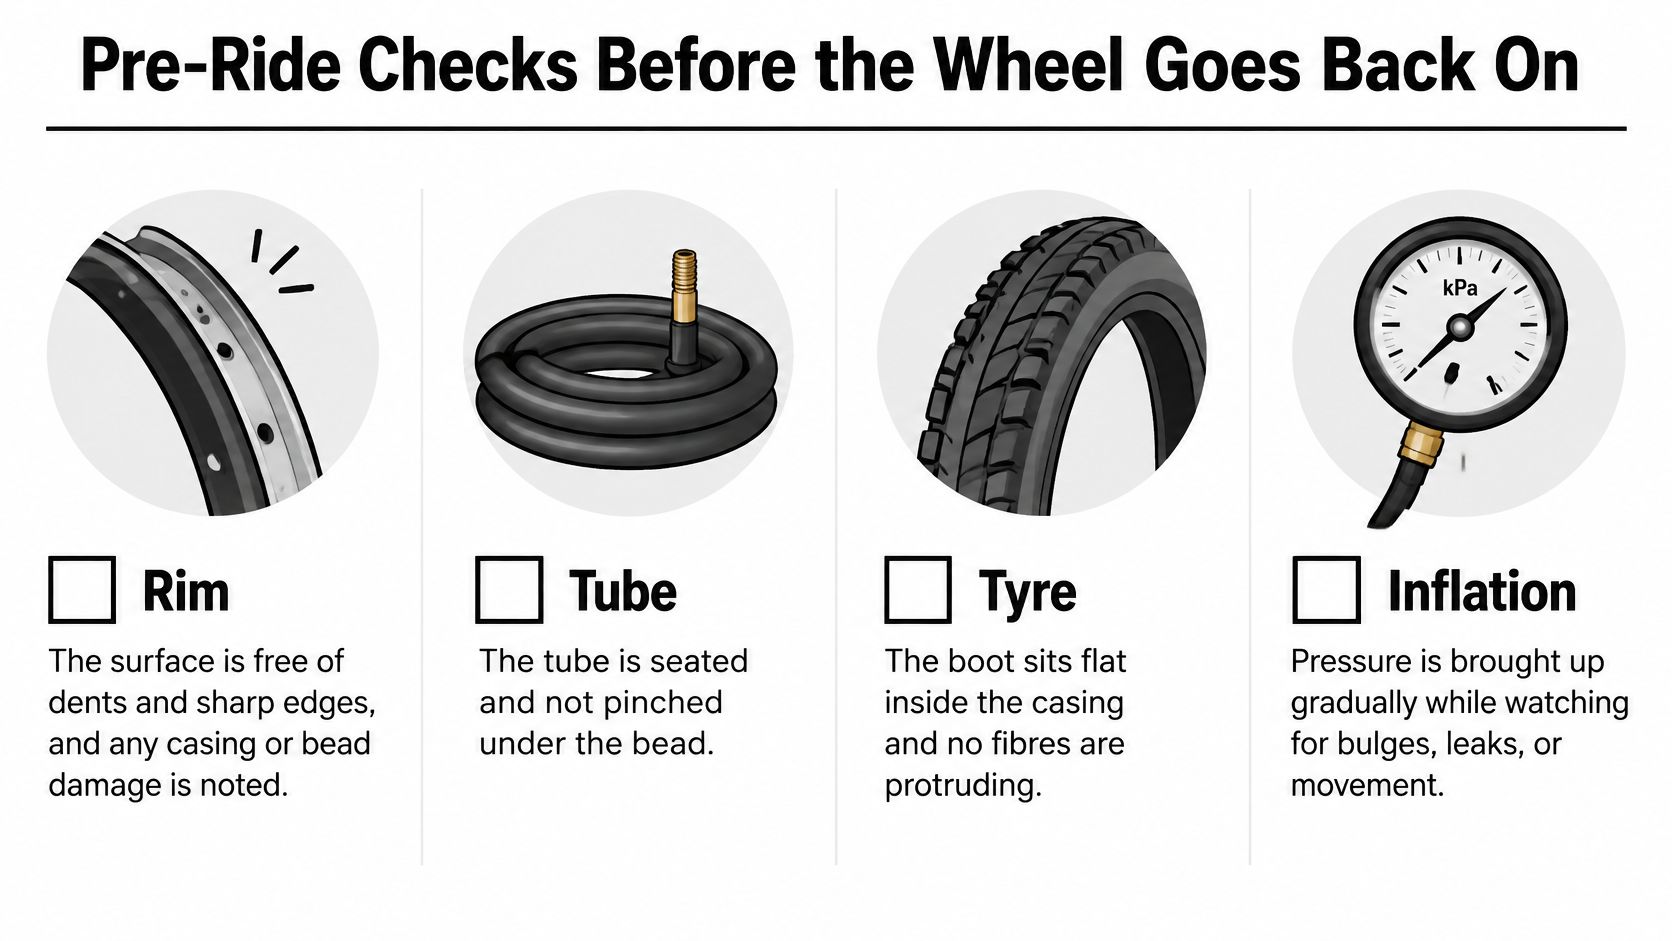
- Rim: No sharp edge, significant dent or damaged bead seat that could cut the tube or prevent secure tyre retention.
- Tube: Evenly seated, with no section pinched beneath the bead and no strain pulling the valve sideways.
- Boot: Flat against the casing, covering the full damaged area with overlap intact. Confirm this before closing the tyre.
- Bead: Evenly seated around the rim, with the tyre's moulded seating line consistent on both sides.
- Pressure: Stable through a stationary observation period, with no hissing, softening or opening of the cut.
- Rotation: No local bulge or distortion at the repair when you turn the wheel. After installation, confirm clearance and that the brake works normally.
The visual checks are just as important as whether the pump gauge holds steady.
A stationary pressure check can reveal a bad repair. It cannot guarantee that the tyre will survive the next impact.
If a check fails, don't start riding that tyre. Walk the bike or arrange a shuttle or collection from an accessible exit, keeping clear of other trail users.
If the checks pass, start with gentle movement on easy ground and stop to inspect before committing to the route out. Any new wobble, rubbing, pressure loss or change in steering is a reason to stop immediately.
At home, open the tyre and inspect the rim, tube, casing and bead under better light. Trail dirt and liquid sealant can conceal damage that wasn't obvious during the repair.
Get the Tyre Replaced Before Your Next Big Ride
Treat a booted casing as finished for demanding riding. Getting out under your own power is a successful emergency outcome, not evidence that the tyre is ready for another descent.
Before dismantling it at home, note whether the repaired section stayed flat and whether pressure changed during the exit. Bring the wheel, boot and damaged tube to the workshop so the technician can assess the whole assembly rather than the outside of the cut alone.
Make the replacement address the cause
Choose the replacement for the riding that damaged the old tyre. A lighter casing can suit smoother routes, while repeated sharp-rock exposure calls for a more protective construction, with the accompanying weight and ride-feel trade-offs.
Use our NZ MTB tyre guide to narrow the choice by terrain and setup. Don't choose solely by tread pattern if the failure was through the sidewall.
At Rider 18, we only carry out wheel repairs if they're deemed safe. Our workshop can assess the wheel, but a damaged bead or structural split isn't something we'll approve just because a boot held during the trip home.
Your next actions are straightforward:
- Replace the damaged tyre: Resolve the casing failure before returning to technical or remote riding.
- Check the new installation: Re-inspect the rim and bead seating after the first ride, and investigate any unexplained pressure loss.
- Restore the repair kit: Replace used supplies and keep a sound boot and suitable spare tube packed.
Book the replacement and wheel check with Rider 18 before your next big ride, rather than leaving the decision until you're loading the bike.
Rider 18 offers workshop support and mountain-bike maintenance to help you assess a damaged wheel and choose a suitable replacement tyre. Visit Rider 18 to arrange a check, and bring the booted tyre and tube so we can inspect the damage before you head back onto the trails.


