

Mountain Bike Helmets for Men: The Ultimate 2026 Guide
- by Nigel
-

In New Zealand, bicycle helmets became mandatory in January 1994, and the current rules still require an approved, securely fastened helmet on the road. The best mountain bike helmet for you is the one that fits your head shape and riding style perfectly and meets an approved standard.
Are you choosing a helmet by brand, price, or appearance while ignoring the two things that matter most, fit and the kind of riding you really do? That approach fails quickly on New Zealand trails, where a ride can include a road connection, a steep technical descent, or a sanctioned downhill course with requirements that ordinary online buying guides barely mention.
I've fitted enough helmets to know the common mistake. A rider picks a familiar logo, tightens the dial until it hurts, leaves the straps loose, and assumes a certification sticker makes the fit safe. It doesn't. Certification matters first, but a helmet that shifts, sits high, blocks vision, or leaves pressure points is the wrong helmet for your head.
New Zealand's cycling culture also makes the road and trail harder to separate. You might pedal to a trailhead, cross a public road, ride an enduro stage, or enter a downhill event. Your helmet choice needs to reflect that whole ride, not just the easiest part.
Finding the Perfect Fit Before You Shop
Start with your head, not the brand catalogue. A helmet's size label is only useful after you know your head circumference and understand the shape that the shell is designed to suit. New Zealand guidance warns that sizing charts are a guide because individual helmet shapes vary, and it recommends checking the helmet's position, straps, and retention system rather than relying on circumference alone. Auckland Transport's helmet fitting guidance is a useful reference for those checks.
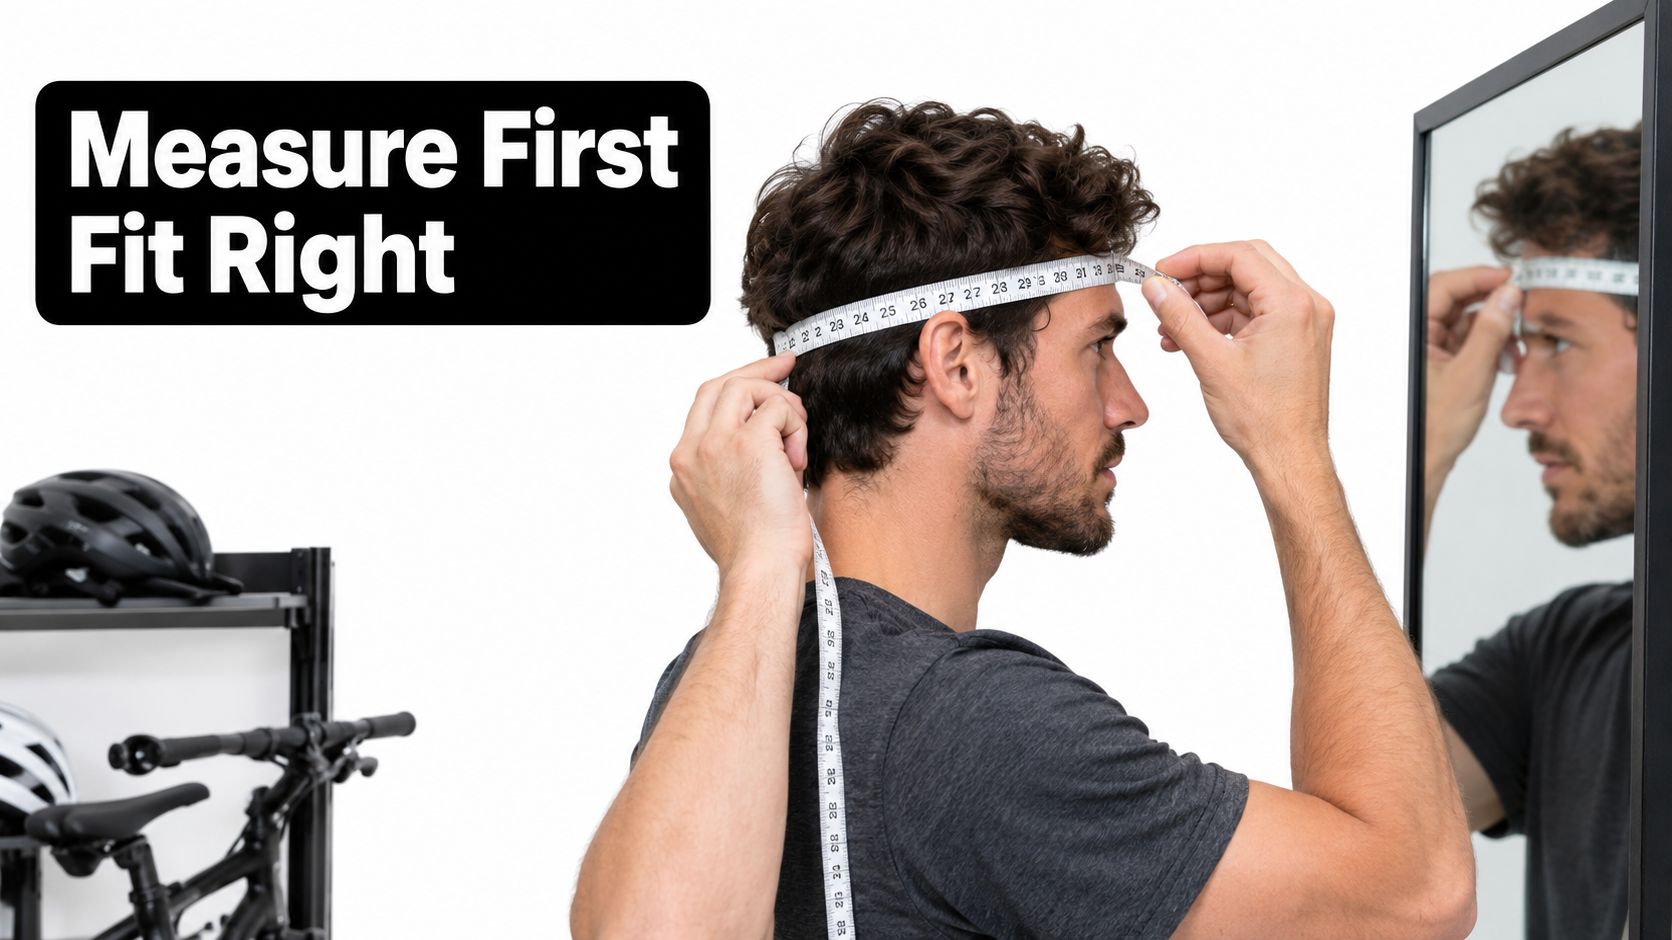
Measure before comparing brands
Use a soft tape measure and wrap it around the widest part of your head. Keep the tape level, passing above your eyebrows and around the fullest point at the back of your skull. Don't pull it tight enough to compress your hair, and don't measure around the top of your forehead where the helmet won't sit.
Take the measurement more than once and write it down. That number gives you a starting size, but it doesn't tell you whether your head is long, round, narrow, or broad. Two helmets with the same labelled size can feel completely different once they're on.
Men often assume that a larger size or a familiar brand will solve fit problems. It won't. Head shape varies between individuals, and the shell shape can matter more than the printed size. Try several models if possible, especially if you feel pressure at the temples, forehead, or rear of the skull.
Practical rule: If you need to overtighten the retention dial to stop the helmet moving, try a different shell shape instead of forcing that helmet to work.
Set the helmet correctly
Place the helmet level on your head. The front should sit low enough to protect your forehead without obstructing your vision, while the rear should cover the back of your head without pressing into your neck. A helmet tipped backwards may look casual, but it exposes the area it needs to protect.
Adjust the side straps so they meet just below each ear. The buckle should sit comfortably under your jaw, not against your throat. The straps should lie flat and stay clear of your ears when you turn your head.
Use the fit checks recommended by local guidance. The retention system should hold the helmet securely without creating sharp pressure points. You should be able to make the appropriate finger checks around the straps and under the chin, but the helmet must not rock when you shake your head or look down.
Test movement, not just comfort
Leave the helmet on for several minutes. Walk around, bend forward, turn your head, and simulate the posture you use on climbs and descents. A helmet that feels fine for a few seconds can become uncomfortable once the dial presses against one area of your skull.
If you wear glasses, goggles, a winter cap, or a ponytail, test those combinations before buying. Don't size up just to accommodate accessories. A loose helmet can shift during a crash, and that movement can reduce the protective benefit even when the helmet itself carries valid certification.
Fit mountain bike helmets for men by stability first, comfort second, and features third. Once the helmet stays level and secure without pain, then compare ventilation, adjustment systems, visors, and impact technology.
Choosing Between Trail, Enduro, and Full-Face Helmets
The right helmet depends on what the trail can throw at you. A smooth forest loop, a long all-day trail ride, an aggressive enduro descent, and a downhill race place different demands on coverage and retention. Treating them as the same ride leads to poor choices.
Trail helmets suit open, varied riding
A trail helmet is the sensible choice for general riding, climbing, commuting between trails, and moderate descents. It usually prioritises low weight, open ventilation, an adjustable visor, and enough rear coverage for everyday mountain biking.
The compromise is obvious. Your face and jaw remain exposed, and the helmet isn't designed to provide the same coverage as a full-face model. That isn't a flaw if your riding matches the design. It becomes a problem when you take an open trail helmet onto terrain where falling over the bars, hitting trees, or sliding into rocks is a realistic possibility.
Enduro helmets add useful coverage
Enduro and all-mountain helmets generally extend farther down the rear of the head and around the sides than basic trail models. They offer a stronger sense of coverage without the enclosed feel of a chin bar. For riders who climb under their own power and descend technical tracks, this middle category often makes the most practical compromise.
You'll trade some ventilation and lightness for more shell coverage. That trade is worthwhile if your descents are steep, fast, or cluttered with rocks and roots. Look for a secure retention system, a stable rear cradle, a visor that stays put, and enough room for your eyewear.
The right category also depends on the group and terrain you ride with. A useful cycling formations guide can help riders think about group movement and positioning, but it won't replace a helmet decision based on your actual crash exposure.
Full-face helmets are the serious option
A full-face helmet protects the head while adding a chin bar and facial coverage. It makes sense for downhill riding, bike parks, steep technical tracks, jumps, and aggressive enduro where the consequence of a forward crash is high. It also makes sense for riders who value maximum coverage more than minimum weight.
You'll notice the drawbacks on the climb. Full-face helmets are warmer, heavier, and less convenient to carry. Some modern designs improve airflow and allow easier breathing, but they remain more enclosed than open-face helmets. Don't buy one because it looks serious. Buy it because your riding justifies the coverage, or because you prefer that protection.
For a deeper look at this category, use this full-face helmet guide alongside the certification requirements for your discipline.
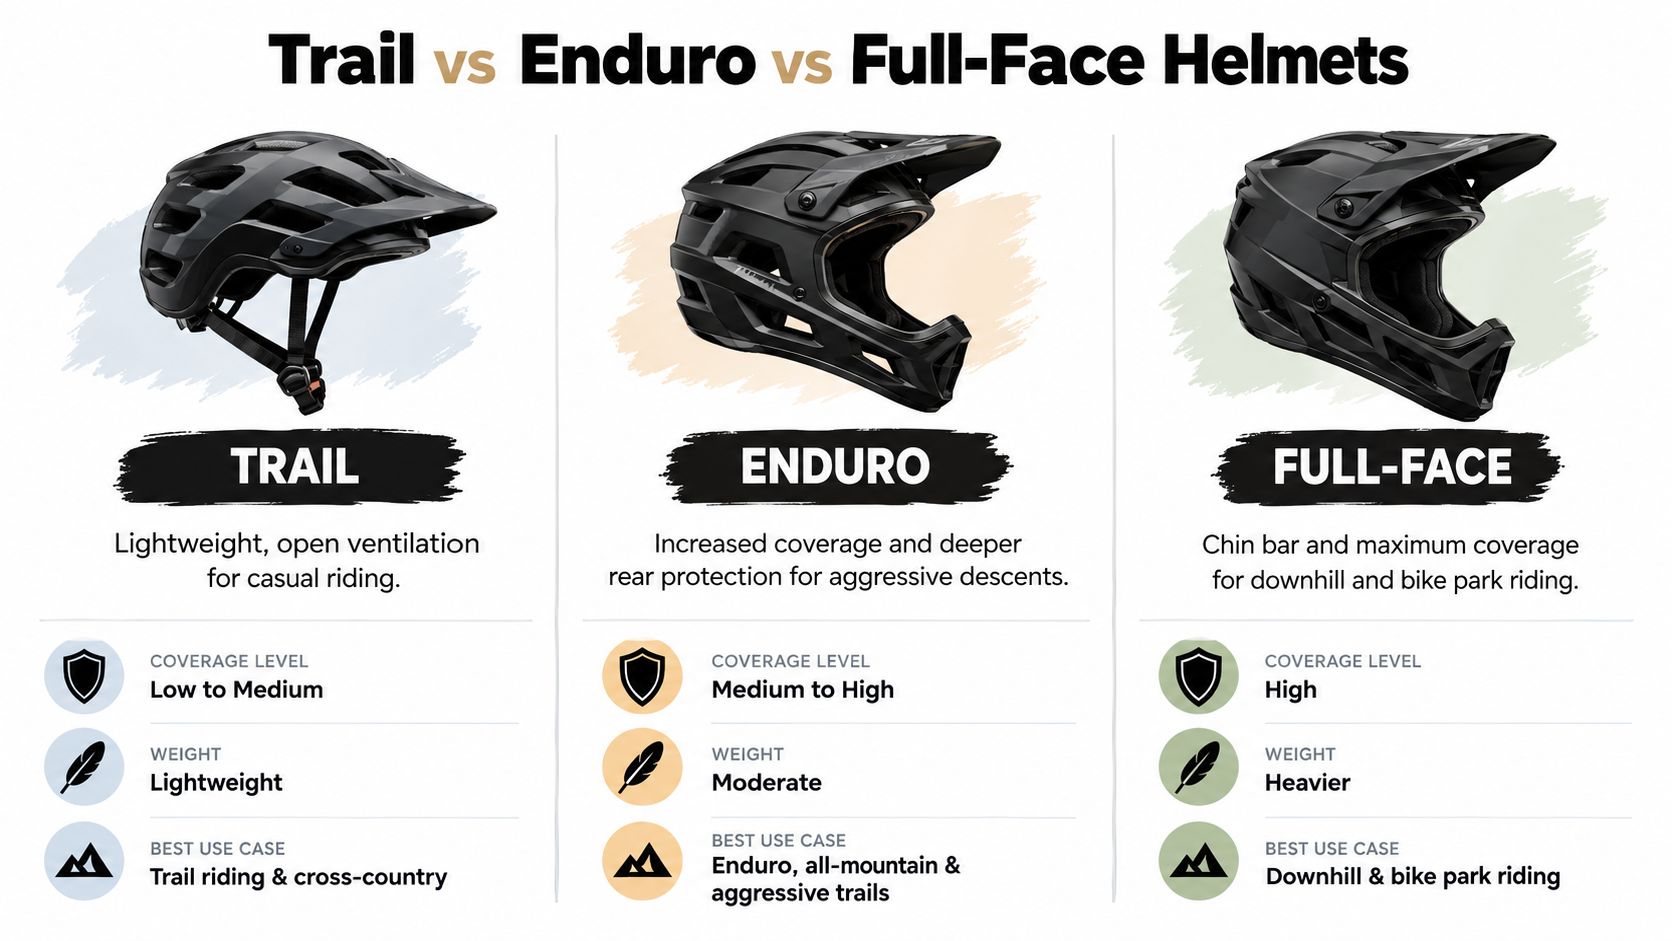
Match the helmet to the worst part of the ride
| Helmet type | Coverage | Main advantage | Best use |
|---|---|---|---|
| Trail | Open, with moderate rear coverage | Ventilation and low bulk | General trail riding and long mixed rides |
| Enduro | Deeper rear and side coverage | More protection without a chin bar | Aggressive trail and enduro descents |
| Full-face | Head, face, and jaw coverage | Maximum coverage | Downhill, bike parks, jumps, and high-risk descents |
If a ride includes a shuttle to a steep descent or a downhill course, don't let the easy access road determine the helmet. Choose for the descent. New Zealand competition rules make this especially clear, because full-face helmets are compulsory for downhill-style racing and training on-course and must meet approved certifications such as ASTM-F1952 or an equivalent standard.
Understanding Helmet Safety Standards in New Zealand
New Zealand's helmet rules are not a decorative line on a product page. They affect what you can legally wear on public roads and what race organisers can accept on demanding courses.
Bicycle helmets became mandatory in New Zealand in January 1994. The current Land Transport (Road User) Rule 2004 requires a person riding on a road to wear a securely fastened safety helmet that meets an approved standard. The approved standards listed in the regulations include AS/NZS 2063, EN 1078, and AS 2063.2. The New Zealand regulatory document on bicycle helmet requirements sets out that legal framework.
Read the certification label
Check the helmet itself, its packaging, and the manufacturer's compliance information. Look for a recognised standard, not vague wording such as “impact tested” or “race inspired”. A brand's marketing language can't substitute for an approved certification.
AS/NZS 2063 covers general bicycle helmet performance, including impact energy attenuation, helmet stability, load distribution, retention-system strength, and peripheral vision clearance. Those requirements explain why fit and strap adjustment belong alongside the standard label. A helmet must stay in position and preserve your view, not merely contain a hard outer shell.
For ordinary trail riding, an approved general cycling standard may be appropriate. For downhill racing or training on a sanctioned course, check the discipline-specific rules as well. New Zealand Mountain Bike's technical regulations identify accepted certification requirements for disciplines such as downhill, including ASTM-F1952 or equivalent standards.
Road compliance still matters off-road
A trail ride doesn't become legally separate from road rules just because most of it happens on dirt. If you ride on a public road to reach the trail, the helmet needs to meet the applicable approved standard and remain securely fastened.
That makes certification the first filter when you compare mountain bike helmets for men in New Zealand. After that, assess the fit, retention, coverage, visibility, and suitability for the discipline. Don't reverse the order because a fashionable helmet has a better colour or a more aggressive shape.
Your eyes also need protection from dust, branches, glare, and debris. For broader guidance on choosing protective eyewear, Style Site Optical's sports safety guide offers useful context. A helmet and eye protection should work together, with the visor and eyewear leaving clear sightlines rather than competing for space.
For general helmet buying considerations beyond mountain biking, this bicycle riding helmet guide provides another practical reference. The key decision remains simple: verify the standard, then make the helmet fit your head and riding.
Decoding Impact Protection Technologies
A helmet's foam liner remains the main structure that manages impact energy. The outer shell helps protect the liner, resist abrasion, and hold the design together, while the retention system keeps the helmet positioned on your head. Those fundamentals matter more than a badge printed on the side.
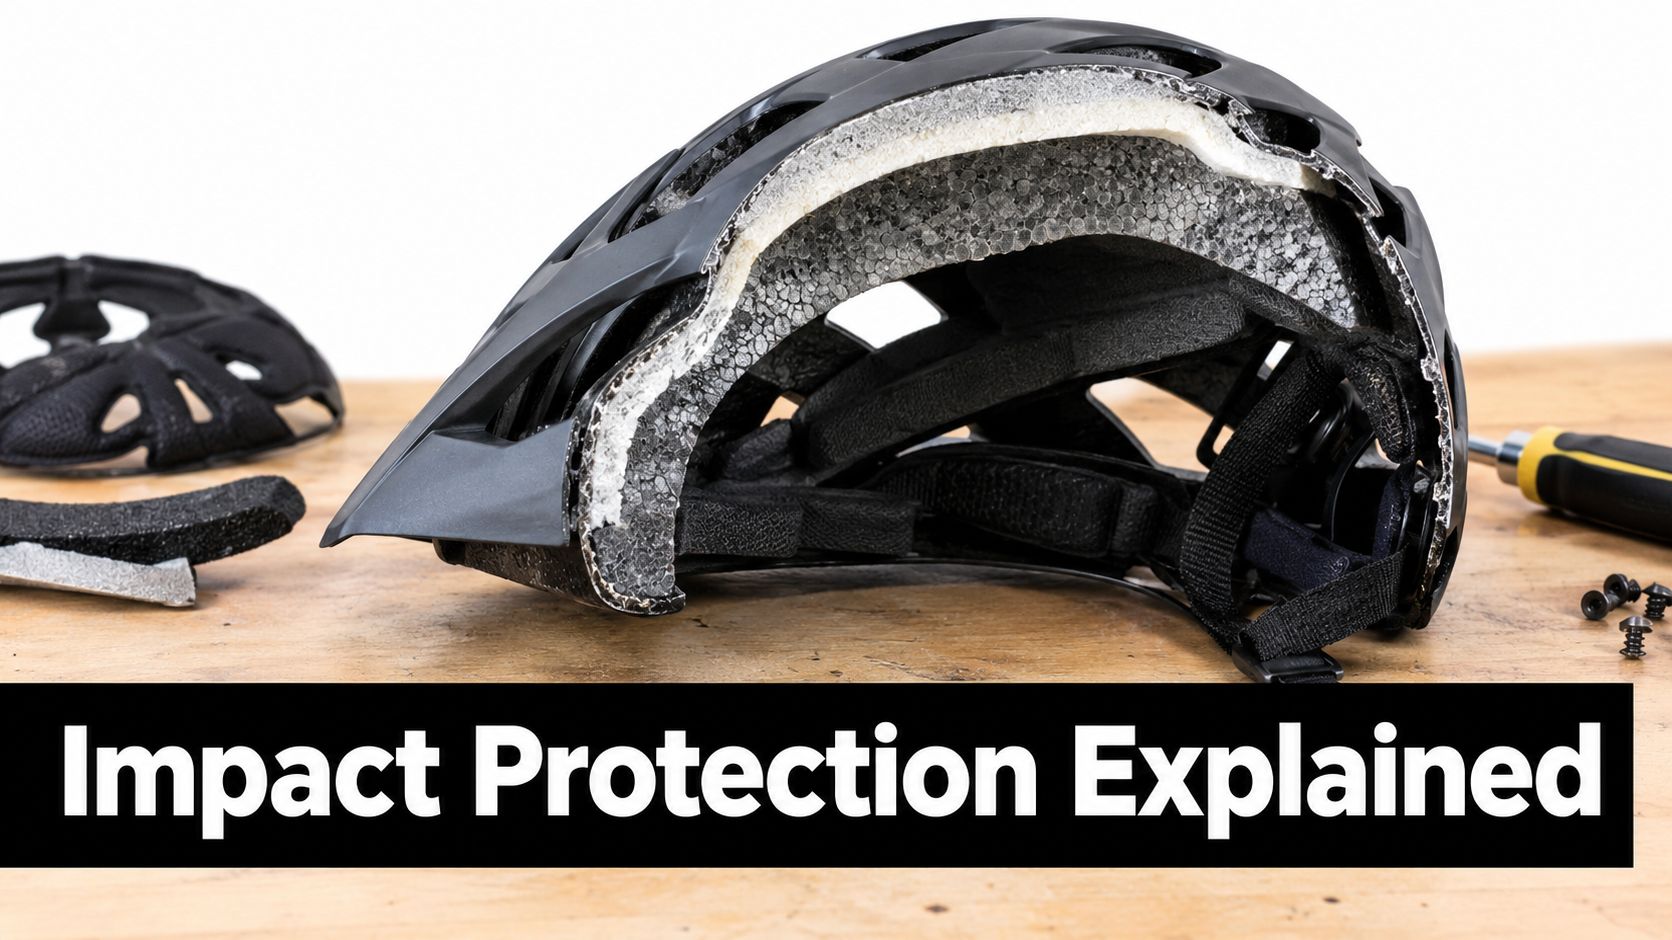
Understand rotational impact systems
Mountain bike crashes rarely happen as neat, straight-down impacts. A front wheel can catch a root, the bike can rotate, and your head can contact the ground at an angle. You might also slide across gravel or strike a tree while the helmet experiences twisting forces.
Systems marketed under names such as MIPS or SPIN are designed to address movement associated with angled impacts. They generally add an internal layer or structure that allows controlled movement between the head and the helmet during certain impacts. That design aims to manage rotational forces differently from a conventional fixed liner.
These systems don't make a helmet invincible, and they don't cancel out poor fit. An internal technology can't do its intended job properly if the helmet rocks on your head, the straps are loose, or the shell shape doesn't suit you.
Fit beats jargon: A well-fitted certified helmet without every premium feature is a better choice than an advanced helmet that moves around your head.
Judge technology in context
Treat rotational-impact technology as a useful feature, not a reason to ignore the fundamentals. First verify the certification and fit. Then consider whether the additional system, adjustment range, ventilation, and price suit the way you ride.
Inspect the inside of the helmet before buying. The system should sit comfortably without creating pressure points, and it shouldn't interfere with your glasses or cause the helmet to sit too high. Move your head from side to side and lean forward as if you're descending. If the helmet shifts, go back to fit rather than adding more tightness.
This short video provides a visual introduction to helmet construction and impact-management concepts. Use it as background, not as a replacement for checking the label and testing the fit.
The practical recommendation is straightforward. Buy the best-fitting approved helmet you can afford, then favour useful impact-management features when two options fit equally well and suit the same riding category.
Prioritizing Ventilation and Ride Comfort
A helmet that overheats your head becomes a helmet you'll eventually leave at home. Comfort affects whether you keep the helmet on during climbs, whether you stop to adjust it, and whether you finish a long ride focused on the trail instead of the pressure around your forehead.
Ventilation depends on more than the number of holes. Front openings need to capture air, internal channels need to move it across the head, and rear openings need to let warm air escape. A helmet with large openings in the wrong places can feel less effective than one with fewer but better-connected vents.
Test airflow in riding position
Try the helmet while leaning forward. Stand upright in a shop and you may miss how the padding, visor, and shell interact once your head drops for a descent. Check that the visor doesn't block your view and that the front vents remain open when you wear glasses.
A deep visor can help with sun and trail debris, but it may interfere with goggles or sit too close to your eyewear. If you switch between open-face and full-face riding, bring the goggles you use most often. Compatibility is easier to confirm before purchase than after a muddy ride.
Weight matters, but don't chase the lightest helmet at the expense of coverage or stability. For long trail rides, reduced bulk can improve comfort. For aggressive riding, a little extra material may be a sensible trade for deeper coverage and a sturdier retention system.
Keep the liner clean
Sweat, dust, sunscreen, and mud accumulate in the pads. Removable liners are easier to wash and dry, which helps the helmet stay comfortable over repeated rides. Follow the manufacturer's cleaning instructions and use mild soap with water rather than harsh solvents that can damage materials or adhesives.
Check the padding after washing. If it no longer sits flat, has separated, or leaves the retention system poorly positioned, replace the affected parts if the manufacturer offers them. Don't improvise with thick aftermarket padding that changes the helmet's intended fit.
Comfort test: Keep the helmet on long enough to discover pressure points before you pay. A five-minute shop test is more useful than a dozen anonymous reviews.
Why Buying Local in Nelson Matters
Online shopping makes comparison easy, but helmet fitting remains a hands-on job. A product page can show circumference ranges and list features, yet it can't feel the pressure at your temples or see that the rear cradle is sitting too high.
At a specialist shop in Nelson, a rider can try different shell shapes side by side and make a direct comparison. One model may pinch at the forehead, another may wobble at the rear, and a third may settle naturally with only moderate retention adjustment. That difference is difficult to solve through an algorithm.
Use experienced eyes
Good staff don't just point to the most expensive model. They check whether the helmet sits level, whether the straps meet in the right place, whether the buckle is comfortable, and whether the rear cradle holds the skull without creating a pressure point. They can also help you decide whether a trail, enduro, or full-face design matches your normal terrain.
That advice matters even more for men who assume that one size or one brand will work everywhere. Brand loyalty is useful when a shell consistently suits you, but it shouldn't override the fit you can verify in person.
A local workshop can also help with adjustments. Retention dials, side splitters, visors, and straps need to work together, and a mechanic can identify a twisted strap or poorly positioned cradle quickly. You leave with a helmet set up for your head rather than one pulled from a box and worn unchanged.
Local stock removes guesswork
Buying locally also lets you inspect the actual helmet before committing. You can check the certification label, test your eyewear, compare visor positions, and confirm that the model is suitable for the way you ride. That's more useful than ordering a helmet from overseas and discovering that the shell shape doesn't suit you.
The Nelson specialist also offers a practical route for riders who need more than a product. Local workshop support, bike advice, and access to mountain bike equipment can simplify the decision. The shop's online service includes nationwide shipping, free delivery over $100, and easy 14-day returns, so remote buyers still have a way to exchange an unsuitable fit. Confirm the current terms before ordering, as retailer policies can change.
Choose the local option when you want advice, immediate comparison, and support after the sale. For a safety item that must fit precisely, those services have more value than a small saving on an unknown online listing.
Helmet Care and When to Replace Your Gear
Treat a helmet as safety equipment, not permanent apparel. The foam liner absorbs energy through its structure, and the retention system must remain secure. Dirt, sweat, ultraviolet exposure, storage conditions, and impacts can all affect how the helmet performs over time.
There isn't a universal replacement calendar that suits every rider and every manufacturer. Instead, follow the maker's service guidance and inspect the helmet regularly. Replace it immediately after a crash or significant impact, even if you can't see a crack. Damage may be hidden inside the foam or around the retention anchors.
Clean it without damaging it
Remove the pads if the manufacturer says they're removable. Wash them with mild soap and water, rinse thoroughly, and let them air-dry away from direct heat. Wipe the shell with a damp cloth and avoid solvents, strong detergents, sprays, or hot water that can affect the shell, foam, adhesives, or straps.
Never leave the helmet in a hot vehicle or store it under direct sunlight. Keep it somewhere dry and cool, away from fuel, chemicals, tools, and sharp objects that can damage the shell. Don't modify the helmet by drilling holes, cutting the liner, or fitting unapproved attachments.
Inspect the complete system
Check the shell for cracks, dents, deep scratches, or deformation. Press gently around the surface and look for areas that feel different from the surrounding foam. Examine the straps for fraying, the buckle for reliable closure, the side adjusters for movement, and the retention cradle for broken or stretched components.
Use this checklist before a demanding ride:
- Shell: Look for visible damage, distortion, or deterioration.
- Foam liner: Check for crushing, cracks, separation, or unusual soft spots.
- Retention system: Confirm that the dial and cradle tighten smoothly and hold securely.
- Straps and buckle: Make sure they lie flat, close properly, and don't show fraying.
- Fit: Recheck that the helmet remains level and stable after cleaning or adjustment.
If a helmet has taken a crash, don't pass it to another rider or keep it as a spare. Replace it. The same principle applies to children's equipment, and this guide to children's helmets in New Zealand offers relevant practical guidance for families.
A replacement should also be considered when the helmet no longer fits because your riding setup has changed, the retention system can't hold securely, the liner has deteriorated, or the manufacturer's instructions call for retirement. Keep the purchase record and model information, because it makes it easier to identify the correct replacement pads or confirm the product's service guidance.
Rider 18 offers mountain bike helmets, including open-face and full-face options, along with fitting advice, workshop support, nationwide shipping, and easy returns. Visit Rider 18 to compare certified helmets and choose one that matches your head shape, local riding, and New Zealand's road and competition requirements.


Please upload banner from store admin blog pages