

Mountain Bike Tyres Review Guide for NZ Riders
- by Nigel
-

You're halfway through a wet corner on a Nelson trail when the front wheel suddenly disappears sideways. The roots are slick, the clay is soft, and your handlebars are no longer pointing where you want to go. Your bike might have excellent suspension and powerful brakes, but the tyre is the only part touching the trail.
That's why a mountain bike tyres review needs more than a list of aggressive tread patterns. You need to know how the casing, clearance, pressure, compound and weather conditions work together. This guide will help you read tyre reviews with a Kiwi trail in mind, then turn that information into a setup that suits your riding.
Why Your Tyres Matter More Than Your Bike
The rider in that wet Nelson corner may not have chosen the wrong bike. They may have chosen a tyre that works beautifully on dry hardpack but struggles when roots, mud and loose rock arrive together.
A tyre's tread is only one part of the picture. The rubber needs to conform to the trail, the casing needs to hold its shape under load, and the pressure needs to give the contact patch enough grip without allowing the rim to strike through. Change any of those and the same bike can feel calm, vague, fast or nervous.
New Zealand's relationship with mountain biking goes back a long way. Te Ara's history of bicycles in New Zealand records that purpose-built mountain bikes emerged in California in the 1970s, began arriving here in the early 1980s, and were being made locally by early 1984. Between 2001 and 2006, around one million bicycles were imported into New Zealand, with mountain bikes making up the majority, while mountain bikes held more than 50% of the cycle market in the mid-1990s.
That history helps explain why tyre choice matters so much here. Mountain bikes moved from a niche off-road machine into a mainstream part of cycling, and New Zealand riders needed rubber that could cope with changing conditions rather than one predictable surface.
A tyre is your bike's contact patch
Think of the tyre as your bike's shoe sole. A smooth running shoe behaves differently from a deep-soled tramping boot, but neither is automatically better. The right choice depends on the surface, the weather and how much support you need.
Practical rule: Start with the trail you actually ride, not the most dramatic-looking tyre in a review photograph.
A fast tyre can make a long ride feel easier, but it may slide earlier on wet roots. A heavily lugged tyre can claw through loose ground, but it may feel slow and vague on firm climbs. A sturdy casing can add confidence in rock gardens, even when its tread looks less aggressive than a lighter option.
Your next purchase should therefore answer three questions: What surfaces do I ride, how hard do I load the tyres, and can my frame and rims support the size I want?
Understanding Tyre Construction From Bead to Tread
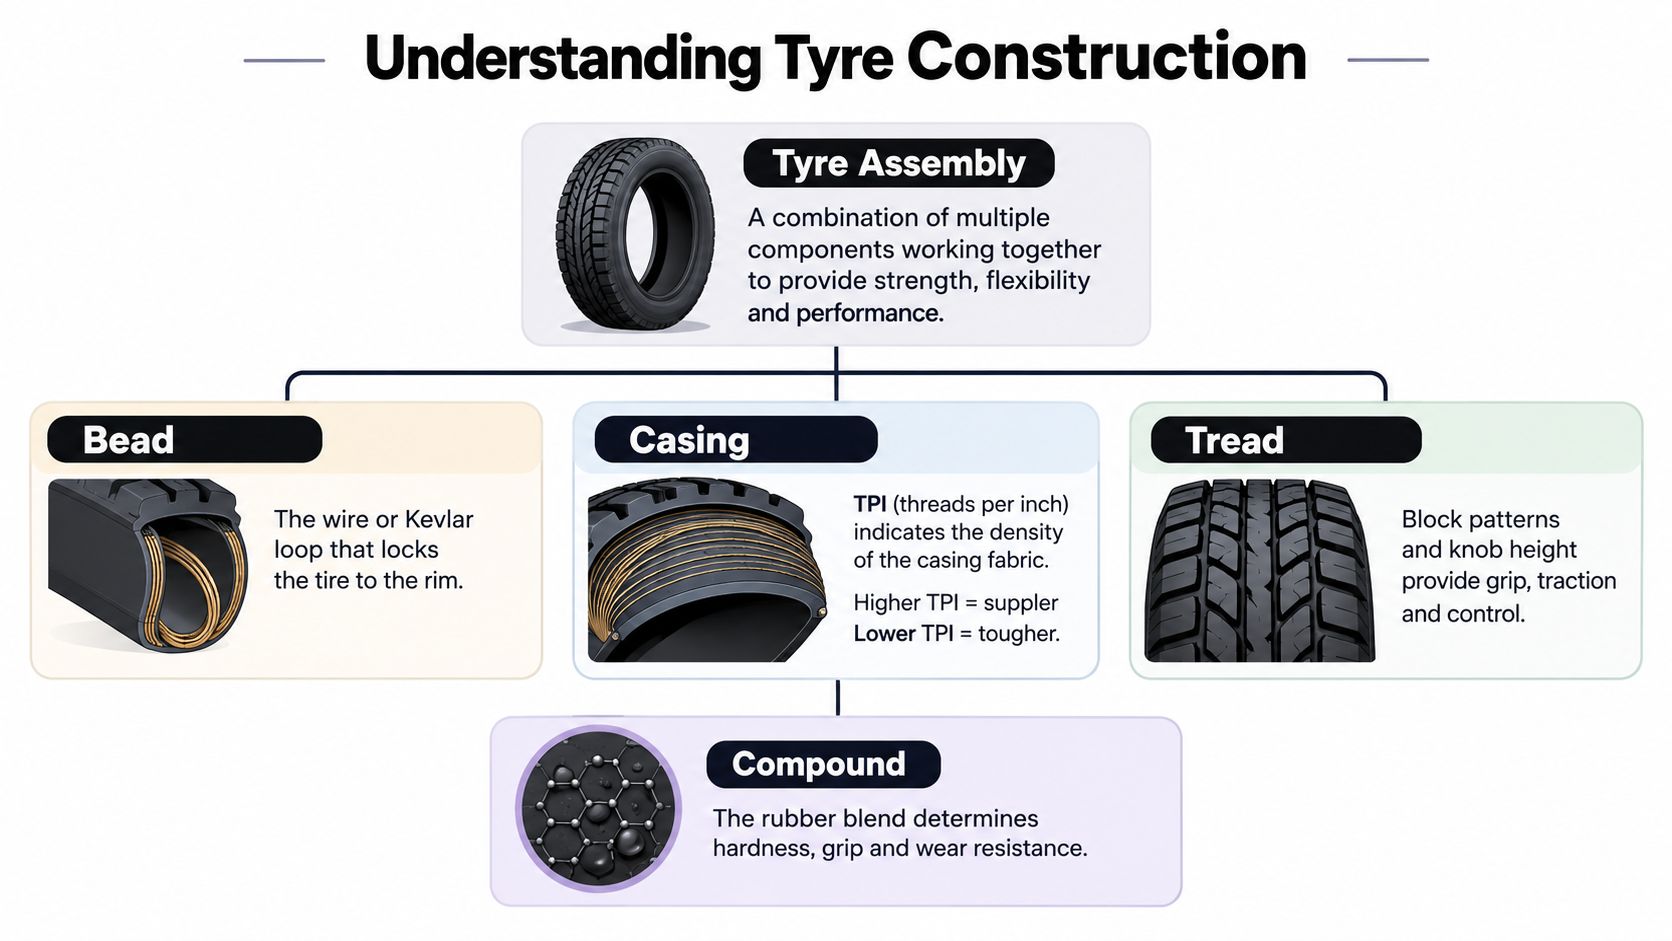
A tyre's sidewall markings can look like alphabet soup until you know what each part does. Start at the inside and work outwards, just as you would inspect a shoe from its structure to its sole.
The bead keeps everything seated
The bead is the loop that locks the tyre onto the rim. It may use wire or a lighter synthetic material, often called a folding bead. The important point is compatibility. A tyre can have the perfect tread and still be the wrong choice if it doesn't seat correctly on your rim or suit your tubeless setup.
The bead also gives the tyre its basic shape. Once inflated, it holds the casing in the correct position so the tread meets the trail evenly.
The casing is the skeleton
The casing is the tyre's supporting fabric, much like the skeleton and upper structure of a shoe. It controls how the tyre flexes, how it absorbs small impacts and how stable it feels when you lean into a corner.
TPI means threads per inch. A higher thread count generally gives a more supple casing, which can conform nicely to uneven ground. A lower thread count tends to create a tougher, more durable structure. Neither is automatically superior. A light trail rider may value flexibility, while a rider hitting sharp rock may favour support and protection.
Sidewall reinforcement adds another layer of control. NZ Mountain Biker's review of Pirelli's Trail range described beefy sidewall reinforcement that reduced tyre shape change when the tyre was leaned over. On Marlborough Sounds surfaces including loose rock, hardpack clay, mud, dirt and grass, the tested tyres delivered sure-footed front-end grip and rear drive, with zero slippage and no flats.
That matters because a tyre that folds or deforms under cornering can feel unpredictable even when its tread has plenty of knobs. For your next purchase, look for casing information if you ride rocky, rough trails, not just the compound name.
Tread and compound provide the contact
The tread is the visible part, made from a pattern of blocks or knobs. Low, closely spaced blocks usually roll efficiently, while taller and more widely spaced knobs can bite into loose or soft ground.
The compound is the rubber recipe. Softer rubber generally offers more grip, but it wears faster. Harder rubber can last longer and roll more freely, though it may offer less purchase on slick surfaces.
Think of the compound as the rubber in the sole and the tread as the shape of that sole. A deep pattern made from a hard compound may not grip a wet root as well as a shallower pattern made from softer rubber. Your next purchase should balance compound, casing and tread rather than choosing by knob height alone.
Matching Tread Patterns and Sizes to Your Trails
A tread pattern should match the surfaces that cause you trouble, not just the surfaces you hope to ride. Nelson and Marlborough can serve up firm clay, loose rock, damp roots, grass and mud within one outing, so an all-purpose option often makes more sense than an extreme mud or race tyre.
| Tread Type | Best Terrain | Trade-off |
|---|---|---|
| Low, closely spaced knobs | Dry hardpack, firm clay and smoother linking trails | Rolls efficiently but offers less bite in deep mud and loose corners |
| All-round trail pattern | Mixed hardpack, roots, loose rock and changing weather | Balances speed and grip without specialising in one surface |
| Tall, widely spaced knobs | Soft mud, loose soil and steep technical ground | Clears soft material well but can feel slower on firm trails |
A fast-rolling centre can suit riders who pedal long distances or spend plenty of time on smoother trail. A more open pattern can shed mud and find edges in soft ground. Shoulder knobs matter when you lean, but they still need a stable casing underneath them.
Size starts with clearance
The NZ Cycle Trail guide to choosing a bikepacking bike says the most common bikepacking bike in New Zealand is a 29er hardtail with front suspension and 2.2-inch tyres, and that 2.2-inch tyres are the most popular choice in Tour Aotearoa. It also recommends 5–10 mm of clearance on each side and identifies 1.6 inch, or 40 mm, as the minimum sensible width for avoiding rubbing in muddy conditions.
Those figures are a useful reference, not a permission slip to fit the widest tyre available. Measure the frame, fork and current rim before ordering. Check the tightest point around the seat stays, chain stays, fork crown and mud clearance. Mud occupies the space that looks generous in a clean workshop.
Rim width changes the tyre's profile as well. A suitable rim can support the sidewalls and present the tread in the shape the designer intended. An unsuitable rim may make the tyre feel too rounded, too square or poorly supported, even when the labelled width is correct.
Your next purchase should be the widest compatible tyre with reliable clearance, not the widest tyre on the product page.
Tubeless Setup and Pressure Tuning That Works
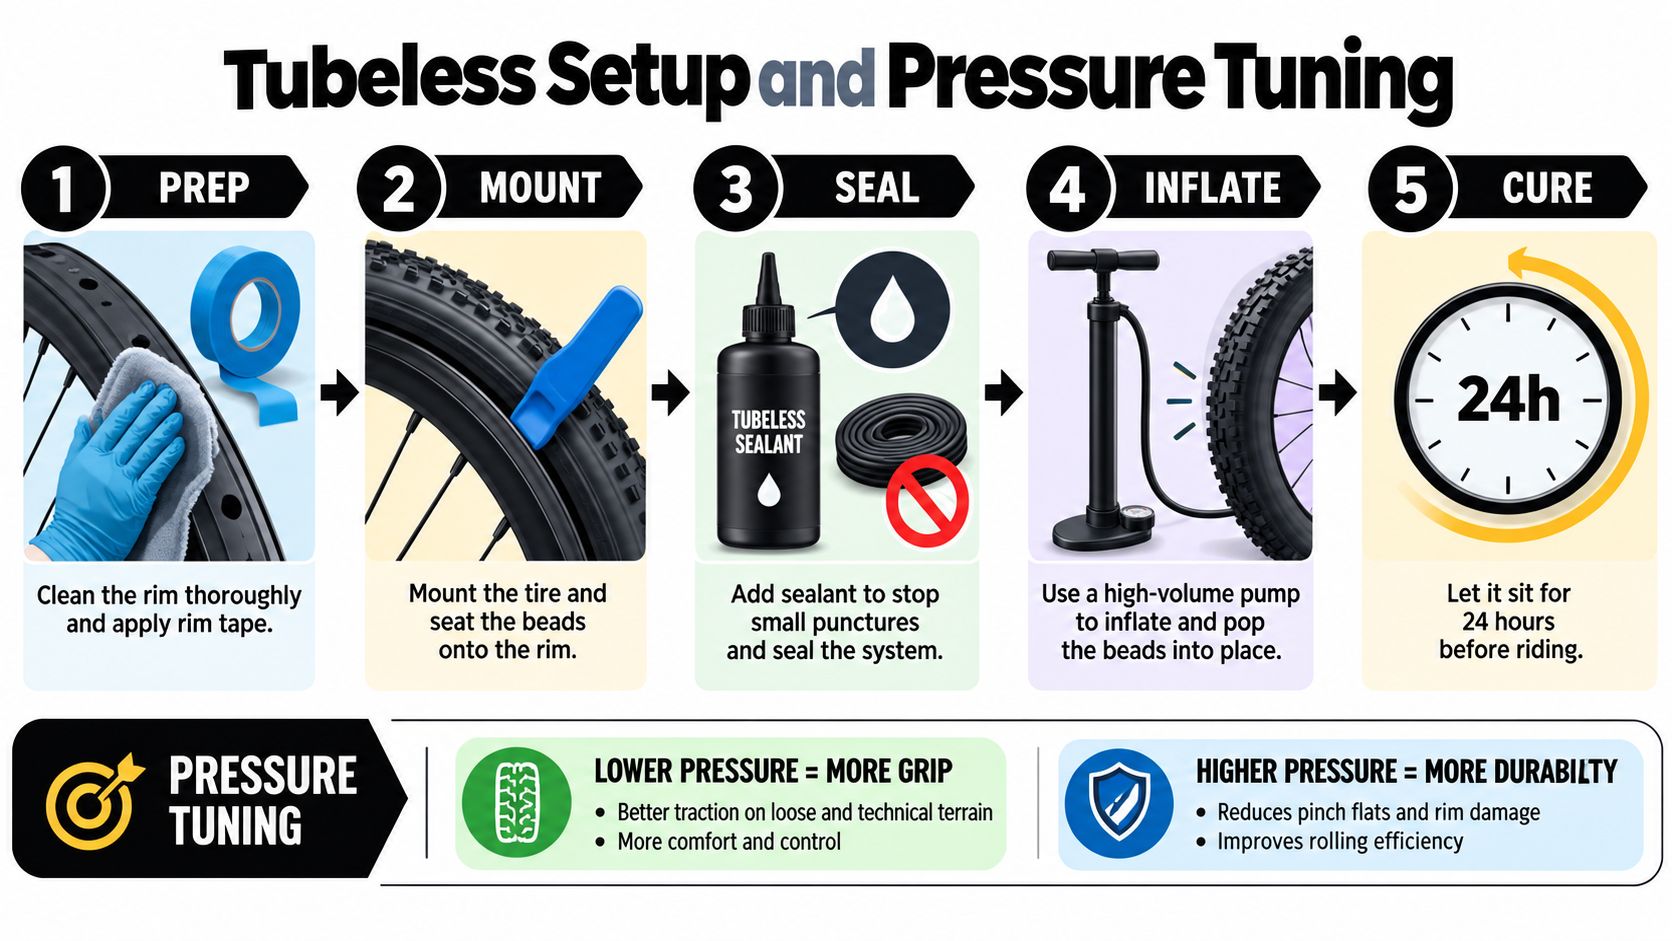
Tubeless tyres replace the inner tube with an airtight rim and sealant system. Sealant can close small punctures while you ride, but installation takes care. You need clean rim tape, a compatible valve, a properly seated bead and enough sealant for the tyre system.
Tubes remain simple and familiar. They're easy to replace at the trailhead, while tubeless setups can reduce the risk of small punctures and let you tune pressure without relying on a tube. If you ride sharp rock or frequently pinch tubes, tubeless is worth considering. If you prefer the quickest roadside repair, carrying a spare tube still makes sense.
Pressure is a handling adjustment
Pressure changes the size of the tyre's contact patch and the amount of support beneath you. Lower pressure can improve grip and comfort, but too little pressure increases the chance of rim impacts, burping or sidewall damage. Higher pressure protects the rim and rolls crisply, but can skip across roots instead of conforming to them.
A New Zealand MTB tyre buying guide recommends starting around 19 psi front and 22 psi rear for a 60–70 kg rider on trail tyres. Its starting points rise to 21/23 psi for a 70–80 kg rider and 24/25 psi for an 80–90 kg rider. The guide also recommends slightly lower pressures for downhill and enduro, and higher pressures for cross-country riding.
The rear runs firmer because it carries more of the rider's load and takes more direct impact. The front is commonly set 2–3 psi softer than the rear, giving it a little more ability to mould around roots and loose edges.
For a practical installation walkthrough, use this guide to setting up tubeless tyres.
Once the tyre is seated, check pressure before every ride and adjust one change at a time. If the rim is striking, add pressure or choose a more supportive casing. If the tyre feels harsh and skips across wet roots, try a small reduction while keeping enough support for your terrain.
This video demonstrates the basic tubeless process:
Your next purchase should include a pressure plan. A good tyre can't rescue a setup that is badly inflated.
How to Read a Mountain Bike Tyres Review Critically
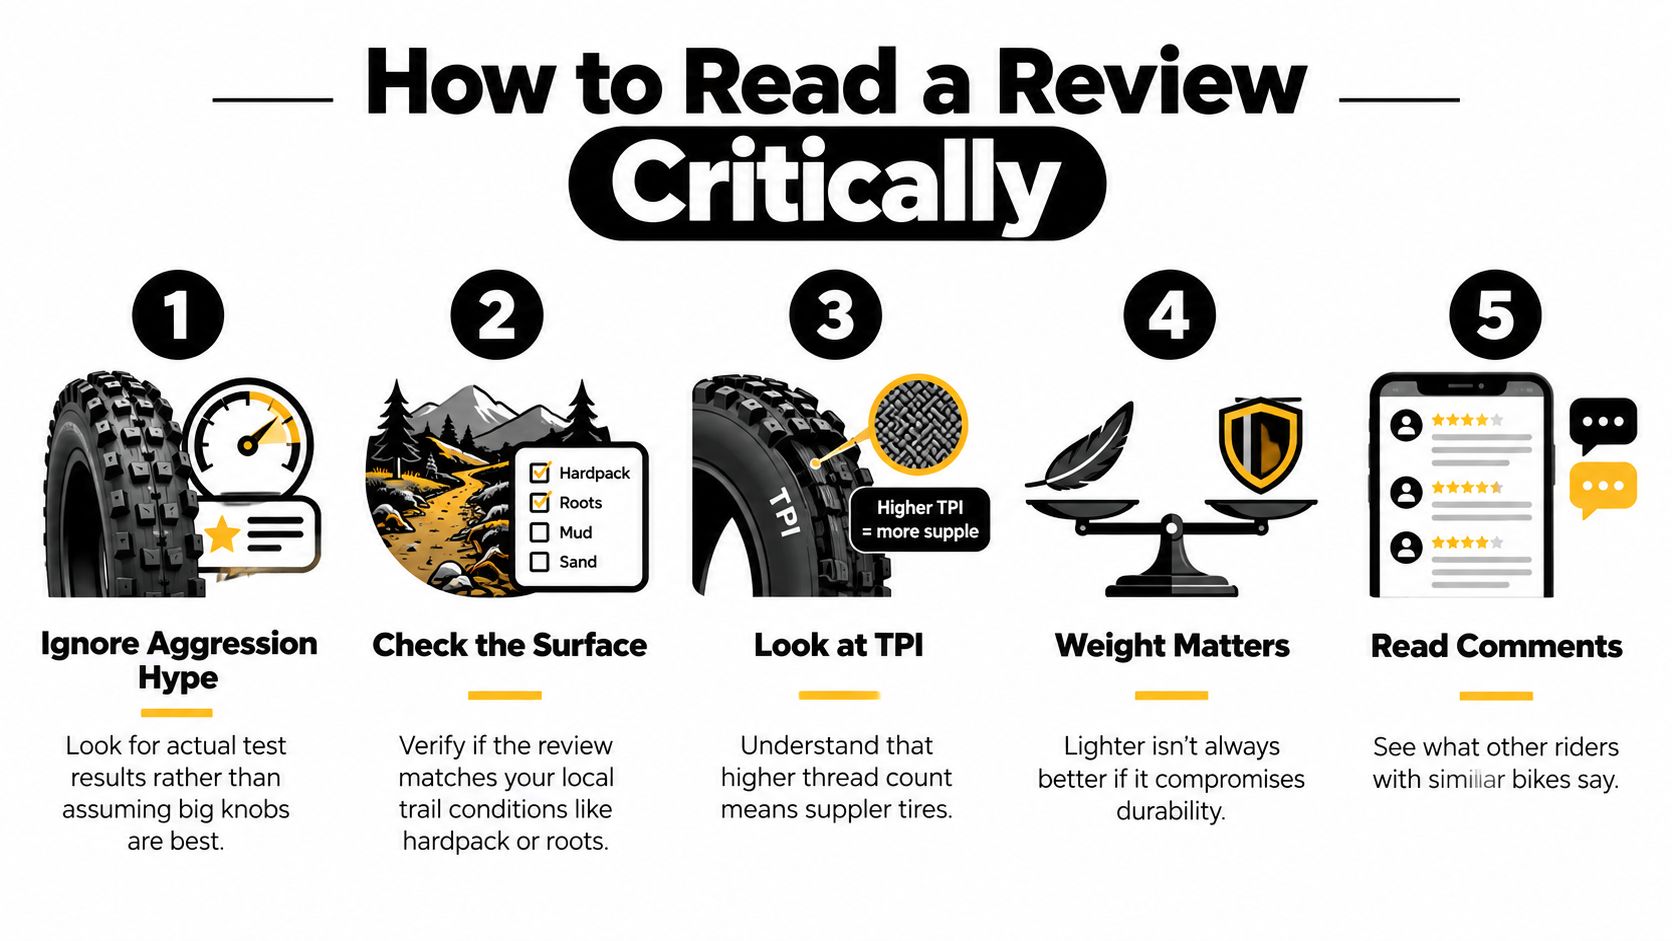
The most aggressive tread isn't automatically the safest choice. Big knobs can help in loose ground, but they don't guarantee grip on wet roots, and they may add drag on firm climbs. A supported casing, suitable pressure and effective puncture protection can matter more than maximum knob height on mixed New Zealand trails.
Most reviews use familiar categories: tread pattern, carcass support, puncture protection, rolling speed, longevity and value. Those categories are useful, but they often leave out the details a Kiwi rider needs. Was the tyre tested on wet roots or dry hardpack? Did the tester change pressure? Was the front tyre different from the rear? How quickly did a soft compound wear on abrasive rock?
Ask better questions of every review
Read a review as a set of test conditions, not as a universal verdict.
- Check the surface: Look for hardpack, roots, loose rock, clay and mud that resemble your local trails.
- Find the casing details: A review that only praises grip may miss the support you need for rough descents.
- Separate front and rear jobs: The front tyre usually needs predictable cornering, while the rear may prioritise drive and rolling speed.
- Read the wear comments: A softer compound may feel excellent but need replacement sooner on abrasive terrain.
- Look for setup information: Pressure, rim width, tubeless use and rider weight change the result.
BikeRadar's guide to mountain bike tyres reflects the broader review pattern, where generic performance categories receive more attention than regional weather and terrain. That gap explains why a tyre praised overseas may feel disappointing on a damp Nelson root section.
Run your own controlled test
Choose a familiar loop with a climb, a corner, a rough section and a surface that normally challenges you. Record the tyre model, casing, pressure and weather, then change only one variable on the next ride.
A useful comparison might involve the same tyre at a slightly different pressure, or the same pressure with a different rear casing. Notice braking confidence, front-end tracking, rolling feel, sidewall support and any rim strikes. Your next purchase should follow the pattern you can feel repeatedly on your own trails, not a headline built around the word “aggressive”.
Recommended Setups for Nelson and NZ Trail Conditions
A useful setup doesn't begin with a brand list. It begins with the job each wheel must perform. The front tyre steers and absorbs changes in direction, while the rear tyre handles drive, braking load and frequent impacts.
Mixed trail riding
For Nelson's mixed hardpack and rooty trails, start with an all-round trail tread rather than the deepest available knobs. A grippier front paired with a faster-rolling rear can give you steering confidence without making every easy section feel like work.
Choose a casing with enough sidewall support for your riding style. If you regularly hit rocks at speed or carry extra load, a tougher construction may be more useful than a lighter tyre. Set pressure conservatively at first, then tune it around grip and rim protection.
Enduro and downhill
Steeper, rougher descents place more demand on the casing and sidewalls. A reinforced front tyre can help keep the steering line stable when you lean hard, while a tougher rear casing protects against the impacts that arrive when braking through rock gardens.
A more open tread can make sense where loose material covers the trail, but don't assume it will solve every wet-root problem. Pressure, compound and casing still decide how the knobs meet the ground. Slightly lower pressure may improve traction for gravity riding, provided the tyre remains supported and the rim stays protected.
For riders comparing options, mountain bike tyres from Maxxis can be assessed using the same questions: front and rear role, casing strength, tread suitability, clearance and pressure range.
Bikepacking and longer rides
Longer trips favour predictable handling, durability and easy clearance. The 29er hardtail and 2.2-inch tyre combination described earlier is a practical reference for New Zealand bikepacking, but your own frame and rim remain the final authority.
Avoid a fit that leaves only a narrow gap around the stays. Mud can turn a comfortable-looking setup into a rubbing problem, and a tyre that contacts the frame can damage both parts.
Think about the cost of grip
Softer rubber can deliver useful confidence on wet or technical ground, but it wears faster. A harder-wearing rear with a grippier front may offer a sensible compromise for riders who pedal frequently, while a matched soft set may suit someone who values maximum traction for shorter, more technical rides.
The Michelin guide to choosing a bike tyre highlights the fit, rim and compound trade-offs that often get overlooked in buying decisions. Your next purchase should account for replacement access and riding frequency, not just the initial price.
Maintenance, Buying Smart and Where Rider 18 Fits In
A good tyre setup needs a small routine. Before a ride, inspect the tread for embedded sharp material and check the sidewalls for cuts, bulges or exposed casing. After a rough outing, look closely at the rim contact area and confirm that the bead remains seated.
Rear tyres often wear sooner because they carry more load and handle drive and braking forces. Rotating tyres can help even out wear where the tread direction and condition make that appropriate, but don't move a damaged tyre to the front just to get more use from it. Front-end reliability deserves priority.
Keep the system ready
Tubeless sealant doesn't last forever. Check its condition periodically, especially if the bike has been stored or the tyre has suffered repeated punctures. Recheck pressure when temperatures change, because a pressure that felt right on one ride may not feel the same in different conditions.
Carry a pump, tyre levers, a tubeless plug kit and a tube for serious failures. This mountain bike tyre repair kit guide can help you organise the essentials before heading into the hills.
Your buying checklist is simple:
- Confirm clearance: Measure the frame and fork, including space for mud.
- Match the rim: Check the recommended rim range and tubeless compatibility.
- Choose the casing: Prioritise support if rocky impacts are common.
- Plan availability: Consider how easily you can replace the tyre locally.
- Ask for fitting help: A workshop can check seating, pressure and rubbing before a problem reaches the trail.
A Nelson-based bike shop with deep mountain bike stock can help riders compare tyres, wheels, components and workshop requirements in one place. That kind of local support is useful when the correct choice depends on frame fit, rim width and the conditions outside the shop, rather than on a product description alone. Riders managing recurring discomfort can also review practical resources such as knee support for active cyclists alongside their broader riding setup.
The right mountain bike tyres review should leave you with a decision you can explain: why that tread suits your trails, why that casing protects your wheels, why the tyre clears your frame and how you'll tune the pressure.
Visit Rider 18 to compare mountain bike tyres, components and workshop support for New Zealand riding. If you're unsure about casing, clearance or tubeless fit, contact the Nelson team before ordering and set up your next ride with advice that matches the trails you use.


