

How to Adjust Derailleur Limit Screws Correctly
- by Nigel
-

You're halfway up a climb when the chain skips. Back home, with the rear wheel lifted, you spot the small screws on the derailleur and wonder whether a quick turn will sort it. Before reaching for a screwdriver, separate two jobs: making the gears shift cleanly and stopping the chain from travelling somewhere it shouldn't. Learning how to adjust derailleur limit screws starts with that distinction.
Why Derailleur Limit Screws Matter More Than You Think
A skipping chain doesn't automatically mean a limit screw needs adjusting. The important question is where it happens: at the edge of the cassette, or somewhere in the middle? Limit screws control the ends of the derailleur's travel, not every gear change between them.
The H, or high-limit, screw controls movement towards the smallest rear sprocket. The L, or low-limit, screw controls movement towards the largest sprocket, beside the spokes. These are mechanical boundaries, not general-purpose tuning screws.
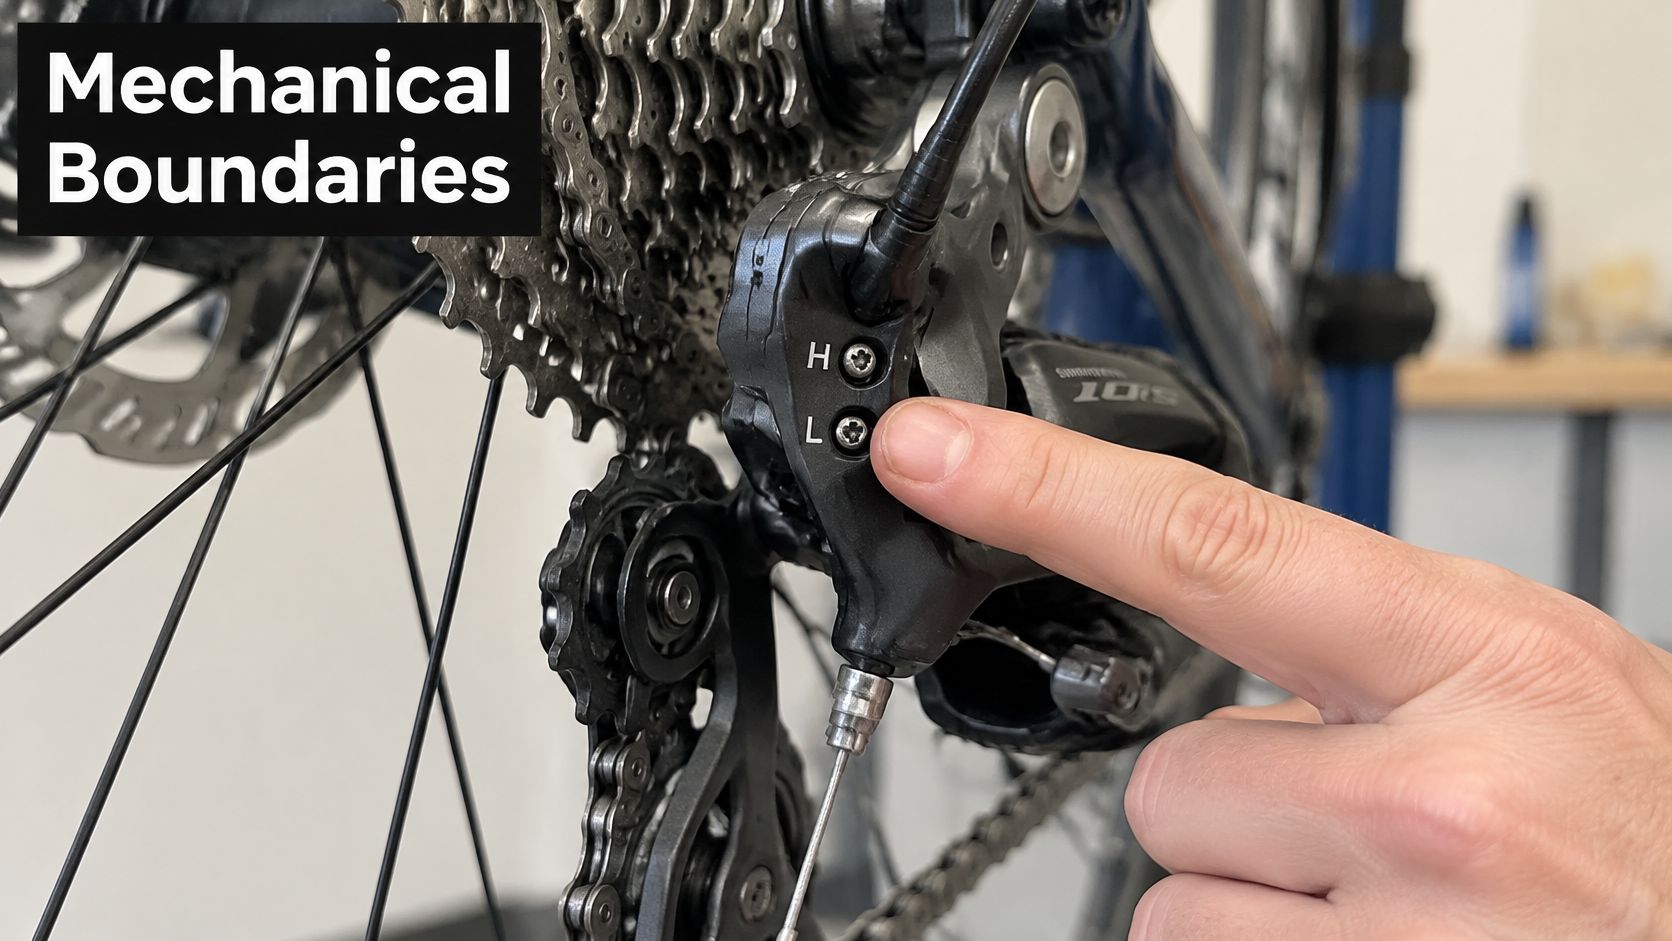
Think containment before performance
Allow too much travel and the chain can leave the cassette. Restrict travel too much and you lose access to an end sprocket, or the chain runs poorly there. The useful setting allows the intended gear without permitting movement beyond it.
New Zealand's cycling-safety history gives this maintenance a wider context. Cyclists have a higher injury risk per distance travelled than drivers, as discussed in Te Ara's account of bicycle safety in New Zealand. That doesn't establish how many crashes involve derailleur faults, but it supports a straightforward approach: prevent avoidable mechanical failures alongside checking brakes, tyres, wheels and chain condition.
Practical rule: Treat a limit screw as a guardrail. Don't move the guardrail to compensate for a different fault.
Check those boundaries after fitting a derailleur, replacing a wheel or cassette, changing cable tension, or transporting an e-bike. You're confirming that the assembled bike still has safe, usable travel, rather than assuming an earlier adjustment remains correct.
Tools and Pre-Checks Before You Touch a Screw
Secure the bicycle so the rear wheel can turn freely without the bike tipping. Rotate the cranks by hand and watch the chain move through the cassette. Keep fingers, clothing and tools clear of the moving drivetrain.
Before adjusting anything, inspect the derailleur hanger, the mounting point between the frame and derailleur. A bent hanger must be addressed before limit tuning; otherwise, you're adjusting stops around a misaligned mechanism. NZTA's bike buyer's guide recommends checking for hanger bending or cracking and checking that gears shift crisply with the rear wheel lifted.
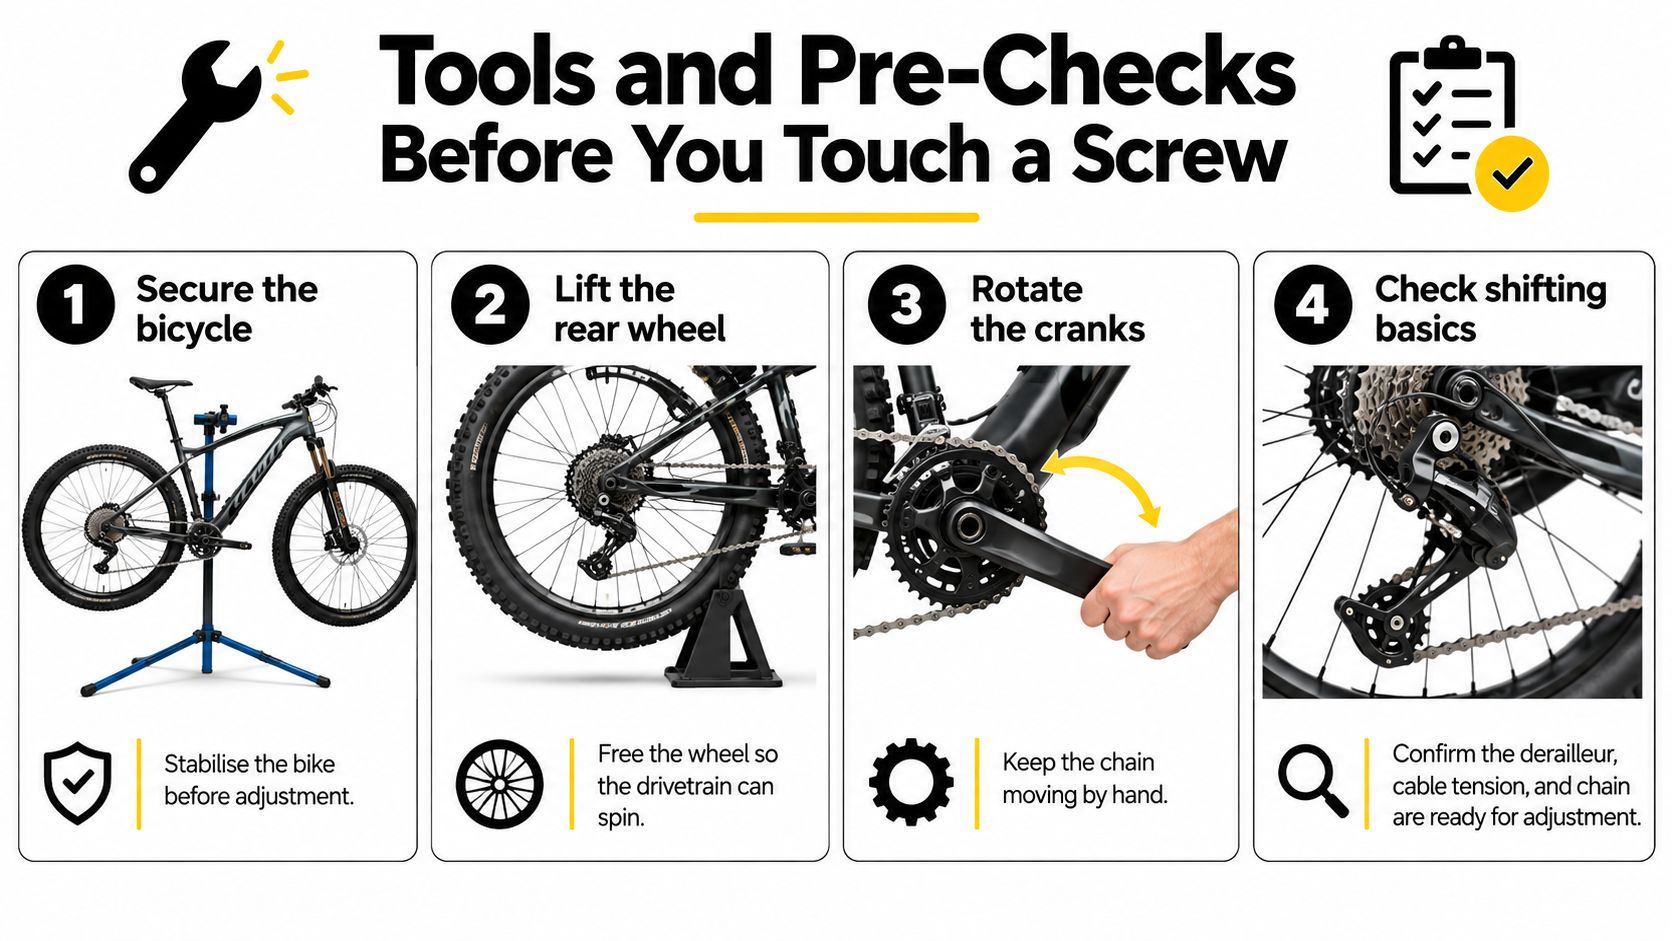
Put the right tools within reach
Use a screwdriver or Allen key that fits the adjustment screw properly. A poor fit makes controlled changes difficult and risks damaging the screw head.
| Tool | What it's for |
|---|---|
| Correctly fitting screwdriver or Allen key | Turning the identified adjustment screw |
| Derailleur-alignment tool | Checking hanger alignment rather than relying on appearance |
| Cable cutters | Replacing damaged shift cable or housing |
| Torque wrench and suitable bits | Securing disturbed fasteners to the manufacturer's specification |
| Secure repair stand | Supporting the bike while the rear wheel turns |
Check cable condition and tension before blaming a stop screw. Then confirm that the rear wheel is seated and secured correctly, because your alignment check needs the cassette in its proper position. Don't loosen fasteners unnecessarily just because the tools are available.
Your readiness check should be short:
- Stable support: The bicycle stays put while you turn the cranks.
- Sound mounting: There's no apparent hanger damage or loose derailleur.
- Usable cable: No fraying or obvious damage needs attention first.
- Correct identification: You can distinguish H and L using the manufacturer's markings or instructions.
Setting the High and Low Limit Screws in Order
Work slowly enough to see what each adjustment changes. The sequence below applies to a conventional mechanical rear derailleur; use the model's service instructions wherever its procedure differs.
Use this sequence as a visual reminder while working at the stand.
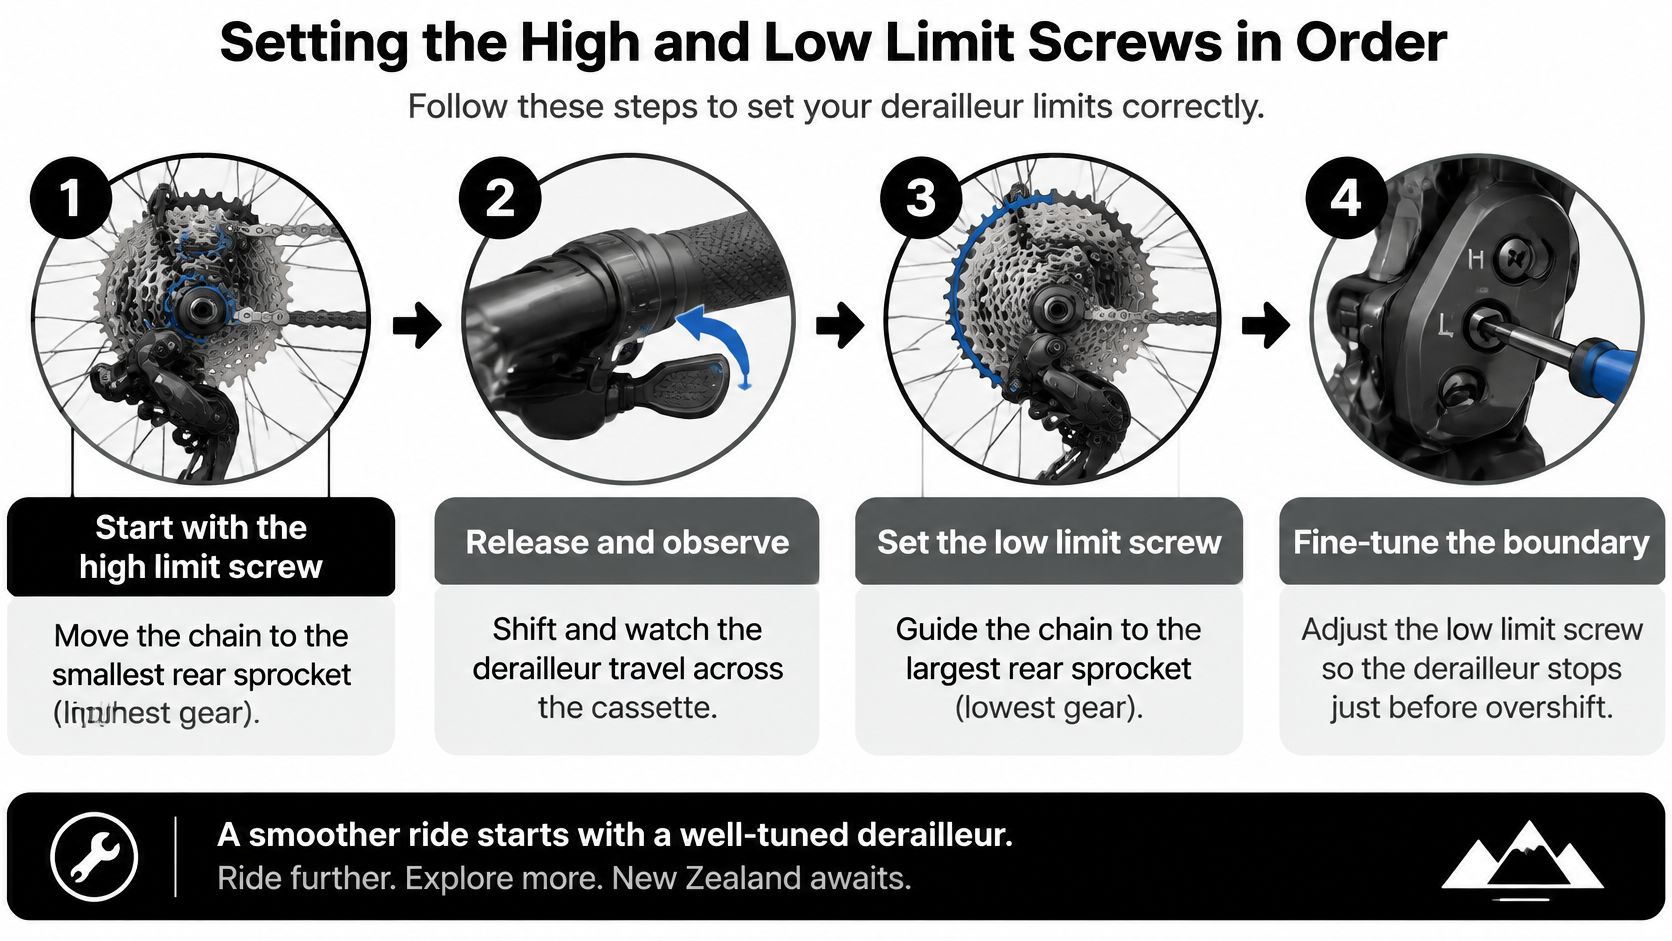
Set the high limit first
Select the smallest rear sprocket. Release cable tension if necessary so you aren't mistaking cable restraint for the mechanical stop. Viewed from behind, the upper jockey wheel should sit vertically aligned with that sprocket.
Make tiny changes, then rotate the cranks and observe the result. Don't assume clockwise or anticlockwise instructions apply universally: screw layout and adjustment details depend on the derailleur. Follow its markings and service manual, and never force a screw that resists turning.
Approach the low limit carefully
Restore enough cable control to shift towards the largest rear sprocket, following the manufacturer's cable-attachment procedure. Approach it cautiously while pedalling by hand. If the chain or derailleur moves towards the spokes, stop rather than completing the shift.
Set the low-limit boundary so the upper jockey wheel aligns with the largest sprocket without allowing overshift. The aim isn't only to make the chain reach that sprocket; it must also remain contained there.
Stop turning the cranks if the chain starts leaving the cassette. An overshift isn't something to pedal through.
Finish the cable setup, then use the barrel adjuster to index the gears. Test the complete cassette in both directions, checking that each selected gear engages cleanly. Don't keep changing a limit screw to chase hesitation between intermediate sprockets.
If your bike has a front derailleur, treat that as a separate setup. Its limit adjustment must contain the chain at the chainrings, but cage positioning and cable setup also matter. Use the specific front-derailleur procedure rather than transferring the rear alignment method to it.
For a moving demonstration alongside the written procedure, use the video below.
How Limit Screw Adjustment Differs on E-Bikes and Modern Drivetrains
An e-bike still needs a safe shifting boundary, but its weight, assistance and drivetrain configuration change how you approach the job. Secure support matters particularly here. Don't start turning the cranks while you're also trying to hold a heavy bicycle upright.
For workshop checks, keep motor assistance off. During a subsequent controlled riding check, use reduced assistance or leave it off, and avoid heavy pedal torque while shifting. You're checking whether the setup works, not stress-testing an uncertain drivetrain on a steep climb.
Derailleur Configurations and What Changes for Limit Screw Setup
These categories overlap. An e-bike may have mechanical shifting and a clutch derailleur, so apply every relevant check.
| Configuration | Extra pre-check | Testing note | When to escalate |
|---|---|---|---|
| Mechanical shifting | Inspect cable condition and confirm cable tension isn't disguising the stop | Complete cable indexing after setting the boundaries | Cable movement remains sticky or inconsistent |
| Electronic shifting | Identify the exact model's adjustment and limit-setting procedure | Use its prescribed setup process, not cable-adjustment instructions | The procedure or available adjustments are unclear |
| Clutch rear derailleur | Check the manufacturer's clutch instructions before setup | Don't assume clutch behaviour diagnoses a limit fault | Resistance or movement remains unexplained |
| Non-clutch rear derailleur | Confirm normal movement and sound mounting | Judge containment and gear engagement directly | There's looseness or damaged movement |
| E-bike drivetrain | Confirm secure support and the assistance state | Avoid high-torque testing; verify containment before riding | Safe testing or support isn't possible |
Correct limits belong to the complete assembly, not the derailleur in isolation. The cassette, chain, hanger alignment, wheel seating and cable or electronic setup all need to agree. A setting copied from another bike isn't a reliable starting specification.
For component-specific context, the Microshift Advent X guide is relevant when identifying that drivetrain. It doesn't replace the service instructions for the actual model fitted.
This matters for everyday transport as well as trail riding. NZTA reports that 67% of e-bike riders cycle at least weekly, compared with 52% of push-bike riders, in its walking, cycling and micromobility research. A repeatable setup check is more useful than a quick adjustment that seems acceptable only on the stand.
Signs Your Limit Screws Are Out of Adjustment
Where the fault happens is your strongest starting clue. Trouble at an end sprocket can involve a limit setting. Trouble across the middle of the cassette calls for a wider inspection, particularly of indexing, cable movement and alignment.
Don't treat a symptom as proof. A chain moving towards the spokes demands immediate attention, but a bent hanger or damaged derailleur can also undermine containment. Correcting the screw without checking the mechanism may leave the underlying problem untouched.
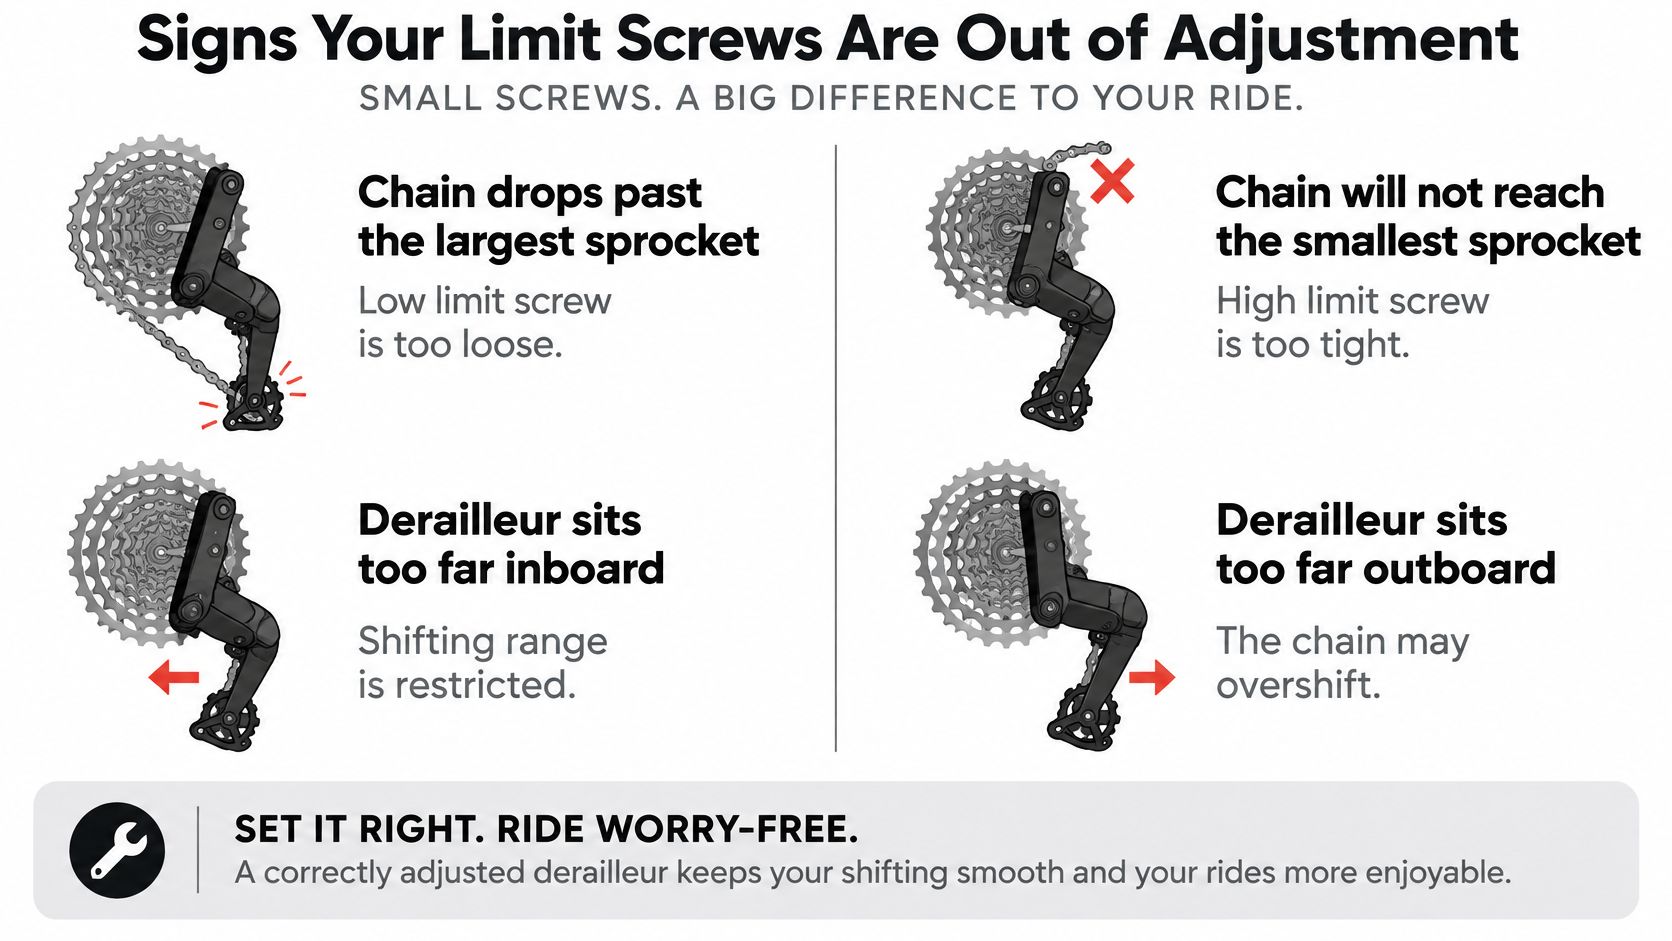
| What you notice | What to investigate | Sensible next action |
|---|---|---|
| Chain travels past the largest sprocket | Excessive inward travel, hanger alignment or derailleur damage | Stop pedalling and inspect before further testing |
| Chain falls beyond the smallest sprocket | Excessive outward travel or misalignment | Recheck the high-limit boundary and mounting |
| Smallest sprocket won't engage | Restrictive high limit, cable restraint or alignment | Separate cable influence from the mechanical stop |
| Largest sprocket won't engage | Restrictive low limit or another setup fault | Observe the approach without forcing the shift |
| Rub or hesitation between intermediate sprockets | Indexing, cable friction or alignment | Leave the end stops alone while isolating the cause |
| Skipping persists under pedal pressure | Chain condition, cassette wear or other damage | Arrange a wear and alignment check |
Distinguish lost range from unsafe travel
A restrictive stop can prevent gear access. An overly permissive stop can expose the wheel or drivetrain to a derailed chain, so deal with uncontrolled travel before riding again.
Diagnostic shortcut: If the problem occurs away from either end of the cassette, don't start by changing the end stops.
Watch the mechanism rather than relying only on noise. Note which sprocket causes trouble, whether the fault happens in both shifting directions, and whether it appears only under load. Those observations help a mechanic distinguish adjustment trouble from worn or damaged parts.
Troubleshooting When Screw Adjustments Stop Working
If small, controlled limit changes don't improve the relevant end-of-cassette behaviour, stop adjusting. Turning both screws repeatedly removes your useful reference points. Large changes make it harder to identify what helped and can introduce an unsafe boundary.
Work through the remaining causes in a deliberate order:
- Cable friction: Check whether the cable and housing allow consistent movement.
- Hanger alignment: Investigate misalignment rather than compensating with the stops. The derailleur-hanger alignment guide explains this separate job.
- Derailleur condition: Look for damage, insecure mounting or unexplained wobble.
- Drivetrain condition: Inspect the chain and cassette for wear, damage and contamination.
Know when the workshop is the next step
Rough or absent gear changes, frayed cables, broken cog teeth and a wobbly derailleur are reasons to seek mechanical attention, as outlined in BikeReady's bicycle-check guidance. More screw turning won't repair those faults.
A successful stand test is necessary, but it isn't the entire check. Once the drivetrain is safely contained and visibly sound, make a gentle riding check away from traffic. If it skips under load, stop and investigate rather than adding pedal force.
After wet Nelson rides, clean contamination from the chain and lubricate appropriately. Wipe away excess and keep lubricant off braking surfaces. Otherwise, you may be trying to assess an adjustment through dirt and poor chain movement.
Making Limit Screw Checks a Repeatable Habit
Keep the final check consistent: inspect the smallest sprocket boundary, inspect the largest sprocket boundary, then turn the cranks by hand through every gear. Recheck indexing after any adjustment and follow the manufacturer's markings rather than a remembered screw direction.
- After drivetrain work: Repeat the full functional check before returning the bike to use.
- For family bikes: Include shifting condition in the same routine as brakes, tyres and wheel security.
- When faults persist: Book an alignment and wear inspection instead of repeating the adjustment.
Basic maintenance deserves attention on children's bikes too. NZTA's cycling-safety research describes poor helmet condition or fit, or bicycle-maintenance deficiencies, in approximately 40% of a sample of 215 students aged 8–12. That isn't a derailleur-fault rate, but it reinforces the value of routine checks.
Build these checks into your scheduled bicycle maintenance, rather than waiting for the next noisy climb.
For a drivetrain that still won't shift cleanly, visit Rider 18 for Nelson workshop support, including a Gear Tune with derailleur-limit resetting. If you're tackling the job at home, the nationwide parts and tool range offers options for replacement cables, drivetrain components and workshop equipment.


