

Bike Water Bottle Buyer Guide 2026
- by Nigel
-

A standard bike water bottle holds about 500 ml to 1 litre, and most rides beyond a short outing will require at least one refill. Choose the lighter bottle for rough trails and responsive handling, or choose insulation for temperature control on long, hot rides.
You've probably had the ride where the bottle runs dry well before the trail does. The first climb feels manageable, then the nozzle gives you warm air, the cage is empty, and the next reliable refill is still a long way away. At that point, the problem usually isn't the bottle alone. It's the mismatch between your hydration plan, riding conditions, bottle capacity and refill options.
New Zealand riders have another decision to make. A basic plastic bottle is light and inexpensive, an insulated design keeps water cooler but adds bulk, and a premium magnetic system can improve convenience while costing much more. The right choice depends less on a universal “best” bottle and more on how you ride, where you refill and how much movement your bottle must tolerate.
Why Hydration Planning Comes Before Bottle Shopping
Running out of water halfway through a ride is rarely caused by one dramatic mistake. More often, a rider starts with one small bottle, assumes a familiar trail will have a working tap, and discovers that the route is longer, warmer or harder than expected. A bottle can be perfectly secure and easy to drink from, yet still be the wrong tool if its capacity doesn't match the ride.
A useful New Zealand benchmark is to drink about 500 ml roughly two hours before riding, then aim for approximately 150 to 250 ml every 15 to 20 minutes during the ride, as outlined in New Zealand cycling hydration guidance. That rate turns bottle selection into a practical calculation rather than a shopping preference. A standard bottle may suit a short loop, but longer outings commonly demand another bottle, a refill stop or a larger hydration system.
Start with the route, not the bottle
Before choosing a nozzle or material, answer three questions:
- How long will I be riding? A short local loop may work with one bottle, while a longer route can require planned refills.
- How warm or exposed is the route? Heat, sun and sustained climbing make easy access to fluid more important.
- Where can I refill? A known tap changes the capacity decision. An uncertain or remote route favours more carried fluid.
A water bottle bag for cycling can add carrying flexibility, but it doesn't remove the need to understand the route. The same NZ guidance notes that bottles are simple and lightweight, while larger hydration packs can carry more fluid on remote rides where refill access is inconsistent.
Practical rule: Decide how much fluid the ride demands first. Then choose whether bottles, extra bottles or a hydration pack can deliver it without becoming a nuisance.
The bottle is one component of the hydration system. Its capacity affects refill frequency, its cage affects retention, and its cap determines whether drinking is realistic when you're climbing or steering through rough ground. Once you know the duration, conditions and refill points, features stop being abstract specifications. You can judge each one against a real need.
Bike Water Bottle Materials and Insulation Explained
Bottle material changes three things you notice on the bike: weight, temperature retention and handling. Lightweight single-wall plastic is usually the straightforward choice for mountain biking because it sits easily in a cage and doesn't add much mass high on the frame. Insulated or stainless construction takes a different approach, prioritising cooler water and a more substantial feel over minimum weight.
Local product listings make the trade-off tangible. A 550 ml ultralight cycling bottle is listed at 54 g, while a 500 ml stainless bottle is listed at 300 g, with both figures shown in New Zealand cycling bottle listings. The difference isn't just a number in a catalogue. On rough terrain, extra mass and bulk can make a bottle harder to remove, harder to replace and more noticeable when the bike is being moved quickly.
Plastic, insulated and stainless choices
A single-wall plastic bottle works well when you value low weight, easy squeezing and inexpensive replacement. It can also fit a broad range of cages, although the fit still depends on the bottle shape and cage tension. For aggressive MTB riding, that simplicity is often more useful than extra insulation.
Insulated bottles make more sense for commuting, gravel and long hot rides. They retain temperature longer, which can make drinking more appealing when the bottle is exposed to sun or carried for a long period. The cost is additional weight and a wider, more rigid body in some designs. A stainless bottle adds durability and a solid drinking experience, but the mass can be excessive when every movement on a technical trail matters.
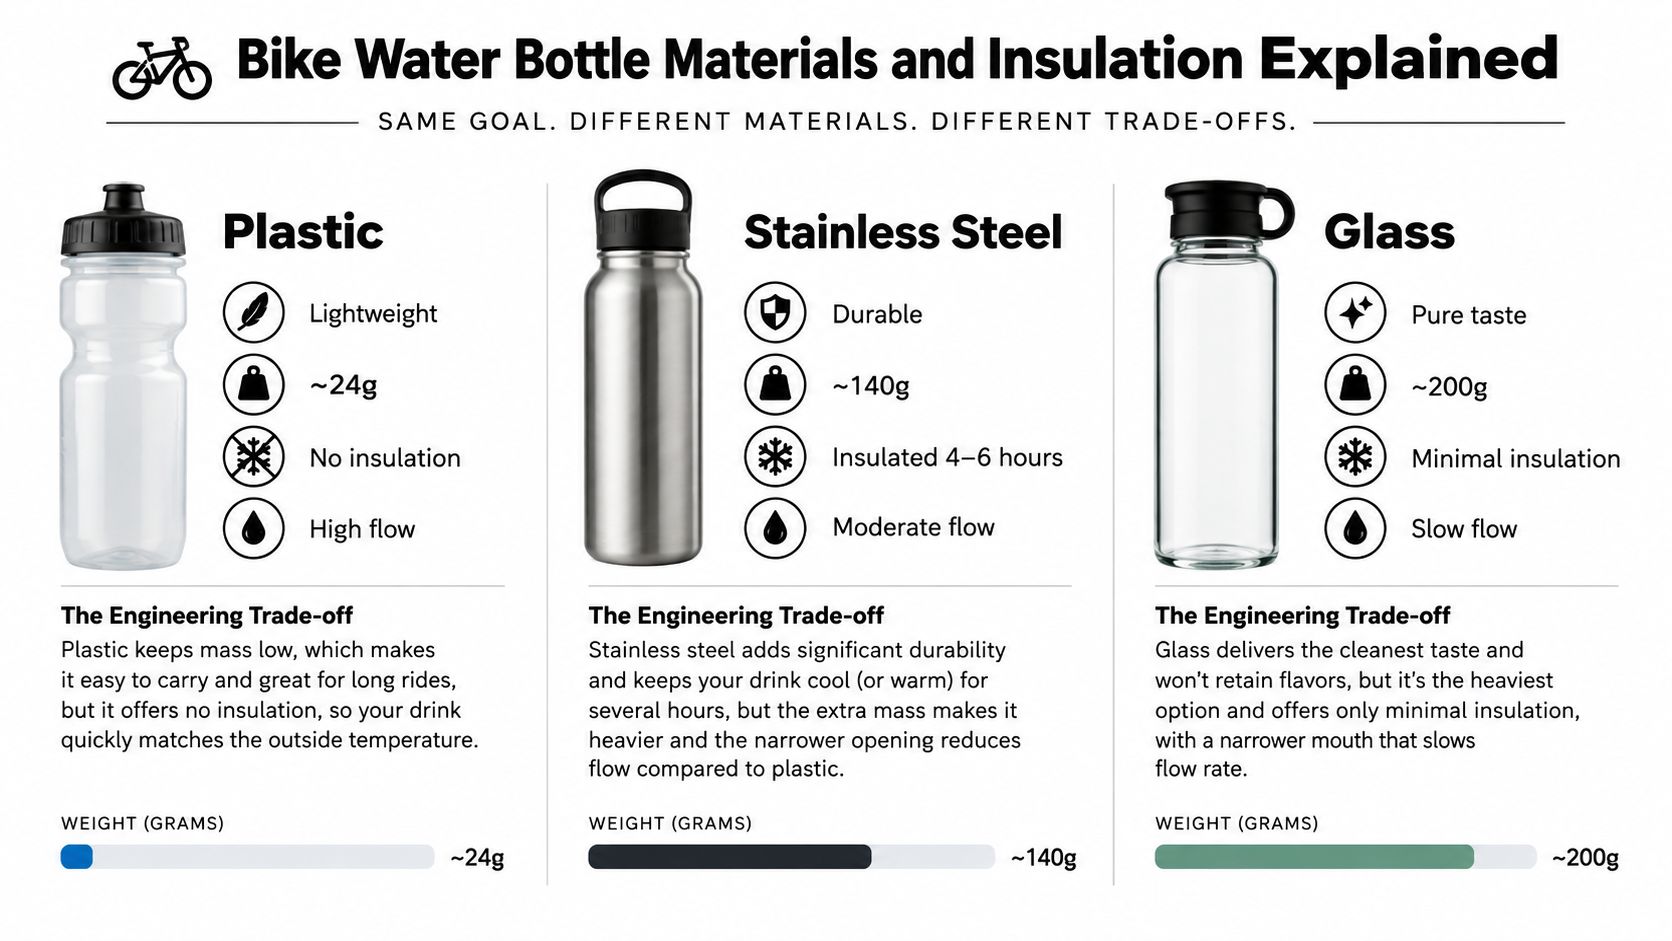
The practical choice isn't “insulated is better”. It's whether temperature control earns its place in your ride. Riders comparing everyday insulated options may find this guide to the best insulated drink bottle in NZ useful for understanding the wider trade-off between cooling performance, construction and portability.
A lighter bottle generally wins when the cage is mounted in a tight frame space or the bike sees repeated vibration. A heavier bottle can win when cold water helps you drink consistently during a long, exposed ride. The best material is the one whose main advantage you will use.
Nozzles, Valves and Bottle Cap Systems Compared
The cap is the part of a bike water bottle you operate while moving, often with one hand and limited attention. That makes flow control more important than many buyers expect. A bottle can fit perfectly and keep water cool, but if the nozzle is awkward, stiff or prone to leaking, riders tend to drink less often.
Standard push-button or pull-up nozzles remain popular because they're simple, inexpensive and easy to replace. They usually offer a familiar squeeze-and-drink action, with fewer parts to maintain than premium systems. Their weakness appears when mud or dust collects around the opening, or when the cap becomes difficult to operate with gloves.
Match the valve to the riding situation
Straw-style valves keep the bottle upright while you drink, which can suit commuters, children and riders who prefer not to tip the bottle. They can be convenient on a bike with restricted movement, but the additional tube and valve parts create more places for residue to collect. Cleaning becomes part of the ownership decision, not an afterthought.
Magnetic systems such as Fidlock focus on attachment convenience and a clean release action. Local listings show a large price spread, from roughly $12.95 for basic bottles to $109.99 for Fidlock bundles, as recorded by New Zealand drink bottle listings. That difference can be justified when quick attachment, a particular frame layout or premium convenience solves a genuine problem. It isn't automatically good value for a rider whose standard cage already works reliably.
- Choose a standard nozzle if low cost, easy replacement and familiar operation matter most.
- Choose a straw valve if upright drinking and simple access suit your commute or family rides.
- Choose a magnetic system if attachment and removal are the main frustration, especially where a conventional cage is difficult to reach.
Mud changes the calculation. A cap with recesses and moving parts may need more attention after wet trail rides, while a basic design can be rinsed quickly. Retention also depends on the mount, not only the cap. A bottle that drinks well but rattles loose over bumps has failed the actual test.
The premium option should earn its price through easier use on your bike. If it doesn't save time, solve access problems or improve confidence over rough ground, a well-fitting standard cage and push-button bottle remain the sensible choice.
Bottle Capacity, Cage Fit and Refill Strategy
Capacity affects both your route plan and the way the bike handles. Standard bike bottles commonly hold 500 ml to 1 litre, so choose the size that matches your refill options rather than just buying the largest bottle. Extra water can prevent a stop, but it also adds weight and may create clearance problems inside a compact frame.
A larger bottle earns its place on warm rides, sustained efforts and routes with few services. It adds little value on a short ride with reliable taps. A hydration pack can carry 1.5 to 3 litres, which suits remote routes where one frame-mounted bottle is unlikely to provide enough water.
Compare the carrying options
| Option | Typical capacity | Best for | Main trade-off |
|---|---|---|---|
| Standard bottle | 500 ml to 1 litre | Short rides, regular refill points and general cycling | Limited range between refills |
| Larger-capacity bottle | 769 ml to 1 litre | Longer rides, warmer conditions and gravel | More weight and possible frame clearance issues |
| Hydration pack | 1.5 to 3 litres | Remote routes and rides with inconsistent refill access | More body contact, bulk and cleaning |
Fit matters as much as capacity. Check the bottle diameter against the cage, confirm that it clears the frame, and make sure you can reach it without changing your riding position. An oversized bottle may rub the top tube or fail to slide into a tight frame. A loose bottle can rattle across corrugated gravel and eject on a rough descent.
If the problem is access or retention, review this bike water bottle holder guide before replacing the bottle. A side-entry cage can solve limited frame clearance. A flexible mount may suit a commuter or family bike, while rough trails generally call for a cage with firmer retention.
Refill planning also needs to account for New Zealand trail facilities. Standard drinking fountains are not always convenient for bike bottles. NZ cycle-trail design guidance recommends bottle-fill stations, at least one intermediate water station on longer riding legs, and clear information about water supply at the start of each leg, as outlined in NZ cycle-trail design guidance.
Use the larger option when it replaces an unreliable refill. Leave it behind when dependable water access makes the extra weight unnecessary.
Choosing the Right Bottle by Riding Style
A bottle that works on a Nelson trail bike can be a poor choice for a family ride or a long gravel day. Terrain, distance and access to water determine whether low weight, temperature control, capacity or retention deserves priority.
Mountain biking
For technical riding, use a lightweight single-wall plastic bottle in a cage with firm retention. The cap should open easily while the bike is moving, and the bottle must stay secure through vibration, roots and rough descents. A rigid insulated bottle keeps water cooler, but it can be awkward in a tight frame and adds weight when you are lifting or manoeuvring the bike. A basic bottle usually does the job better for short, technical rides.
Gravel and long hot rides
Gravel routes often run between dependable refill points, so capacity and temperature become more important. An insulated bottle is useful when you want cooler water throughout a longer day. Two standard bottles can be the more practical option where the frame has room, because one can be replaced or refilled without losing the other. That trade-off matters in New Zealand, where spending more on insulation is worthwhile only if you regularly ride in heat or between distant water supplies.
E-bike riding
E-bikes extend range and make sustained speed feel easier, but fluid planning still matters when the route reaches beyond shops, taps and other services. Choose a larger bottle if the frame allows it. If there is room for only one cage, a waist pack or hydration pack may carry enough water for the full ride.
A bottle keeps weight on the bike and avoids body contact. A reservoir gives quicker access while riding and carries more fluid, but adds pack bulk and another item to clean. For a practical comparison, read this New Zealand hydration bladder guide.
The practical mapping is simple:
- Mountain bike: light bottle, firm retention and an uncomplicated cap.
- Gravel bike: larger or insulated bottle when refill access is uncertain.
- E-bike: capacity first when greater range takes you beyond regular taps.
- Family or kids' bike: easy-open cap, durable construction and manageable size.
Reusable bottles also reduce reliance on disposable drink containers. New Zealanders consume 2.57 billion beverage containers each year, with roughly 55% stockpiled, littered or landfilled. Another Kiwi sustainability source reports 188 million single-use drink bottles used annually. Reusing one bottle will not solve the waste problem, but it gives riders a practical way to cut disposable packaging during regular riding.
Cleaning, Maintenance and Stuck-Cap Fixes
A good bike water bottle can become unpleasant quickly if it gets put away wet. Rinse it after every ride, especially if it held a sweetened drink, and wash both the bottle and cap rather than only flushing the main chamber.
Use warm water and dish soap for routine cleaning. Work the nozzle, valve and threads separately, because residue hides in the small parts riders rarely see. A soft bottle brush helps with the inside, while an old toothbrush can reach cap openings without damaging them.
A routine that prevents most problems
- Rinse immediately: Empty leftover fluid before it dries inside the bottle.
- Wash the cap: Open or dismantle removable valve parts where the design allows.
- Dry completely: Store the bottle and cap separately until no moisture remains.
- Inspect the seal: Check for grit, swelling or damage around the thread and valve.
- Replace worn parts: If the bottle smells permanently stale, shows heavy discolouration or the cap no longer seals, retire it.
A stuck cap usually needs patience rather than force. Soak the assembled cap in warm soapy water, then grip the bottle with a cloth and turn the cap slowly. If grit is visible in the threads, clean it out before applying pressure. Forcing a dry, dirty cap can damage the seal and create the leak you were trying to prevent.
Drying matters as much as washing. Refit the cap only when the inside and valve are fully dry, otherwise trapped moisture creates the conditions for mould and odour. Extending bottle life also supports the broader purpose of choosing reusable equipment in the first place.
Where to Buy and Get Expert Fitting Advice in Nelson
Buying a bottle in isolation is easy. Getting the bottle, cage and riding position to work together is where local advice earns its value. Frame clearance, side-entry access, valve preference and the amount of vibration on your usual trails can all change the sensible choice.
Rider 18 is based at 60 Vanguard Street in Nelson and supports mountain biking, e-bikes and family cycling. The team brings over 30 years of two-wheeled experience from the motorcycle world to bicycles, with fitting advice, workshop support and trusted cycling brands available alongside bottles, cages and hydration packs.
For online orders, Rider 18 offers nationwide shipping with free delivery over $100 and easy 14-day returns. Those policies matter when a bottle looks compatible online but doesn't clear the frame, sits securely in the cage or feels comfortable to use on the trail.
Bring the bike, or bring its frame measurements and current cage, when you visit. A short conversation about your route, refill points and riding style can prevent you paying for insulation or magnetic hardware that won't improve your rides. The best bottle is the one that fits the bike, matches the conditions and stays usable when the trail gets rough.
Visit Rider 18 in Nelson for practical bottle and cage fitting advice, workshop support and hydration options suited to MTB, e-bike, commuting and family riding. If you're buying online, browse Rider 18 and choose a setup that matches your bike, your route and your likely refill stops.


