

Rear Bike Rack Guide for Kiwi Riders
- by Nigel
-

A weekday morning in Nelson tells you quickly whether your bike setup works. A parent is fitting a child seat to a step-through, a commuter is loading panniers for work, and someone else is deciding whether the same bike can carry groceries home after a ride along the Great Taste Trail. A rear bike rack can make all of those trips easier, but only if it matches the frame, the load, and the way you ride.
The wrong rack can flex, rattle, foul a disc brake, or make a familiar bike feel awkward under weight. The right one keeps bags stable, leaves room for lights and reflectors, and turns everyday carrying into a simple part of riding. This guide focuses on the choices that matter on New Zealand roads, trails, bus trips, school runs, and e-bike tours.
Why a Rear Bike Rack Matters for Everyday Riding
The parent with the child seat needs a rack that stays rigid while the bike starts, stops, and leans at low speed. The commuter needs pannier rails that don't let a laptop bag swing into the wheel. The rider combining a bus trip with cycling needs equipment that works with a bike rack on public transport, not a bulky arrangement that becomes difficult to lift or secure.
Those needs overlap, but they aren't identical. A rack designed for light road-bike luggage isn't automatically suitable for a child seat or a heavy e-bike. Frame mounts, wheel clearance, brake design, tyre size, and the intended load all affect the result.
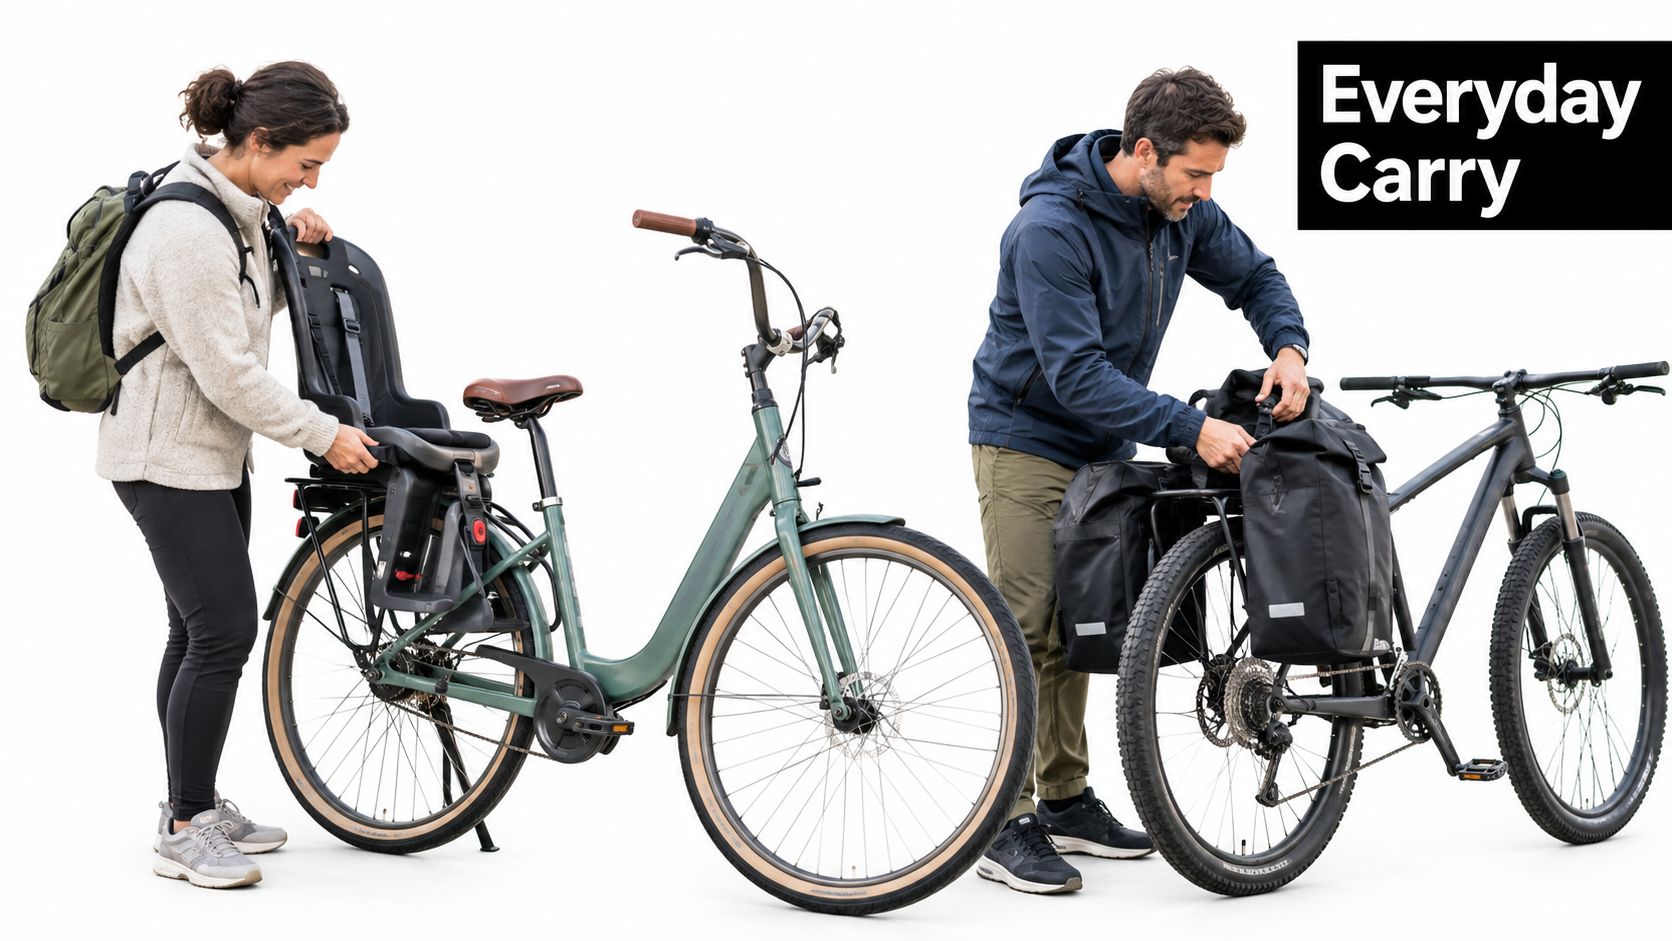
The everyday jobs a rack should handle
A useful setup should carry the things that make cycling practical without making the bike unpredictable:
- Work gear: Panniers protect clothing, food, and electronics better than a backpack.
- Shopping: Low, side-mounted bags keep groceries closer to the bike's centreline.
- Family riding: A compatible child seat needs a rack with the required structural support, not a light touring platform.
- Multi-modal travel: New Zealand bus networks have used front-mounted bike racks as a practical link between cycling and public transport. Greater Wellington recorded an average of 17 users per month and 105 total users during a six-month trial, while a later regional report recorded more than 17,000 bike trips on buses since January of that year. These figures are documented in Greater Wellington's bike-rack trial report.
A rear bike rack also changes handling. Weight behind the saddle shifts the bike's balance, and a tall top load can make slow turns feel vague. Put dense items low in panniers, keep the two sides reasonably balanced, and leave the deck for light, secure cargo.
Practical rule: Choose the rack for your heaviest regular job, then carry lighter loads inside that limit. Buying for the occasional school run is smarter than buying for an empty commuter bike and improvising later.
For bags, fitment matters just as much as capacity. The Rider 18 guide to bags for biking is a useful starting point when you're deciding between panniers, trunk bags, and other carrying options.
Rear Rack Types and Materials Explained
Start with the mounting format, not the colour or brand. A rack that attaches securely to the frame will usually handle everyday commuting better than a quick solution designed only for occasional light luggage.
Pick the format that suits the frame
A seatpost-clamp rack attaches around the seatpost rather than to frame eyelets. It suits road and gravel bikes without dedicated rack mounts, and it can be a practical answer for light day rides. Its deck is usually shorter, its load limit is lower, and rough surfaces can make the cargo move more than it would on a frame-mounted rack.
A frame-mounted rack bolts to eyelets near the dropouts and seatstays. This is the standard choice for hybrids, utility bikes, commuters, and touring bikes because the load transfers into the frame rather than relying on the seatpost clamp.
Disc-brake-compatible racks use shaped lower struts or offset mounting hardware to clear callipers and rotors. Don't assume a conventional rack will clear a modern disc setup. Measure the gap before buying.
Full-length decks work well with panniers and straps, while shorter decks reduce weight and can leave more room around a dropper post or compact frame. Plate-style platforms are handy for baskets and trunk bags, but tubular rails often provide better pannier-hook engagement.
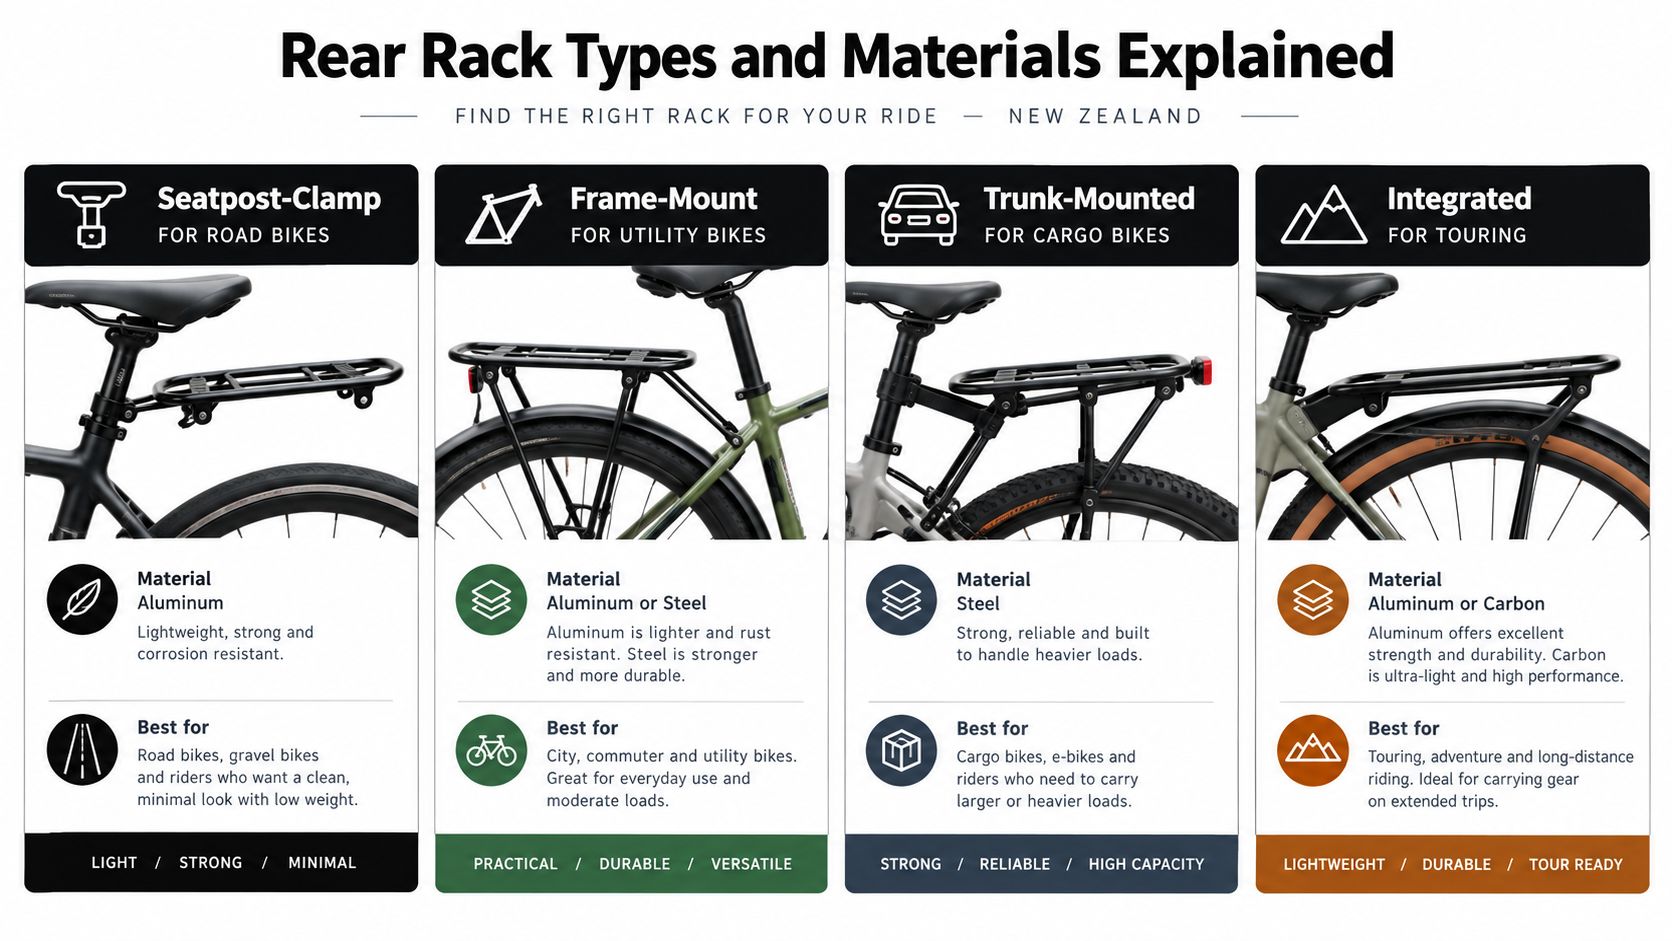
Material affects the way the rack behaves
Aluminium alloy is the sensible default for most Kiwi commuters. It keeps weight down, resists coastal corrosion, and works well for panniers and ordinary touring loads. A Nelson rider who parks near salt air still needs to inspect bolts and mounting points, but alloy is generally the easy everyday choice.
Chromoly steel suits riders who value load capacity and repairability over minimum weight. It can feel solid under heavier bags, though it adds weight and needs attention where paint damage allows rust to start.
Carbon appears on premium lightweight builds. It can make sense when carrying capacity is secondary, but it isn't the material we'd choose for a child seat, heavy shopping, or a loaded e-bike unless the complete system is specifically designed for that use.
For bikes without traditional eyelets, a system such as the Topeak TetraRack R2 Rear Rack can provide an alternative mounting approach. Check the manufacturer's compatibility instructions and the actual bike before ordering.
Load Ratings and What They Actually Mean
A rack's load number is not a suggestion to carry that weight high, loose, and unevenly distributed. It describes the maximum supported load under the manufacturer's conditions, and the bike frame, wheel, tyres, brakes, and mounting points may have lower limits.
New Zealand listings show rear-carrier designs ranging from 18 kg to 60 kg, while a touring rear cargo rack listed locally is rated at 25 kg and uses an anti-roll anchoring system to stabilise cargo. These load classes and the anti-sway principle are reflected in New Zealand rear-carrier listings.
Rear Rack Load Ratings at a Glance
| Load Class | Typical Max Load | Best For | NZ Rider Notes |
|---|---|---|---|
| Light duty | 18 kg | Road, gravel, and light commuting | Keep cargo compact and avoid rough, heavily loaded riding. |
| Touring and commuter | 25 kg | Panniers, shopping, and supported touring | An anti-roll design helps keep bags stable when the load rises. |
| Heavy duty | 35 to 40 kg | Cargo use and compatible child-seat setups | Confirm the frame, wheel, tyre, and seat specification separately. |
| Dedicated cargo | 60 kg | Long-tail bikes and purpose-built family carriers | This is a system-level rating, not a licence to fit the rack to any bike. |
For e-bikes, check the rating per bike as well as the combined limit. New Zealand listings distinguish systems rated for e-bikes up to 30 kg per bike and 60 kg total, a distinction that matters when a family carries heavier modern bikes. E-bike and family-cycling guidance from Evo Cycles also highlights how a rear load changes the centre of gravity and why some full-suspension or high-end bikes aren't suitable for ordinary rear-rack mounting.
The handling change arrives before the rack reaches its maximum. Heavy top bags make the bike feel top-heavy, braking takes more care on damp shoulders, and a loaded rear can make low-speed steering slower. On a full-suspension bike, added mass can also alter suspension behaviour.
Pack dense items low and close to the axle. Use panniers before a tall deck bag, keep the left and right sides similar, and leave a margin below the stated limit. If your usual load is close to the rack's rating, choose a stronger rack or a purpose-built cargo bike instead.
Matching a Rack to Your Bike and Frame
Most failed rack purchases aren't caused by poor intentions. They happen because the buyer checks wheel size but forgets the brake calliper, axle type, seatstay shape, or battery location.
Measure the bike first. Look for threaded eyelets near the rear axle, upper mounting points on the seatstays, and enough clearance above the tyre for the rack deck and any mudguard. A step-through may need a special upper adapter because its frame doesn't have conventional seatstays in the usual position.
Rear Rack Fit by Bike Type
| Bike Type | Wheel Size | Brake Type | Recommended Mount | Fit Notes |
|---|---|---|---|---|
| Hybrid commuter | 700c | Rim or disc | Standard frame mount | Usually the simplest fit, provided eyelets and mudguard clearance are present. |
| Hardtail mountain bike | 26-inch or 700c | Disc | Disc-compatible frame mount | Check calliper position, tyre width, and lower strut clearance. |
| Folding bike | 20-inch | Rim or disc | Folding-specific or adjustable rack | Confirm that the rack doesn't interfere with folding hinges or transport dimensions. |
| Step-through town bike | Commonly 700c or smaller | Rim or disc | Frame mount with step-through adapter | Upper stays may need an adapter; keep the deck level and clear of the battery. |
| E-bike with integrated battery | Varies | Usually disc | E-bike-rated frame or axle solution | Check battery removal, motor wiring, tyre clearance, and the per-bike load rating. |
| Full-suspension MTB | Varies | Disc | Axle-mount or approved quick-release system | A fixed seatstay rack can interfere with suspension movement. Test full compression. |
| Belt-drive bike | Varies | Rim or disc | Manufacturer-approved mount | Avoid hardware that traps or damages the belt system. |
Wheel diameter alone won't tell you whether the rack fits. A wide 26-inch mountain-bike tyre may need more clearance than a narrow 700c commuter tyre, while a 20-inch folder may require an adjustable platform to sit level.
Thru-axles create another common blocker. The rack may need a compatible axle plate rather than a conventional dropout bolt. Integrated e-bike batteries can restrict the upper mounting area, and full-suspension frames need clearance through the complete travel range, not just while the bike is parked.
If you use a belt drive, unusual tubing, a dropper post, or a large integrated battery, take the bike to a fitter before buying. Forcing a generic rack into a non-standard frame is how threads get damaged and tyres end up rubbing struts.
Mounting and Installation Basics
A basic rack installation is straightforward when the bike has clear eyelets and the rack matches its brake layout. It becomes a workshop job when the mounting points are offset, the bike has suspension movement, or the battery and brake hardware leave little room.
Start by placing the rack over the rear wheel without fully tightening anything. Attach the lower struts at the dropout or axle plates, then adjust the upper stays so they run cleanly and sit parallel with the seatstays. The platform should remain level above the tyre, with enough clearance for tyre flex, mudguards, and normal wheel movement.
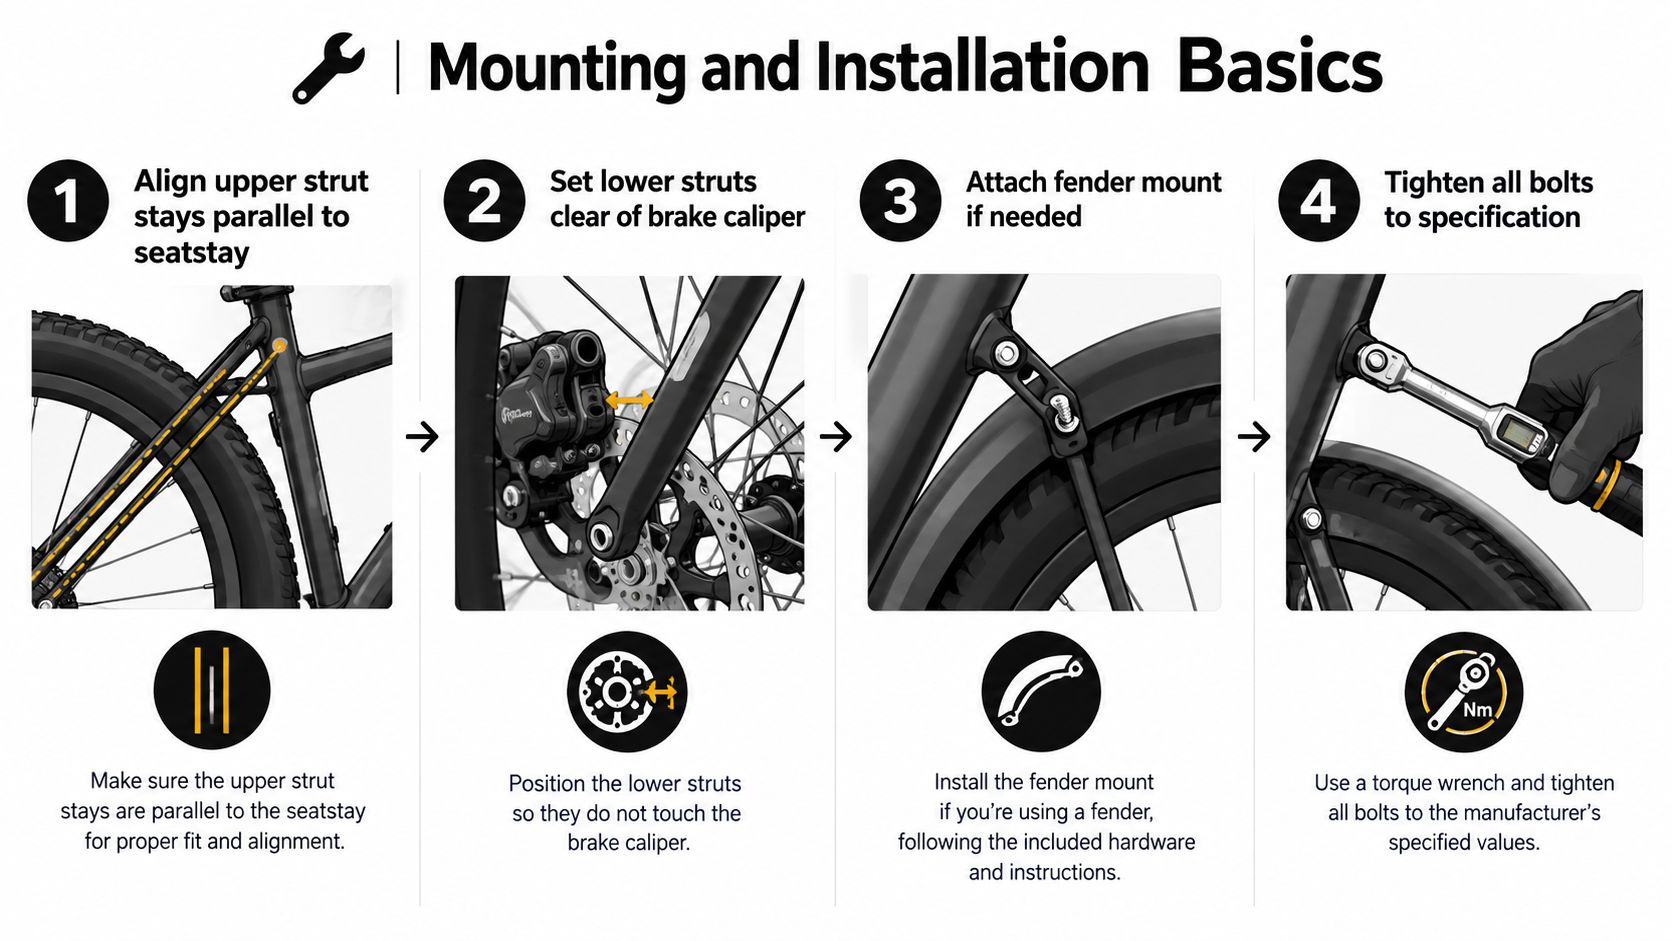
A careful home fit
A confident home mechanic will need the correct hex keys, washers, a small torque wrench, and patience. Fit all bolts loosely first, check alignment from behind, then tighten progressively rather than locking one side before the other. Many alloy racks use a tightening range of roughly 4 to 6 Nm, but follow the rack and frame manufacturer's specification rather than treating that range as universal.
Seatpost-clamp racks avoid frame eyelets and can be useful for a bike that has no mounting points. They aren't a substitute for a proper frame-mounted rack when you regularly carry heavy panniers, a child seat, or bulky shopping.
If the bike has disc brakes, attach any supplied spacers and confirm that the lower struts can't touch the rotor. If it has a rear mudguard, use the rack's dedicated fender mounting point where available instead of trapping the mudguard awkwardly under a rack bolt.
The rear rack installation video shows the kind of alignment and clearance checks worth making before a loaded test ride.
Leave e-bike battery clearance, suspension-link checks, and final torque verification to a workshop if you aren't certain. A correct installation includes checking the rack under load, not just making it look straight in the stand.
Choosing Accessories That Work Together
A rear bike rack doesn't carry anything by itself. The accessory determines where the weight sits, how it stays attached, and whether you can still see the rear light and reflectors.
For commuting and school runs, use dual panniers when possible. They place luggage lower than a large deck bag and distribute weight across both sides. A single trunk bag works well for a light day ride, but it becomes a poor choice when you start stacking heavy groceries on top.
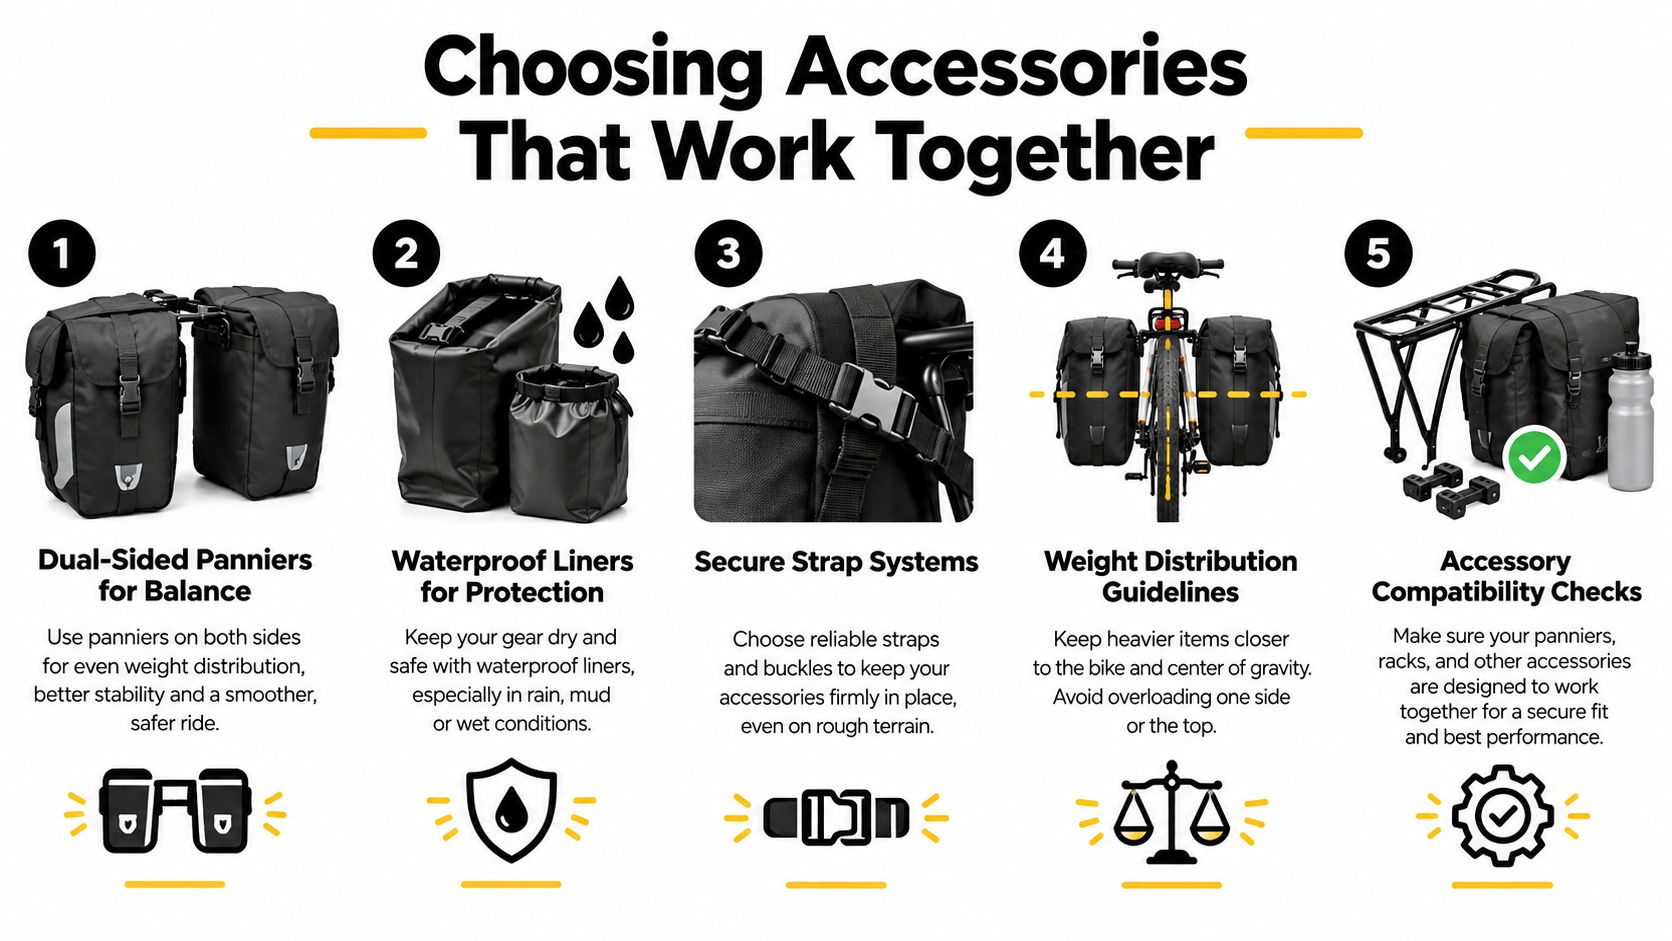
Build the carrying system around the load
Panniers first. Choose bags with hooks that lock firmly onto the rack rail and a lower retaining point that stops them swinging into the wheel. Waterproof liners are worthwhile for Nelson weather, even when the outer bag claims weather resistance.
Child seats need a proper match. The rack, seat, frame, and child-seat instructions must agree. Don't fit a seat to a light rack because the platform looks wide enough. A child moves, which makes a rigid mounting system and careful harness adjustment more important than a high headline load.
Trunk bags suit lighter cargo. Use them for tools, a jacket, lunch, or a small camera. Keep the heaviest items inside the panniers, not on the top deck.
Bungees aren't a complete retention system. They can hold a jacket or a boxed item, but they stretch and can release energy if cargo shifts. Cam-buckle straps give more controlled tension, while dedicated pannier clips and anti-sway hooks keep the bag connected to the rack.
The load must also remain visible and legal. New Zealand cycling guidance stresses that fitted equipment and carried loads shouldn't obscure required safety equipment, including the bell and reflectors. Canyon's New Zealand gear guidance refers to the Pedal Bicycles Safety Regulations in this context.
Keep straps short, protect loose ends from the wheel, and check that a pannier doesn't cover the rear reflector. If the load extends beyond the rear axle or becomes unusually bulky, reduce it or use a purpose-built cargo solution rather than trying to make a standard commuter rack do everything.
Safety, Visibility, and Routine Maintenance
A loaded bike needs more space and smoother inputs. Brake earlier, take wet corners with less speed, and avoid sharp steering corrections when a child seat or heavy panniers are fitted. Extra mass behind the saddle changes how quickly the bike settles after a bump, especially on rough road edges and gravel trails.
Visibility is a legal issue, not just a courtesy. NZTA guidance warns that vehicle-mounted loads can obscure the rear number plate and essential lights, requiring a supplementary plate and light arrangement where those items are blocked. The same principle applies to bicycle cargo: a bag, basket, child seat, or touring load mustn't hide the equipment that keeps you visible.
New Zealand Transport Agency guidance on cycles and rear visibility is the reference to check when a load or carrier arrangement affects lights, reflectors, or visibility. On an e-bike, a bright rear light mounted where panniers can't cover it is more useful than a small light hidden behind luggage.
Use a short pre-ride check
- Rack hardware: Press the rack sideways and listen for movement or clicking at the bolts.
- Struts and mounts: Look for bent stays, cracks, damaged threads, or movement at the dropout.
- Pannier attachment: Confirm every hook is seated and the lower anti-sway catch is engaged.
- Child seat: Check the mount, harness, foot straps, and clearance from the wheel.
- Tyres: Set pressure for the loaded bike, using the tyre maker's safe range.
- Visibility: Confirm that the rear light, reflector, bell, and any required vehicle equipment remain unobstructed.
Wet West Coast roads, salty coastal air, and summer touring all expose weak mounting points quickly. Wipe grit from the rack and pannier hooks, inspect the bolts periodically, and look closely for corrosion where dissimilar metals meet.
Make a more thorough inspection at least every few months, and examine the rack before a longer tour. Look for cracked struts, elongated mounting eyes, loose rivets, and rubbing around the tyre or brake rotor. E-bike vibration and extra mass can accelerate wear, so don't wait for a rack to wobble before checking it.
Buying, Fitting, and Local Workshop Support
Buy the rack after you have answered four questions: what bike is it for, what will it carry, where will you ride, and how will the load attach? Those answers are more useful than choosing by appearance or headline capacity.
Take the complete bike to a local shop if you can. Bring the wheel size, brake type, axle standard, frame model, intended load, mudguards, child seat, and any existing bags. If you can't bring the bike, take clear photos of the rear dropouts, seatstays, brake calliper, axle, battery, and tyre clearance.
Ask these questions before paying
- What is the measured working load for this exact setup? Separate the rack's rating from the frame, wheel, child-seat, and e-bike limits.
- Will the lower struts clear the brake calliper and rotor? Don't rely on a generic product photograph.
- Does the step-through need an adapter? Upper mounting hardware must sit securely and keep the deck level.
- Will the rack clear the battery and suspension movement? E-bike and full-suspension fitments need a complete movement check.
- Can it take the accessories you already own? Check pannier hooks, trunk-bag clips, child-seat hardware, and rear-light placement together.
Online listings often hide the problems that appear during fitting. A rack may look universal but fail to clear a disc calliper, lack the correct struts for a full-suspension frame, or quote a load limit that doesn't suit your bike. The EziGrip bike rack guide is useful when you're comparing rack systems and thinking about how the carrier will work with the rest of your transport setup.
A workshop fit should include alignment over the rear axle, clearance checks with the wheel and brake moving normally, bolts tightened to specification, and a short loaded test ride. Choose that route for e-bikes, full-suspension mountain bikes, unusual tubing, belt drives, and any setup carrying a child.
Rider 18 in Nelson can help match a rear bike rack, panniers, child-seat setup, or e-bike carrier to your actual bike and intended load, then fit and check the hardware in the workshop. Visit Rider 18 with your bike, and get a practical recommendation before you spend money on a rack that won't clear your brakes or carry what you need.


