

How to Replace Brake Pads: A Rider 18 Guide
- by Nigel
-

You're halfway down a wet track above Nelson when the brake lever starts coming closer to the handlebar. The pads looked acceptable before the ride, but mud, repeated descents and heat have changed the feel. At that point, “I'll sort it later” is a poor plan. You need to know how to replace brake pads correctly, then prove the repair works before heading back onto the trail.
A pad change isn't difficult when the brake type, pad compound and installation details are right. It becomes risky when a rider fits a physically compatible part without checking alignment, rotor condition, lever travel or bedding-in. The following workshop approach suits rim brakes, mountain bikes, e-bikes and the mixed family fleet commonly seen around Nelson.
Why Your Brakes Matter More Now Than Ever
A muddy descent from the hills around Nelson puts a brake system through a different workload from a short, flat commute. Water and grit reach the braking surfaces, the rider carries speed into corners, and repeated braking turns movement into heat. On an e-bike, extra vehicle mass and higher typical speed can make a tired pad or contaminated rotor noticeable much sooner.
Brake pads are the working interface between your hands and the ground. They create friction against a rim or rotor, converting motion into heat so the tyres can slow the bicycle. Worn, glazed or oily friction material can't produce dependable stopping power, even when the lever and cable appear to move normally.
New Zealand treats bicycle braking as a safety matter, not an optional upgrade. The Product Safety Standards (Pedal Bicycle) Regulations and related braking framework connect the AS/NZS 1927:1998 standard with its regulatory adoption in 2000, while Standards New Zealand published ISO 4210-4:2023 locally with braking test methods. Those requirements cover design, performance and owner-maintenance information for many bicycles supplied here.
Workshop rule: A replacement should return the brake to the manufacturer's intended operating condition. Matching the shape alone isn't enough.
Before fitting anything, confirm the pad profile and compound, check the fasteners, inspect the braking surface, and make sure the wheel spins freely afterwards. The owner's manual is useful here, particularly for e-bike calipers and less familiar family-bike systems. General vehicle-maintenance thinking can also help you build a regular inspection habit, and these SwiftJet maintenance insights offer a broader reminder that preventative checks matter before a failure becomes urgent.
Replacing Rim Brake Pads Step by Step
Rim brakes reward careful alignment. A new block fitted a few millimetres too high can touch the tyre, while one set too low can damage the rim or reduce the contact patch.
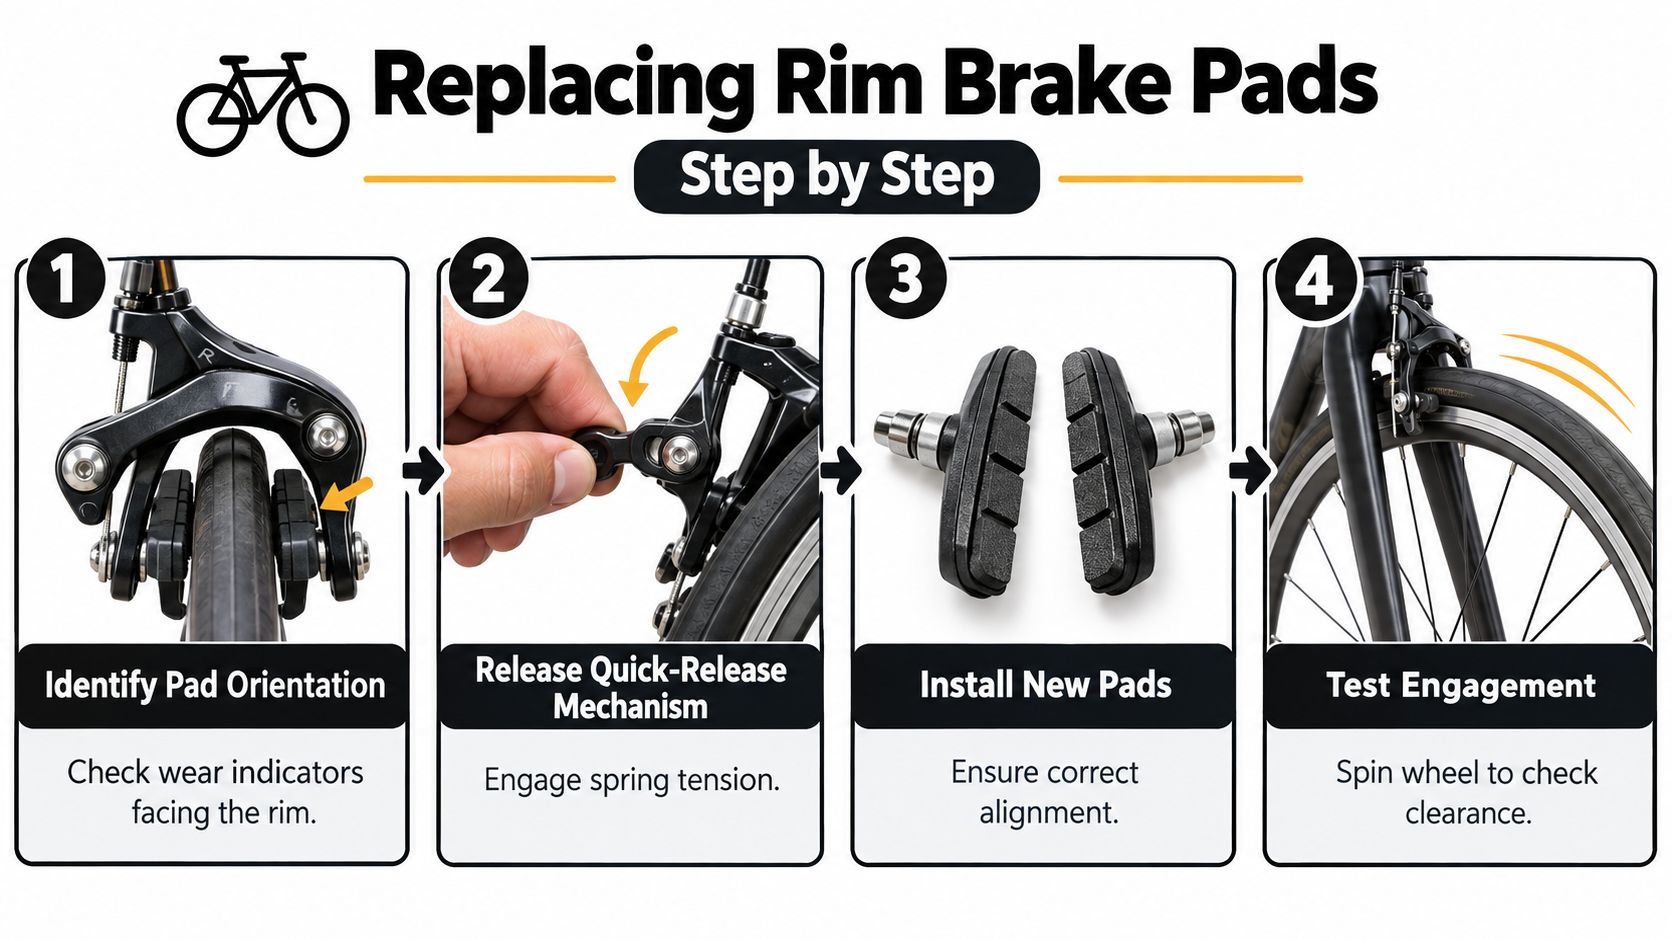
- Identify the pad and its direction. Check whether the pad is for the front or rear of the holder, look for directional marks, and compare the new pad with the old one. If the remaining material is 3 mm or less, Auckland Transport's cycling safety guidance supports replacement rather than continued use.
- Open the brake. Release the rim-brake quick-release or cable mechanism as the manufacturer specifies. Some designs are easier to work on with the wheel removed. Keep the old washers and spacers in order because they control the pad's angle and position.
- Fit the new block. Put the directional mark facing forward. The entire braking surface must sit on the rim's braking track, with no part touching the tyre and no lower edge hanging below the rim. Set a small amount of toe-in if the brake design calls for it, using the old pad position as a reference rather than guessing.
- Tighten and reconnect. Hold the pad square while tightening its hardware, then restore cable tension or spring position. Squeeze the lever firmly several times. It shouldn't reach the handlebar, and the blocks should move evenly onto the rim.
Spin the wheel. Listen for constant rubbing and check that the rim remains clear of the tyre. Clean the rim with an appropriate clean cloth, and keep chain lubricant, degreaser and greasy fingers away from both the rim and new pad.
A final low-speed ride should use gradual stops rather than one hard pull. The Rider 18 guide to the best brake pads in New Zealand can help when you're unsure which compound or pad style matches the bicycle. If the brake still feels weak after adjustment, stop troubleshooting by substitution. Check cable condition, rim wear and caliper movement before riding faster.
Swapping Disc Brake Pads Safely
Disc brakes handle muddy mountain-bike riding well, but they demand discipline during a pad change. The most common serious mistake is squeezing a hydraulic lever while the wheel or pads are out. The pistons can advance, leaving insufficient clearance for the rotor.
Start by stabilising the bicycle so it can't roll. Remove the wheel, then locate the retaining pin or bolt on the caliper. Withdraw the old pad pair and spring, keeping note of how the spring sits. Mechanical and hydraulic systems differ in detail, so the caliper manual should decide whether the retaining hardware uses a clip, pin or threaded fastener.
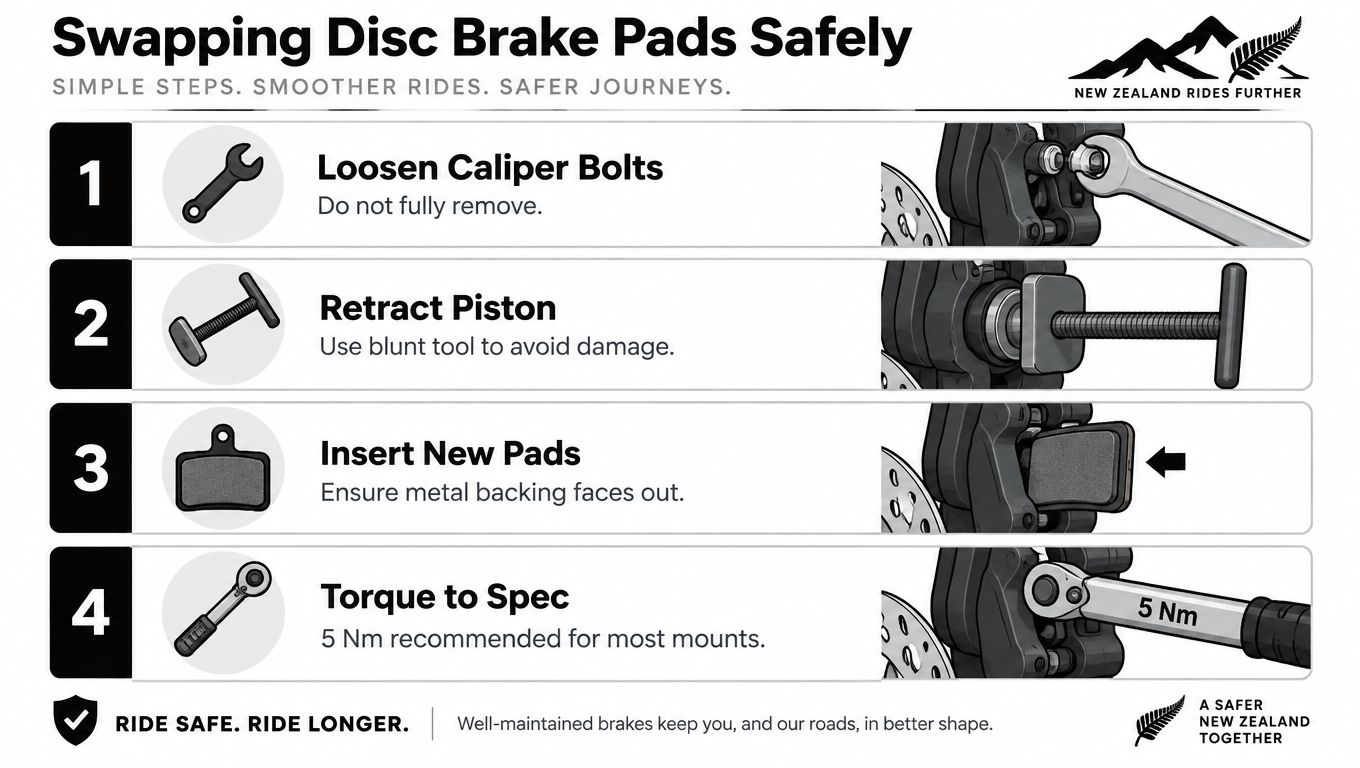
Inspect the old pads against the new pair. Uneven wear can point to a sticking piston, misaligned caliper or poor wheel seating. Look at the rotor for scoring, blue heat marks or oil contamination. Clean it with isopropyl alcohol only, using a clean lint-free cloth. Don't use chain cleaner or a general degreaser, and don't touch the friction faces.
Hydraulic pistons need to be reset before the new pads go in. Use a dedicated plastic piston tool or the manufacturer-approved implement, applying even pressure and avoiding sharp metal tools that can damage seals or the piston surface. Fit the correctly shaped pair, place the spring correctly, and reinstall the retaining pin or bolt securely.
Never pull a hydraulic brake lever with the rotor or pads removed. The resulting piston movement can turn a straightforward pad change into a clearance problem.
Refit the wheel fully and confirm the axle or quick-release is secure. Spin the wheel while watching the rotor pass through the caliper. If it rubs consistently, check wheel seating and caliper alignment before reaching for more cable or lever adjustment. Pump the lever until it feels firm, then perform separate front and rear brake tests.
Use the Rider 18 brake bleeding kit guide when the issue may involve hydraulic fluid rather than friction material. Bed the new pads on a safe, dry road with approximately 10–20 progressive stops, allowing brief cooling between each stop, as outlined in NZTA's bicycle equipment guidance. Don't drag the brake continuously. One long descent on fresh pads can glaze the surfaces or overheat the system.
Bedding In and Testing Your Brakes
Fresh pads rarely deliver their final feel straight out of the packet. The pad and rim or rotor need controlled contact so the surfaces settle together. On a Nelson bike, that matters after wet transport, muddy trail riding and any descent where you'll use the brakes repeatedly.
Begin on a dry, quiet, low-traffic road or other controlled area. Apply one brake at a time at moderate speed, slow smoothly, release it, and allow a short cooling period. Repeat the process with both brakes, using firm but progressive pressure rather than locking a wheel.
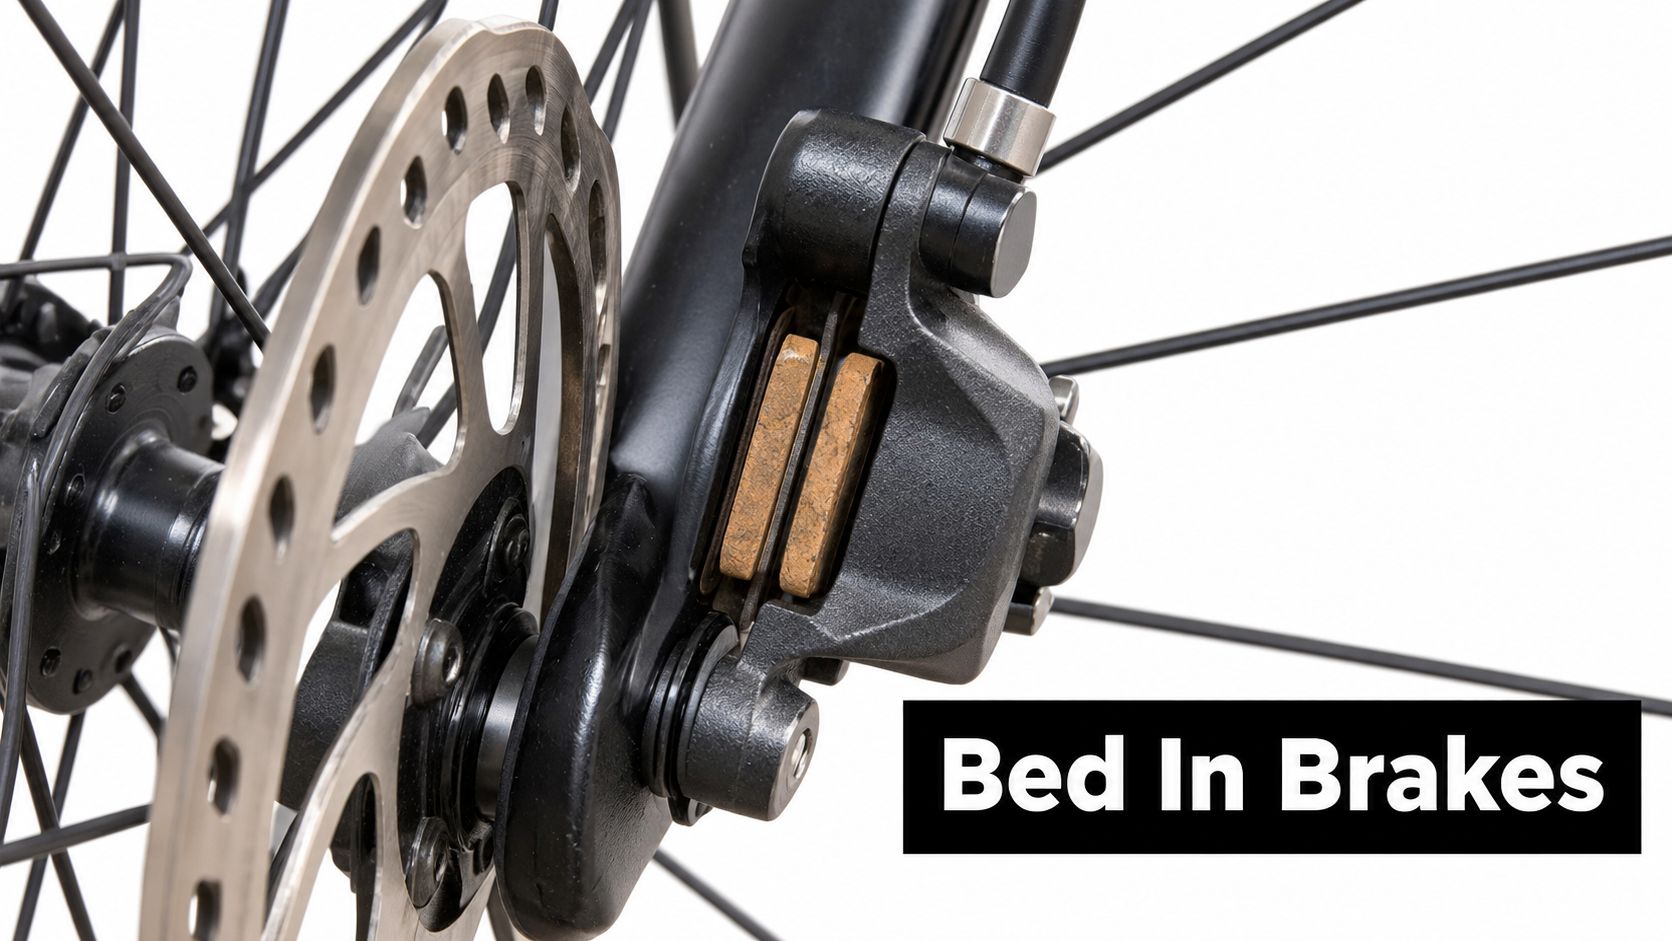
A consistent lever should feel predictable, not spongy or progressively closer to the handlebar. Listen for changes too. A brief new-pad noise can occur, but persistent squealing, pulsing or vibration deserves investigation rather than more aggressive braking.
What the test tells you
- Lever reaches the bar: Stop riding and check pad seating, cable tension, hydraulic piston position or fluid condition.
- Constant rotor rub: Check wheel installation and caliper alignment. Don't accept rubbing as normal after a pad change.
- Vibration or pulsing: Inspect the rotor and pad surfaces. The problem may involve a damaged or warped rotor, not just the pad.
- Weak braking after bedding: Look for contamination, uneven pad contact or a hydraulic fault.
E-bike owners need a stricter approach because higher mass and speed increase the energy the brakes must manage. NZTA research identifies those characteristics as different safety considerations from conventional bicycles, and the ComCom bicycle product-safety information supports treating inspection as preventive risk control.
There isn't a universal kilometre replacement figure. Rider weight, hills, weather, braking habits, cargo, rotor condition and mud all change wear. A small maintenance detail can help during inspection: keep fluid-system components clean and correctly sealed. For riders learning how reservoirs fit into hydraulic systems, this Sixrace brake fluid reservoir resource provides useful component context, but it isn't a substitute for bleeding instructions from the brake manufacturer.
E-Bikes and Family Bikes - Special Considerations
An e-bike deserves more than a quick glance at the pad window. NZTA guidance describes e-bikes as typically 4–8 kg heavier and travelling about 3–8 km/h faster than conventional bicycles, which can increase crash likelihood and injury severity according to its research on electric bicycles and low-powered vehicles. Consumer NZ recommends replacing e-bike pads when the friction material is under 1 mm, for the reasons explained in that same maintenance context.
Those figures don't mean every e-bike needs the same schedule. A loaded commuter, a cargo-carrying family bike and a trail e-bike on steep wet tracks experience different brake loads. Inspect more often when the bike regularly carries weight, descends hills or rides through abrasive mud.
Use this decision process:
- Confirm the caliper: Read the model marking and match the exact pad shape. Similar-looking pads can use different backing plates or compounds.
- Measure both pads: Don't judge one side only. Uneven thickness can indicate caliper or piston trouble.
- Inspect the rotor: Oil, scoring and excessive wear can defeat a new pad.
- Check lever travel: A lever that reaches the handlebar points beyond a simple pad swap.
- Bed in deliberately: Fresh material needs controlled stops before hard trail riding.
New pads won't cure every brake complaint. Persistent softness can indicate bleeding is required, while vibration may point to a worn pad or warped rotor. The Rider 18 e-bike maintenance checklist is a useful companion for organising those wider checks.
Children's bikes require a separate diagnosis. A small-wheel bicycle may use rim pads, while another family bike may use a coaster or back-pedal brake. NZTA's cited safety requirements allow a children's bicycle to use one back-pedal brake, so an adult disc-brake tutorial can send a parent looking for a removable pad that isn't there.
Before a child rides, roll the bike forward and apply each available brake separately. The lever should remain within reach and shouldn't touch the handlebar. A pad replacement can't correct a brake system that's unsuitable for the child, a loose wheel, a damaged rotor or a conversion that was never safely configured.
When to DIY and When to See a Pro
DIY pad replacement is reasonable when you can identify the brake type, match the part, use the correct tools and verify the result. Rim pads are often approachable for a careful home mechanic. Disc pads are also manageable when the wheel, retaining hardware, piston position and rotor are all understood.
Professional service makes more sense when the symptom doesn't match ordinary pad wear. Stop and seek help if you find leaking hydraulic fluid, a damaged hose, a severely scored or visibly distorted rotor, severe uneven pad wear, a caliper that won't align, or a lever that remains soft after correct installation and bedding.
Home-built e-bikes and conversion kits deserve extra caution. NZTA's technical material explains that production e-bikes typically meet requirements for braking on each wheel, while conversion and home-built configurations aren't covered in exactly the same way. If the motor, battery, frame, wheel, controls and brakes weren't designed as a system, fitting new pads may only disguise a larger compatibility problem.
For family bikes, choose the service path by brake type:
| Brake system | Sensible first action | Stop and seek help when |
|---|---|---|
| Rim brake | Identify pad orientation and align it fully on the rim | The pad touches the tyre or the caliper won't centre |
| Disc brake | Match the pad, reset pistons and inspect the rotor | Pistons stick, fluid leaks or the rotor remains damaged |
| Coaster or drum brake | Identify the hub mechanism before removing anything | The back-pedal brake slips, binds or feels weak |
| Modified e-bike | Check the complete braking arrangement | Wheel security, lever reach or system compatibility is uncertain |
A basic home toolkit should include the correct hex keys, clean cloths, isopropyl alcohol and a suitable piston tool. Workshop tool selection is broader than a single brake job, and this guide to essential tools for your shop gives useful context when building a properly organised maintenance bench.
At Rider 18 in Nelson, workshop staff can inspect brake condition, adjust pads and carry out basic brake adjustments when a home repair hasn't restored safe operation. The right choice isn't about avoiding DIY. It's about knowing when the brake system has moved beyond a straightforward parts replacement.
Final Checks Before You Ride
Before the bike leaves the driveway, run the same short inspection every time. It catches loose hardware and poor alignment before speed, mud and a steep descent add consequences.
- Squeeze each lever independently. Confirm the lever doesn't reach the handlebar and that the action feels firm and controlled.
- Watch the contact point. On a rim brake, the block should meet the rim and miss the tyre. On a disc brake, the pad should contact the rotor evenly.
- Check the wheel. Spin it and listen for continuous rubbing. Confirm the axle, quick-release or wheel-retention system is secure.
- Look for contamination. Fresh oil, grease or cleaner on the rim or rotor means the braking surface needs attention before riding.
- Test at low speed. Apply the front and rear brakes separately in a clear area, then together. The bicycle should slow predictably without unusual vibration or wandering.
- Ride conservatively at first. Complete the bedding-in process before returning to a fast trail, steep descent or loaded e-bike ride.
Don't treat a quiet lever as proof that the job is complete. Braking performance depends on the pad, rotor or rim, wheel position, caliper, cable or hydraulic circuit, and the rider's ability to apply both brakes. A few deliberate checks are cheaper than discovering a mistake on the Maungatapu or a wet track above the city.
For brake-pad matching, workshop inspection and practical advice on mountain, electric and family bikes, visit Rider 18 in Nelson. Bring the bike in if lever travel, rotor condition or system compatibility is uncertain, or choose the correct replacement parts and tools before starting the job.


