

Best Bike Helmets NZ: A Practical Buyer's Guide
- by Nigel
-

You're standing in the shop, or scrolling through helmet listings at home, trying to work out whether the extra features on one lid are worth paying for. Maybe it's for your daily commute, a Nelson trail ride, a child heading to school, or an e-bike you've just started riding. The answer doesn't start with a brand name or a price tag. It starts with an approved helmet that fits your head and suits the riding you do.
| Riding context | Helmet type to consider | Put fit and approval first, then look for |
|---|---|---|
| Road and city commuting | Commuter or road helmet | Comfortable straps, useful ventilation, reflective details or lights |
| Trail riding | MTB or enduro helmet | More rear coverage, a secure fit, and a visor if it suits your trails |
| Downhill riding | Full-face MTB helmet | Stable fit and coverage suited to gravity riding |
| E-bike riding | A certified commuter or MTB helmet suited to the route | Coverage, visibility and comfort for your speed and traffic exposure |
| Children and school trips | A properly fitted children's helmet | Stable retention, a level position and a design the child will wear |
Why Helmet Choice Matters for NZ Riders
New Zealand has required cyclists of all ages to wear an approved, securely fastened helmet on roads since 1 January 1994. Adult helmet use rose from 43% in 1993 to 92% in 1994, and national monitoring found use stayed above 90%, including 93% in 2011. Those figures show that wearing a helmet is a long-standing norm here, not a specialist habit reserved for keen road cyclists. (New Zealand helmet-use monitoring)
But a helmet in the cupboard doesn't help on a ride, and a loose or poorly positioned helmet isn't the right choice just because it has an impressive list of features. Start with the legal baseline: the helmet must meet an accepted safety standard and be securely fastened when you ride on a road. Then check whether it sits steadily on your head without relying on excessive padding or constant readjustment.
Choose for the ride you actually do
A lightweight road helmet may feel right for an exposed commute, while a trail helmet's deeper rear coverage and visor may make more sense on rough tracks. A child needs a helmet that stays in place through movement and is easy to buckle correctly. For an e-bike, the same approval and fit requirements apply, but your route, speed, traffic and visibility needs should shape which design you choose.
There's no single “best” shape for every rider. Prioritise certification and fit first, then decide whether extra coverage, ventilation, weather protection or integrated lights earn a place in your purchase. More expensive doesn't automatically mean safer, and heavier doesn't automatically mean better.
That's the practical way to approach best bike helmets in NZ: match the helmet to your use, check the label and get the fit right before comparing finishes or technology. The following sections cover the standards to check, how to fit a helmet, and when an older one should be replaced.
NZ Safety Standards and Helmet Technologies Explained
On a Nelson commute, a helmet with an impressive feature badge is no help if it lacks the required compliance marking or sits loose on your head. Check the compliance label inside the helmet first. Waka Kotahi lists accepted standards including AS/NZS 2063:2008, NZS 5439 and AS 2063.2. The helmet itself should carry the relevant marking. A retailer's description is not a substitute. (Waka Kotahi bicycle equipment guidance)
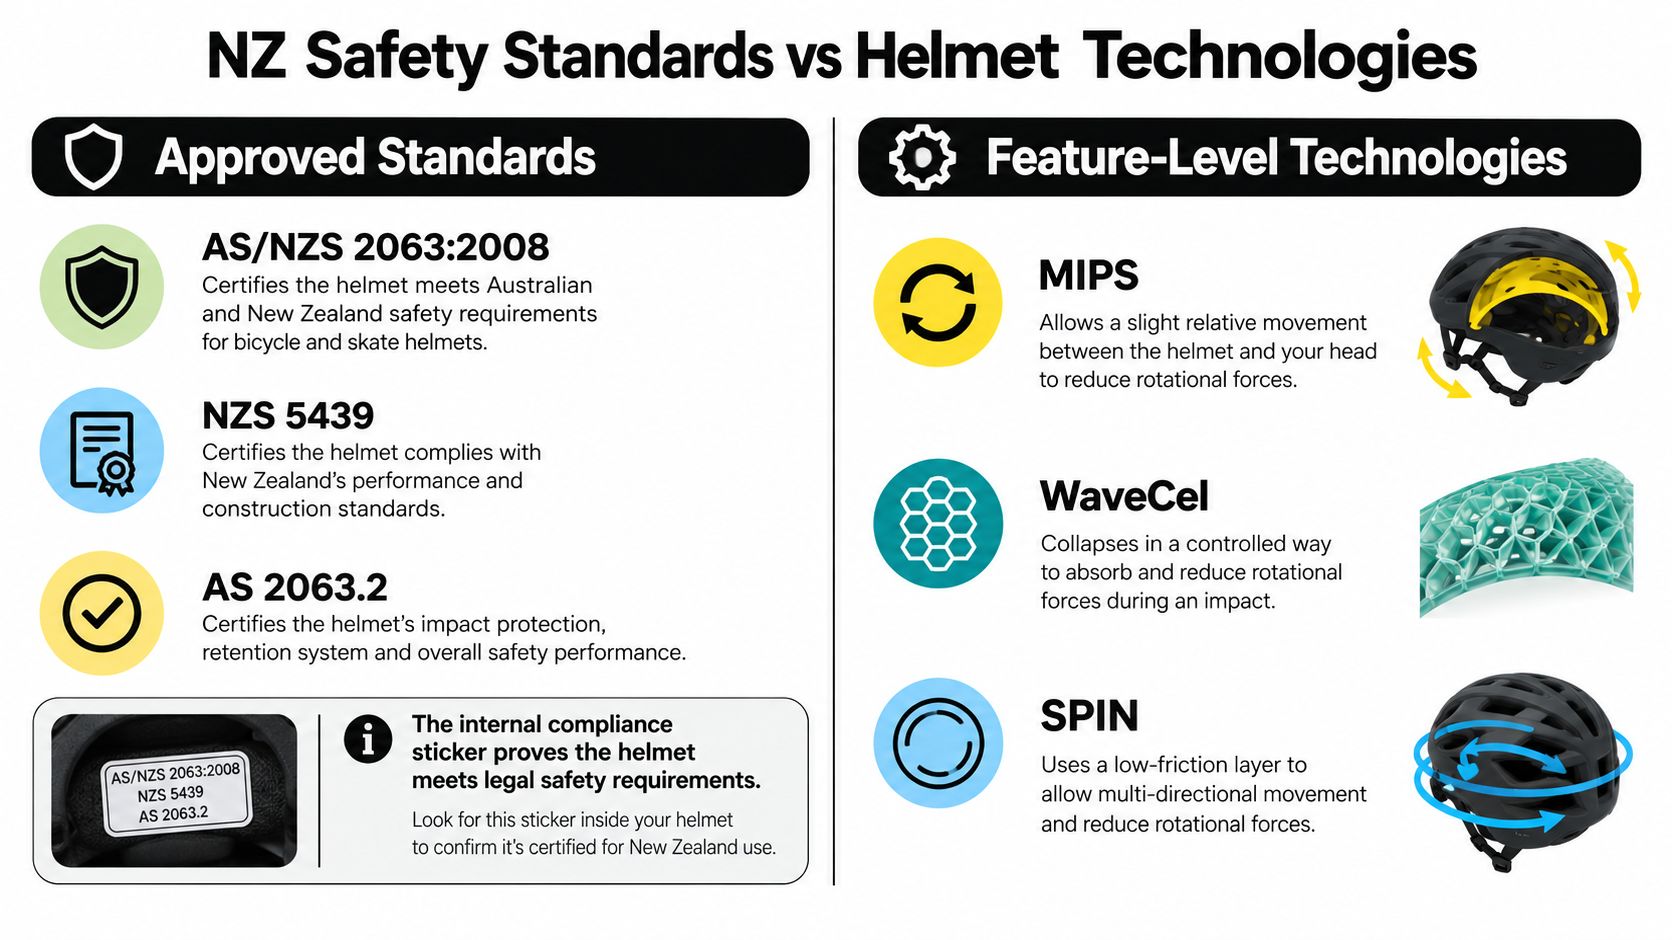
A climbing, motorcycle or horse-riding helmet is made for a different activity, so it cannot replace an approved bicycle helmet. Once you've checked the marking, look at the design and intended ride. A guide to bicycle helmets for road bikes can help you compare road styles, but certification comes before appearance or advertised technology.
What the added technologies do, and don't do
MIPS, WaveCel and similar systems are extra design features, not New Zealand compliance standards. They address aspects of impact performance, but their presence does not establish that a helmet meets the local requirement or fits your head. Try the helmet on and confirm its label before weighing these features. For commuting, school rides, e-bikes or trails, start with the certified helmet that fits the intended use, then decide whether an added system is worth choosing.
Evidence supports helmet use as a way to reduce risk, not as a guarantee against injury. A New Zealand Medical Journal evaluation cites a meta-analysis of 40 studies, which associated helmet use with a 51% reduction in head-injury odds, a 69% reduction in serious-head-injury odds, and a 65% reduction in fatal-head-injury odds. (New Zealand Medical Journal evaluation)
Buy in this order: approved bicycle helmet, secure fit, then extra features. MIPS or WaveCel cannot make the wrong size right.
Comparing Helmet Types for NZ Riding
Choose a helmet family by the conditions you ride in, not by an assumption that one style suits everyone. The table is a starting point. It describes broad design trade-offs rather than guaranteed specifications, which vary between models.
| Helmet Type | Best NZ Use | Coverage | Vents | Typical Price |
|---|---|---|---|---|
| Commuter or road | City streets, cycleways and road riding | Usually focused on head coverage without a chin bar | Often designed for airflow; vary by model | Varies by model and features |
| MTB or enduro | Trail rides and rougher tracks | Often extends farther over the rear of the head | Varies, with comfort and coverage balanced differently | Varies by model and coverage |
| Full-face MTB | Downhill and gravity riding | Includes a chin bar for added face coverage | Varies by design | Varies by model |
| Children's | School trips and family rides | Depends on model; correct positioning matters more than appearance | Varies | Varies by model |
New Zealand injury research provides useful context for taking fit and consistent use seriously. A study of cyclists admitted to public hospitals from 1988 to 1996 estimated that the 1994 helmet law reduced cyclist head injuries by 19% during its first three years, with a 90% confidence interval of 14% to 23%. Other New Zealand analyses estimated reductions of 24% to 32% in head injuries in crashes not involving motor vehicles and 20% in motor-vehicle crashes. (New Zealand cyclist injury study)
Match the shape to the job
A commuter or road helmet suits riders who want a relatively open design for everyday roads and cycleways. If you ride early or late, consider visibility details or a light, but check that any accessory doesn't interfere with fit or obstruct vents.
An MTB or enduro helmet is the natural place to start for trail riding. Extra rear coverage and a visor can suit rougher terrain, changing weather and low sun. Don't assume a visor or bulkier shell makes every trail helmet preferable for every rider. Try it on and see whether its shape works with your head.
For downhill, a full-face helmet adds a chin bar and more face coverage, but its enclosed design and extra bulk can be a poor match for ordinary commuting. If you're comparing this category, Rider 18 has a separate guide to full-face helmets.
A children's helmet earns its place through secure retention and a fit that stays level as the child moves. Pick a colour or design your child likes, but don't let appearance decide the size. E-bike riders don't automatically need a separate label: choose an approved helmet whose coverage and features suit the actual route.
How to Get the Right Fit Every Time
A helmet that shifts when you move your head is the wrong fit, whatever its safety features. Measure around the widest part of your head, usually just above your eyebrows, then check the manufacturer's sizing guide. If you fall between sizes, try both. Choose the one that sits evenly and snugly around your head, rather than relying on extra pads to make a poor fit work.
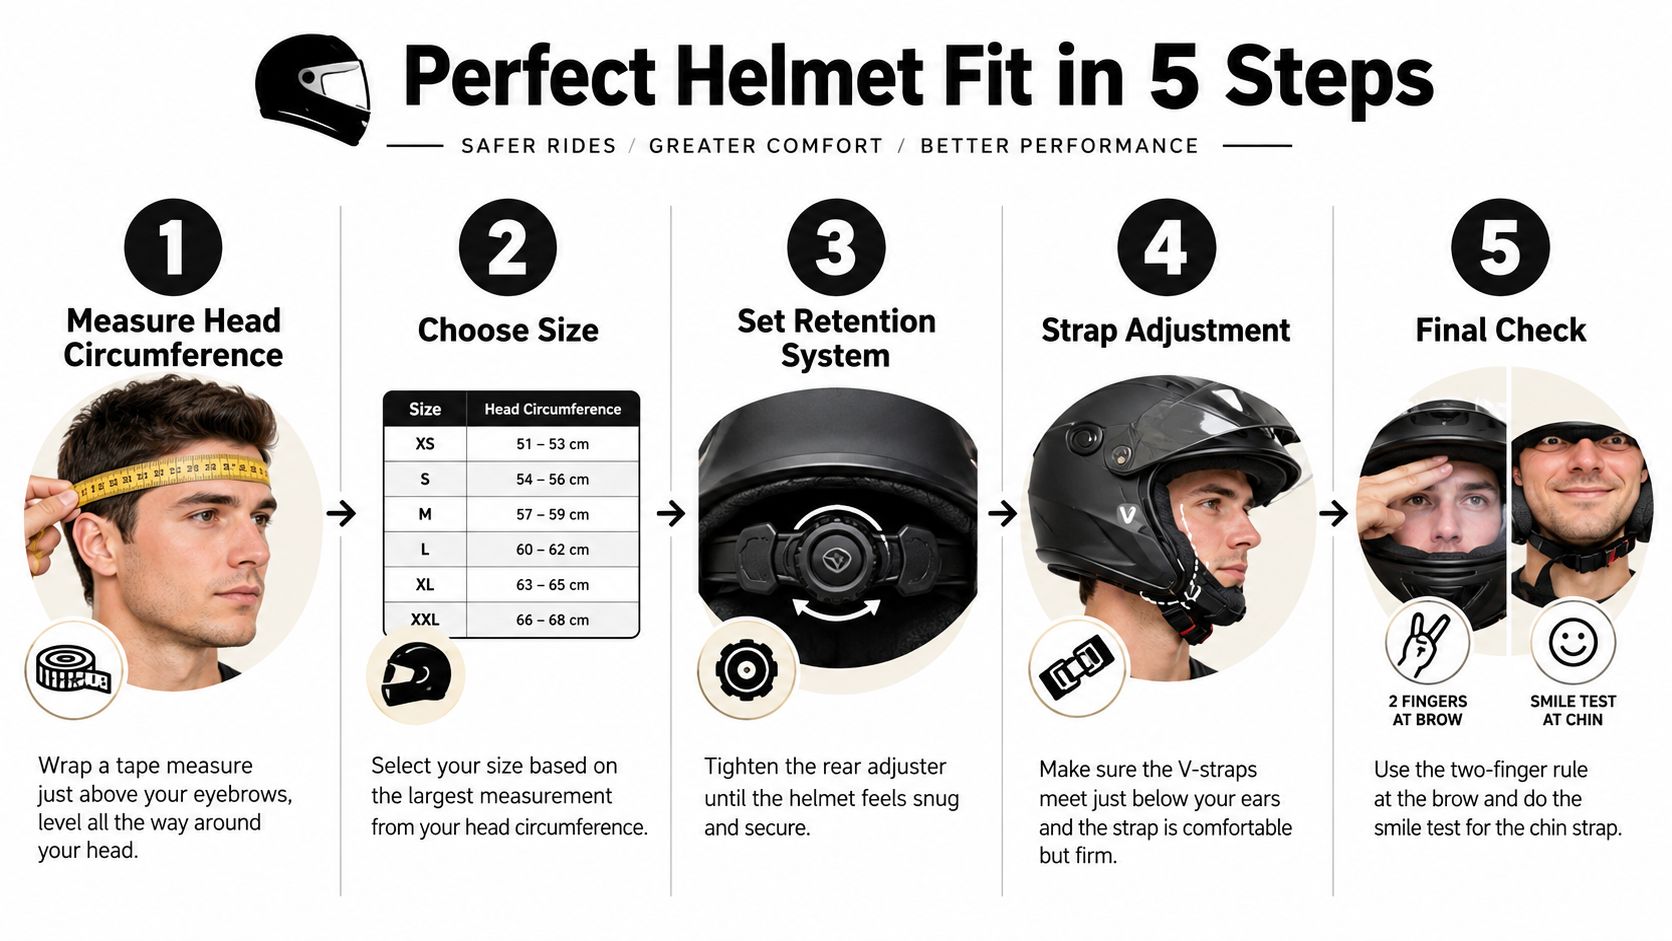
Position the helmet level, with its front edge low enough to cover your forehead. Tighten the rear retention dial or cage until the helmet stays secure without creating pressure points. It should feel snug, with little or no wobble. Don't use padding to disguise a shell that is the wrong shape or size.
Adjust the straps, then test the fit
Set the side straps to form a neat Y below each ear. Buckle the chin strap and adjust it so the helmet stays put when you open your mouth, without pinching or feeling too tight. Wear your usual glasses and hairstyle, including a ponytail if you ride with one. Check that nothing pushes the helmet out of position.
Use this check before buying or setting off:
- Level position: The helmet does not tip back, and your forehead stays covered.
- Stable shell: Gently move your head. The helmet should not wobble independently.
- Straps: The side straps meet below your ears and lie flat.
- Secure fastening: The chin strap holds the helmet in place without hanging loose or feeling restrictive.
- Riding gear: Your glasses, hairstyle, and accessories do not disturb the fit.
For a child, ask them to look up, turn their head, and open their mouth while you check the helmet's position. It should stay level through each movement. Check the fit again as they grow, since a helmet that once sat correctly may no longer fit.
A well-fitted, straightforward helmet beats a high-spec model that shifts on your head.
Foot comfort can affect how steady you feel on the pedals, but it is separate from helmet fit. Riders looking for more support can compare insoles for cycling footwear. Keep the helmet check focused on a secure, stable fit.
Matching Helmets to Real NZ Riders
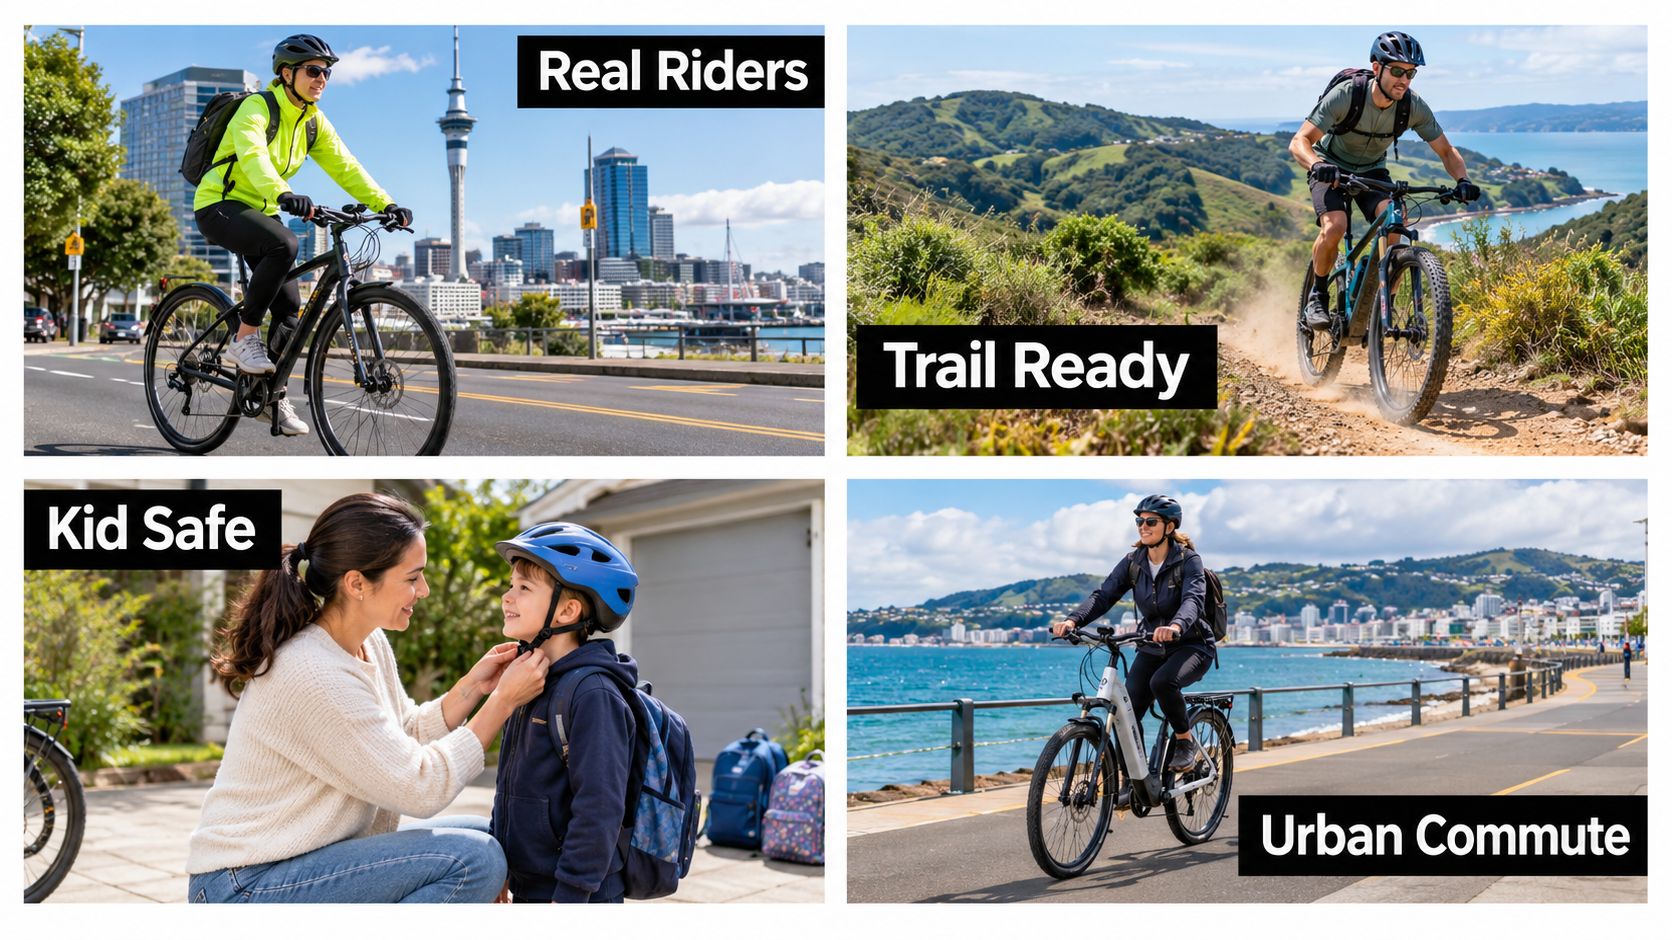
An Auckland commuter riding cycleways and busy streets should start with an approved commuter or road helmet that feels comfortable for everyday use. A stable fit and useful visibility features may matter more than a premium impact system if the added technology makes no difference to comfort or fit. Try it with the glasses and clothing you wear.
A Nelson weekend trail rider has a different brief. An MTB or enduro helmet with a secure fit and more rear coverage may suit rougher tracks better than a road design. A visor can help with sun, rain or trail debris, but there's no reason to pay for one if it gets in the way or doesn't suit your riding.
Four riders, four sensible choices
The school parent should put retention and stable positioning ahead of vent count. Let the child choose a design they're happy to wear, then make sure the helmet stays level and the straps sit correctly. For additional guidance, see this practical advice on choosing a child's crash helmet.
A Wellington urban e-bike rider still needs an approved, securely fastened bicycle helmet. The practical choice depends on the route and exposure: a commuter design may suit smoother urban trips, while an MTB-style helmet may be more comfortable for a rider who wants extra coverage. Don't assume an e-bike label alone means better protection. Check fit, coverage, and whether lights or reflective details make sense for the conditions.
A short visual guide can help you spot the sort of fit and equipment details to check before a ride.
Across all four examples, the sensible order stays the same: confirm approval, get a secure fit, then choose features for the route. No scenario makes condition irrelevant. A well-chosen helmet that's cracked, loose or otherwise damaged needs attention before it goes back on the rider's head.
Replacement, Crash Care, and ACC Context
Replace a helmet after a crash, even if you can't see obvious damage. A hard drop onto a solid surface is also a good reason to inspect it carefully and seek advice about whether it should be replaced. The outer shell can look fine while the protective structure inside has been compromised, so don't use appearance alone as your test.
Check the shell, straps, buckle and inner liner for cracks, deformation, looseness or wear. If anything looks damaged, don't keep riding in it while you decide. Manufacturer care and replacement instructions vary, so use the guidance for your particular helmet rather than assuming every model ages in the same way.
Keep it clean and store it properly
Wash removable pads and straps only as the manufacturer recommends, and let them dry fully before reinstalling them. Store the helmet somewhere cool and dry, away from prolonged sun exposure and anything that could crush or damage it. If the straps no longer adjust properly or the retention system won't hold the helmet in place, treat that as a functional fault, not a cosmetic one.
ACC reported more than 31,000 cycling-related injuries in New Zealand in 2024, costing $115 million, the highest total of the previous five years. Those figures don't tell you what any individual helmet would prevent, but they do underline why riders should take fit, condition and replacement seriously. (ACC's report on cycling-related injuries)
If you're unsure whether a helmet still sits correctly, get a second opinion before relying on it. An in-person check can be especially useful when a child has grown, a rider has changed hairstyles or eyewear, or an e-bike accessory has been added. If the shell or straps are damaged, replacement is the sensible call.
Buying and Fitting at Rider 18 in Nelson
Buying online works well when you know your size and head shape, but an in-person try-on is useful if you're between sizes, fitting a child, or choosing a helmet for a new style of riding. Rider 18 is a Nelson bike shop and online store with helmets for different cycling uses, along with advice from a team that works with mountain bikers, e-bike riders and families. The shop offers nationwide shipping with free delivery over $100 and easy 14-day returns.
Take this checklist into the shop or use it before checkout:
- Riding use: Choose for your commute, trail, downhill, school trip or e-bike route.
- Compliance: Check the internal label for an accepted bicycle-helmet standard.
- Fit: Confirm a level position, secure retention and little or no wobble.
- Features: Pay for coverage, visibility or comfort features that suit your ride.
- Condition: Don't reuse a helmet that's damaged or compromised.
If you're local, bring your bike or riding gear and ask the team to check how the helmet sits with your usual setup. For online orders, take your time with the size guide and make sure the fit is right before your first ride.
Visit Rider 18 to browse helmets for commuting, trail riding, e-bikes and kids, or drop into the Nelson shop for help with fit. Choose the approved helmet that sits securely and suits your riding, then make wearing it part of every ride.


