

Balance Bike Helmet Guide for Safe First Rides
- by Nigel
-

You've probably seen it already. Your toddler straddles the balance bike, pushes off with both feet, beams for two seconds, then forgets how stopping works and tips gently onto one side. Nothing dramatic. Just a very normal first ride.
That small wobble is exactly why parents end up asking about a balance bike helmet so early. The falls usually happen at low speed, but they happen often, and they're awkward. A child might step off late, turn their head while stopping, or topple sideways when the front wheel twists. For a little rider, “just cruising in the driveway” still involves a lot of trial and error.
A good helmet doesn't turn riding into something scary. It does the opposite. It gives your child a safer way to learn, and it gives you one less thing to worry about while they practise those first pushes, glides and stop-start turns.
Why Your Toddler Needs a Helmet From the First Push
The first few balance bike sessions rarely look smooth. Most toddlers don't ride in a straight line, brake neatly, or step off at the right moment. They scoot, wobble, look at the dog, drift toward the garden edge, then sit down suddenly because balance disappeared without warning.
That's normal learning. It's also why a balance bike helmet matters from the very first ride, not only once your child seems “fast enough” to need one.
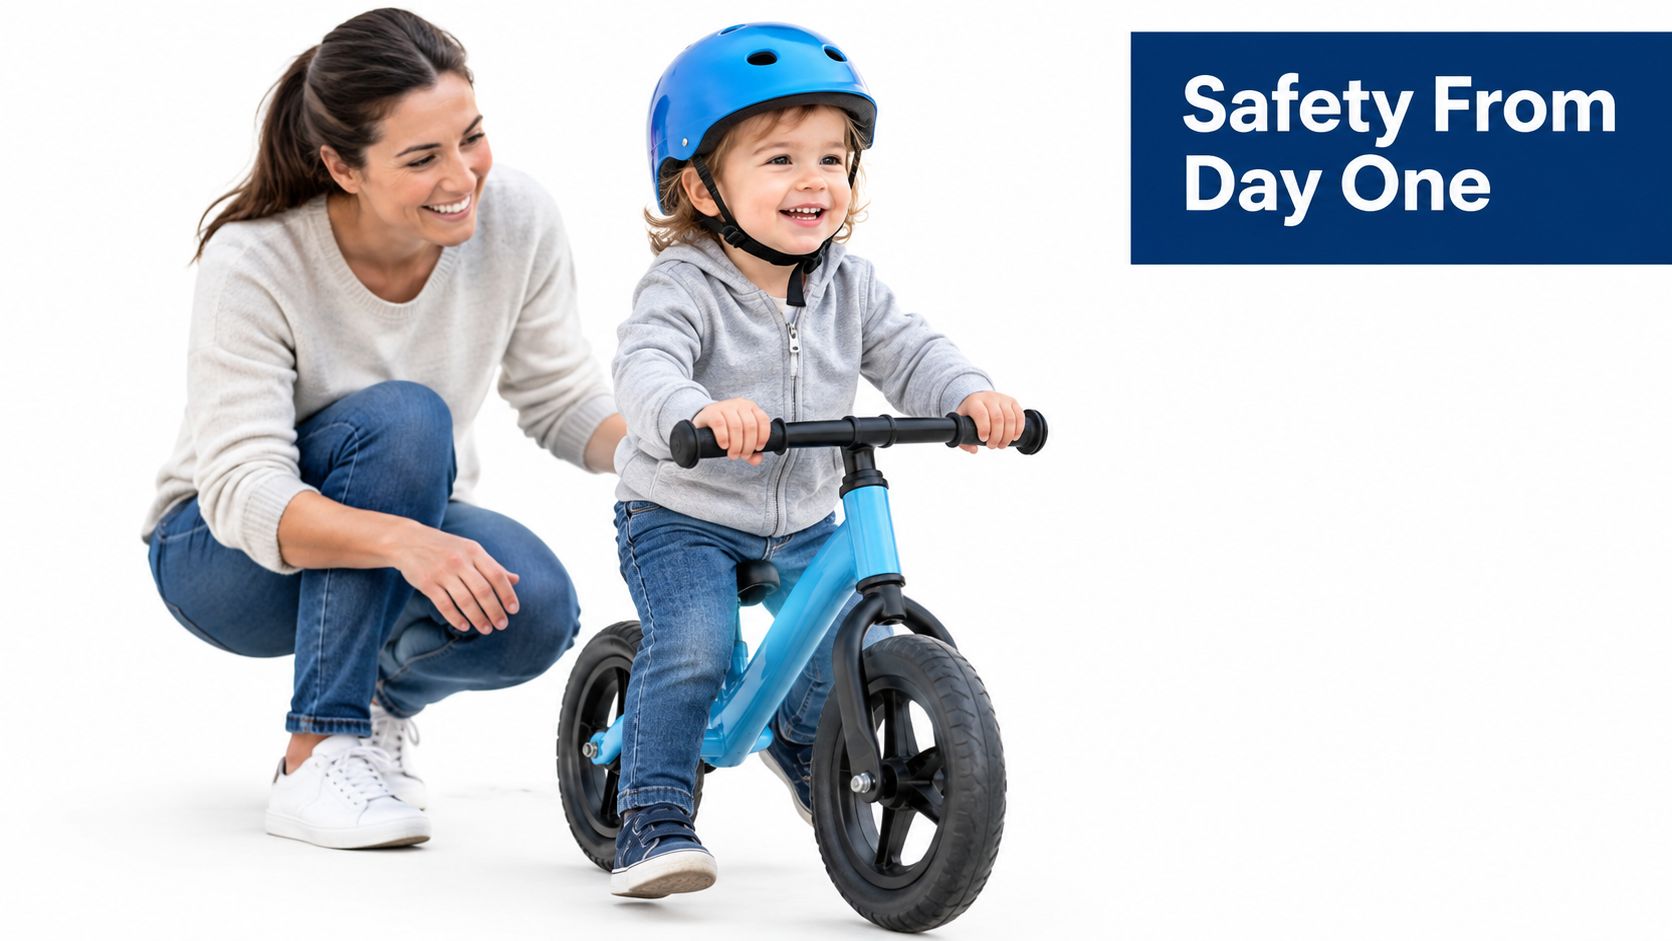
Small speeds still create real falls
A toddler on a balance bike is usually close to the ground, but close to the ground doesn't mean no risk. The common fall isn't a dramatic over-the-bars crash. It's a side tip, a backwards sit-down, or a stumble during a rushed dismount.
Those moments catch children off guard because they're still learning how their body moves with the bike. Their hands don't always go out in time. Their head position changes quickly. A helmet helps when the lesson includes an unplanned meeting with the footpath, driveway, or packed grass.
In New Zealand, helmet use starts early
In New Zealand, cycle helmets are legally required for cyclists on roads, and the helmet must be an approved standard and securely fastened under the Land Transport Rule on cycle helmets. Road-safety guidance also says children must wear an approved helmet while riding, and children under 10 should only ride on roads with an adult.
That matters even if your child is only just beginning. Early rides shape habits. If the helmet goes on every time, your child learns that riding and helmet use belong together, much like shoes go on before a walk outside.
Practical rule: If the bike is out, the helmet is on before the first push.
Confidence grows when the routine is simple
Parents sometimes worry that adding a helmet will make riding feel like hard work. Usually the opposite happens when the fit is right. The child gets used to it quickly, and you stop having the same negotiation before each ride.
If you're also choosing the bike itself, this guide to a balance bike for toddlers can help you match the bike to your child's stage.
What Makes a Balance Bike Helmet Different
A balance bike helmet isn't just a tiny adult helmet. It needs to suit a child who is still developing balance, still learning where their body is in space, and still stopping by putting their feet down whenever they feel unsure.
That changes what matters.
Think of it like shoes, not school uniform
A helmet for a small rider should fit more like a good pair of shoes than a blazer bought two sizes up. If shoes slide around, your child trips. If a helmet shifts around, it can move out of place when they need it to stay put.
Parents often understand this immediately with gumboots. A little growing room feels harmless until the child starts shuffling instead of walking properly. Helmets work the same way. Too much room changes how the child moves and how the gear performs.
The child's stage matters
Auckland Transport notes that balance-bike riders are typically about 85 to 110 cm tall and roughly 2 to 5 years old in its kids learn to ride booklet. At that stage, head size, neck strength, attention span and riding style are all different from an older child pedalling a larger bike.
Starship Safekids also reports in the same booklet that a properly fitted bike helmet can reduce the risk of serious brain injury by 74%. That's why the fit of a smaller child's helmet matters so much. For balance-bike riding, the goal is stable coverage and clear vision, not extra space for next year.
What usually matters most
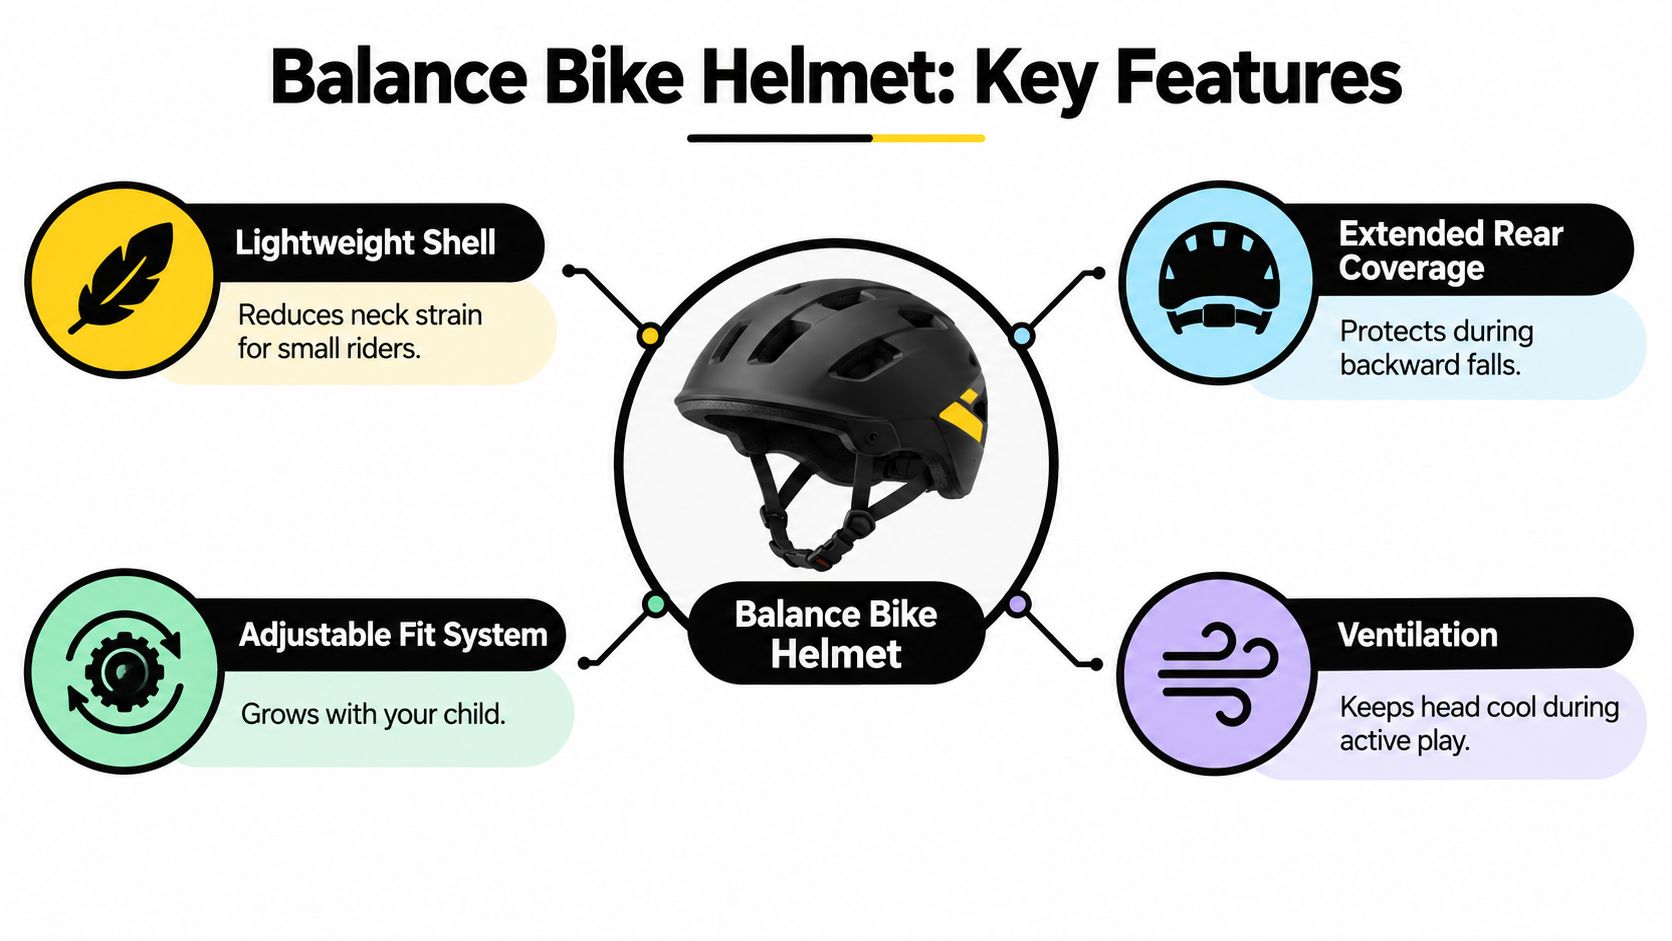
When I help parents compare toddler helmets, I'd put these features near the top:
- Low weight: A lighter helmet is easier for a small child to wear without fussing or tipping their head back.
- Stable hold: The helmet should stay centred during lots of stopping, turning and stepping off.
- Good coverage: Balance-bike falls often involve sideways or backward tumbles rather than a straight-forward slide.
- Simple adjustment: Short practice rides work better when the helmet goes on quickly and predictably.
- Clear sight lines: A helmet shouldn't creep down and block what your child can see.
A child who can see clearly and move comfortably is more likely to relax and learn.
Why an oversized helmet is a poor trade
“Room to grow” sounds economical, but with toddlers it often creates a worse experience. The helmet can bob when they run with the bike, tilt while they look down, or slide forward during a stumble. That's distracting at best and unhelpful at the exact moment the helmet needs to stay where it belongs.
Safety Standards and NZ Rules Every Parent Should Know
A sticker inside a helmet can feel like a small detail. It isn't. For a child's balance bike helmet, the standard tells you the helmet has been made to meet defined safety requirements rather than just looking protective on the shelf.
What AS NZS 2063 means in plain language
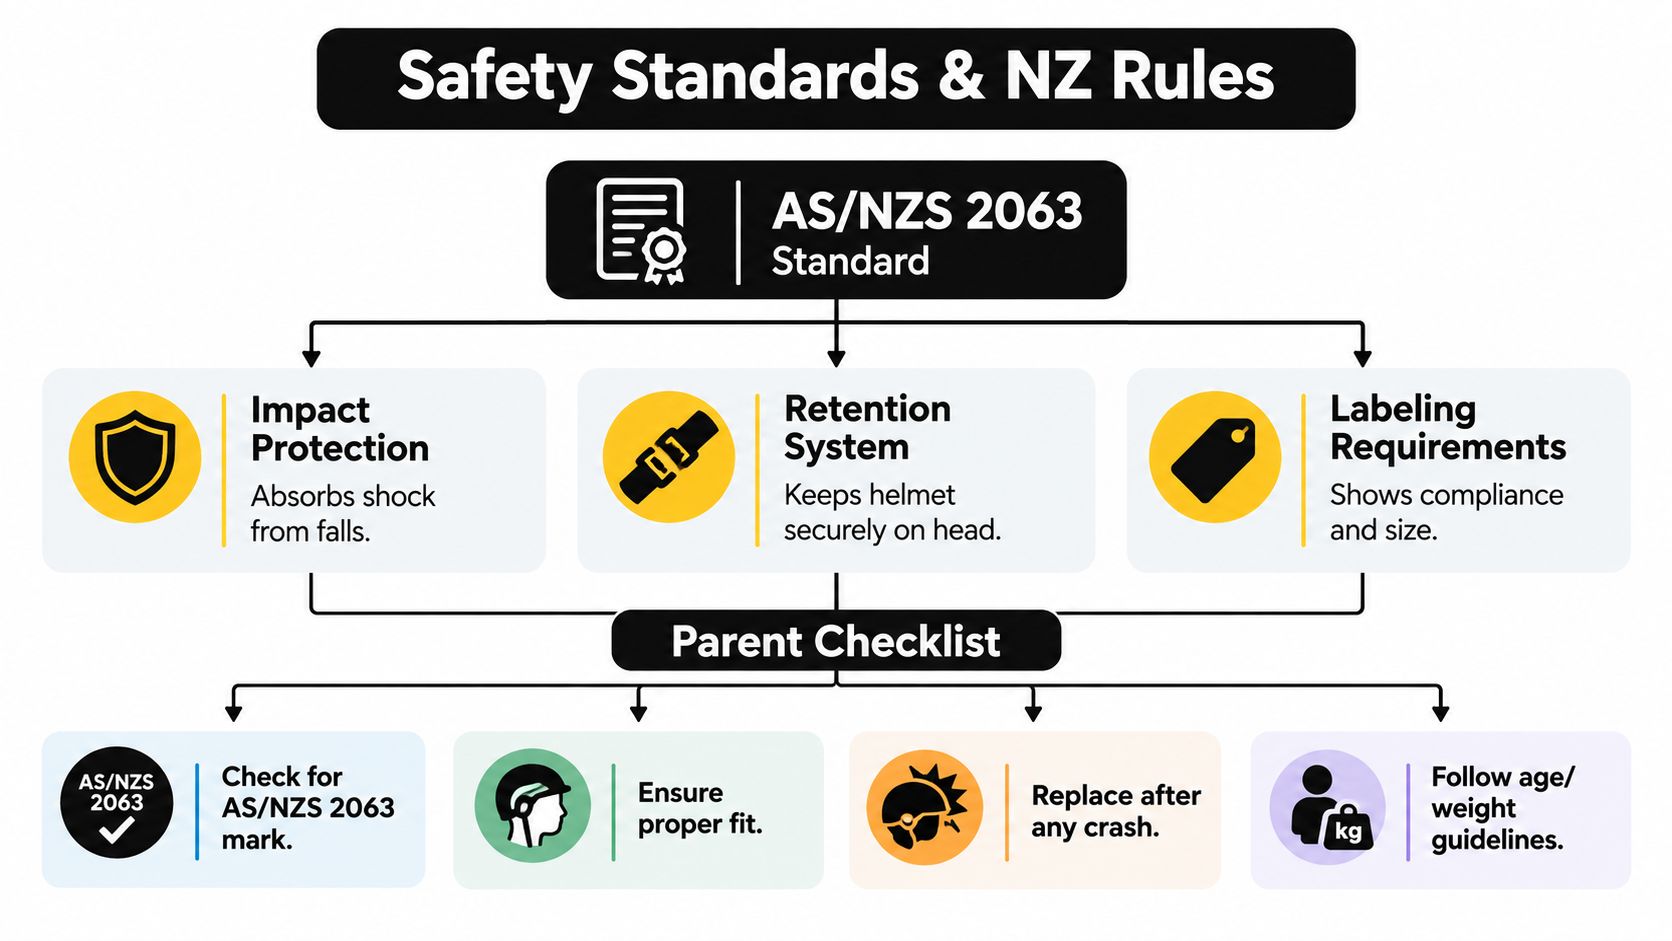
In New Zealand, bicycle helmets should meet AS/NZS 2063, as outlined by Standards New Zealand's bicycle safety guidance. That standard covers impact-energy attenuation, helmet stability, load distribution, retention-system strength, attachment-point performance and peripheral-vision clearance.
Here's what that means in everyday parent language:
- Impact attenuation: The helmet is designed to manage the force of a hit.
- Stability: It should stay positioned instead of rolling easily around the head.
- Load distribution: Force shouldn't concentrate in one small area.
- Retention strength: Straps and fastening parts should hold together properly.
- Vision clearance: The helmet shouldn't block what the rider needs to see.
For balance-bike use, that list matters because toddler falls are often messy rather than dramatic. They can involve side contact, sliding, twisting and the helmet trying to move as the child moves.
Approved and fastened both matter
A certified helmet still needs to be worn properly. New Zealand's rules don't only focus on having a helmet nearby. They require an approved helmet that is securely fastened when riding on roads under the same Land Transport Rule discussed here.
That “securely fastened” part is where many everyday problems begin. A loose strap, a helmet sitting too far back, or too much movement at the sides can undo the value of buying a certified model in the first place.
Why NZ families hear so much about helmets
New Zealand has had a strong helmet-wearing culture for a long time. A Ministry of Transport survey reported a national cycle-helmet wearing rate of 93% in 2011, unchanged from 2010 and similar to the 92% range recorded in 2007 to 2009, as summarised in this background on bicycle helmets in New Zealand. The same summary notes that, in 2003 to 2007, 12 children died from bicycle-related injuries, and child cyclist injuries averaged about two deaths per year plus more than 487 hospitalisations in 2005 to 2009.
Those figures help explain why approved helmets became such a normal expectation here. Parents, schools and road-safety groups didn't land on helmet routines by accident.
Later on, fit makes all the difference in daily use. This video gives a helpful visual sense of what parents should look for before a ride.
What to check before you buy
If you're standing in a shop or comparing listings online, use this quick filter:
- Look for certification marking: Check that the helmet identifies compliance with the relevant standard.
- Check condition carefully: Don't use a damaged helmet, even if the damage looks minor.
- Test the fit system: It should snug the helmet evenly, not just squeeze one spot.
- Watch the child's eyes: If the front edge drops into their view, the fit or size isn't right.
Key Features That Affect Comfort and Protection
Two helmets can both be certified and still feel very different on a toddler's head. That's where features matter. The right ones don't make a helmet safer by magic. They make it more likely the helmet will sit properly, stay on properly and be accepted by the child without daily drama.
What features change the real-world ride
Some balance-bike sessions last only a few minutes. Even so, children notice discomfort straight away. A hot helmet, a fiddly buckle or a shell that wobbles can turn a cheerful practice lap into “take it off” before your child has reached the letterbox.
The most useful buying mindset is simple. Don't chase marketing language first. Look at what will help with actual balance-bike moments such as stepping off in a hurry, stopping on a slope, or riding in warm afternoon sun.
Balance Bike Helmet Features Compared
| Feature | What to Look For | Why It Matters for Balance Bikes |
|---|---|---|
| Weight | A helmet that feels light on your child's head | Small riders tire quickly if a helmet feels heavy or awkward |
| Fit system | Easy adjustment that holds the helmet evenly | Short stop-start rides need quick, repeatable fit changes |
| Strap layout | Straps that sit neatly and adjust without twisting | Twisted or badly placed straps often cause fussing and poor positioning |
| Rear coverage | A shape that protects the back of the head without pushing the helmet around | Balance-bike falls often include backward sit-down tumbles |
| Ventilation | Enough airflow for warm rides, without making the helmet feel bulky | Hot children often try to remove the helmet mid-session |
| Visor shape | A modest visor or none if it affects vision | Toddlers look up and down constantly while learning |
| Padding comfort | Soft contact points that don't create pressure spots | If a helmet hurts, your child won't want it on for long |
| Buckle design | Simple fastening that avoids skin pinches | One painful buckle moment can create helmet resistance for days |
Picking priorities instead of chasing every feature
For a balance-bike helmet, I'd usually rank fit stability first, then weight, then comfort details such as ventilation and buckle ease. A cool-looking helmet isn't much use if it slips when your child turns their head.
Some helmets include added impact-management technologies. Those can be worth considering, but they shouldn't distract from the basics. If the helmet is too big, too high on the head, or always being pushed back into place, the headline feature won't solve the core problem.
Choose the helmet your child can wear correctly, not the one with the longest feature list.
One practical shopping note
If you want to compare actual options, Rider 18 carries kids' and baby helmet products alongside balance bikes, which makes it possible to check bike and helmet fit together in one place. That's useful because some children look fine in a helmet while standing still, then show fit problems as soon as they climb onto the bike.
Finding the Right Size and How to Measure at Home
Sizing causes more confusion than almost any other part of helmet shopping. Many parents start with age. That's understandable, but age is only a rough hint. Head shape and head circumference matter much more.
Measure first, then read the size chart
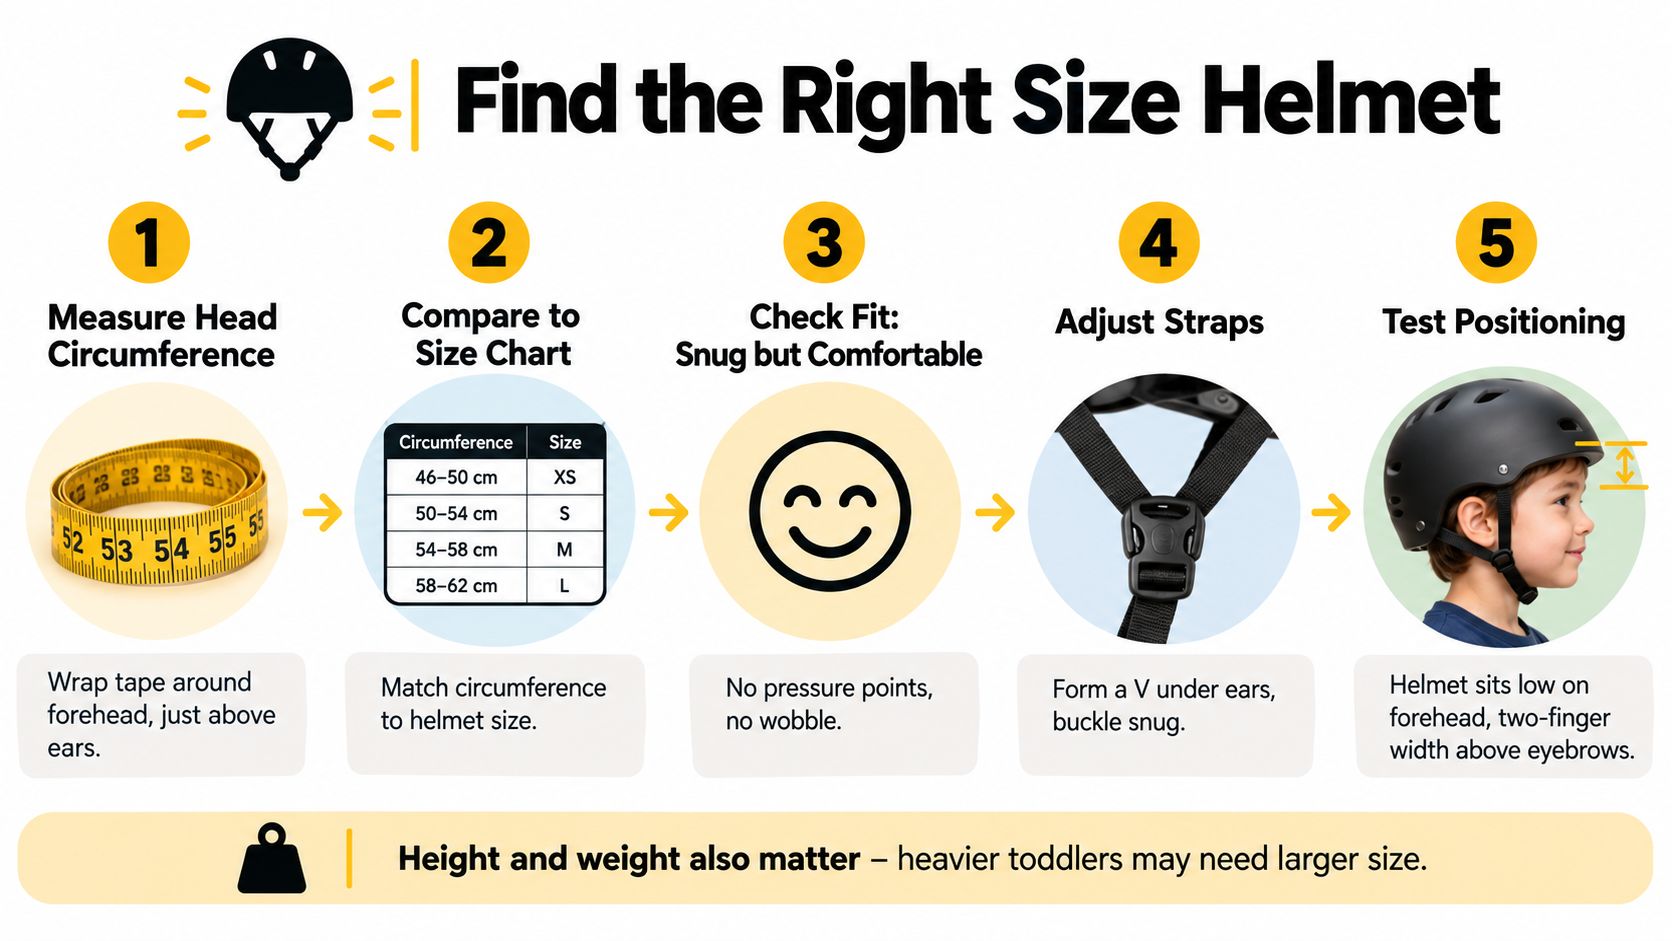
Start with a soft tape measure. Wrap it around your child's head across the brow area, sitting just above the ears. Keep the tape level, not slanting up at the back or dipping at the front.
Write the measurement down straight away. Then compare it with the brand's size range. You want your child's measurement to sit comfortably within that range, not barely squeezed at one end if another size is clearly more suitable.
Why room to grow usually backfires
A helmet that's too large often drops low when the child looks down, shifts when they trot the bike forward, or rocks during a sideways stumble. On a balance bike, those movements happen constantly because children are mounting, scooting, stopping and stepping off all the time.
That's why “they'll grow into it” is one of the least helpful helmet-buying habits. Growing into a jumper is fine. Growing into protective equipment is not.
A simple home sizing routine
Use this checklist if you're measuring before a shop visit or online order:
- Measure at the brow line: Keep the tape level around the widest part of the head.
- Check the brand chart: Match the head measurement to the listed size range.
- Avoid edge cases when possible: If your child sits right at the top or bottom of a size, compare the shape and adjustment range carefully.
- Try the helmet on level: Don't judge fit while it's tilted back like a cap.
- Test for wobble: If it moves too much before strap adjustment, try another size.
If you want a fuller parent-focused walkthrough, this guide to a child's crash helmet is a useful companion.
A helmet should fit your child as they are this week, not the child you expect six months from now.
How to Fit a Balance Bike Helmet Correctly Every Time
Sizing gets you close. Fitting finishes the job. Even a well-sized balance bike helmet can sit badly if it's too far back, too loose at the dial, or hanging from straps that were never adjusted properly.
Start with position before straps
Put the helmet on your child's head and settle it so it sits level. The front should be low enough to protect the forehead, not perched high like a party hat.
A quick visual check helps. From the side, the helmet should look balanced on the head, not tipped backwards. From the front, it should sit straight rather than leaning to one side.
Use this short pre-ride routine
Run through these steps in the same order every time:
- Level the helmet first. Don't tighten anything yet. Just place it correctly.
- Check the forehead gap. Aim for about one to two finger widths above the eyebrows.
- Snug the fit system. Tighten until the helmet feels secure, not squeezed.
- Set the side straps. They should meet just below the earlobes in a neat Y shape.
- Buckle under the chin. The strap should feel firm but comfortable.
- Do the wobble test. Gently move the helmet side to side and front to back.
- Do the vision test. Ask your child to look up, down and around.
If the helmet slides over the eyebrows, rotates too easily, or lifts at the front when nudged from the back, something needs adjusting.
Pass or fail signs parents can spot quickly
Here are the cues I'd trust most during a busy morning:
- Pass: Child can open and close their mouth comfortably, and the helmet stays put.
- Fail: Helmet rocks when they shake their head “no”.
- Pass: Straps lie flat against the face.
- Fail: Straps twist, rub, or sit wide away from the ears.
- Pass: Child can see clearly without tilting their head oddly.
- Fail: Front edge keeps creeping into their line of sight.
A useful habit is fitting the helmet before the child gets excited about riding. Once they're already trying to push off, parents tend to rush and accept a loose setup “just for this one ride”.
Why fit matters beyond the checkbox
Starship notes that at least one tamaiti is killed and about 330 tamariki are hospitalised with serious bike injuries each year, and that Māori and European children are overrepresented in these incidents, according to its bike helmet and wheels safety guidance. The same guidance also points to a broader point. Helmet use matters, but injury prevention isn't only about saying “wear a helmet”.
For balance-bike riders, the safer pattern usually comes from three things working together. A properly fitted helmet, close supervision, and a forgiving riding space such as smooth paths away from cars, steep driveways and hard edges.
Care Cleaning Replacement and Your Buying Checklist
A helmet that fitted beautifully in spring can become the wrong helmet by summer if your child grows, the pads compress, or the shell takes a knock. Care is part of safety. So is knowing when to stop using a helmet that looks “mostly fine”.
Keep cleaning simple
Use mild soap, water and a soft cloth. Let the helmet dry naturally. Skip harsh cleaners, solvents and rough scrubbing, especially on straps and padding.
Storage matters too. Don't leave the helmet baking in a hot car for long periods or tossed under heavy gear in the shed. A child's helmet gets treated roughly enough during normal family life without extra punishment from heat and crushing.
Inspect after drops and daily knocks
Balance-bike helmets get dropped a lot. Some drops are harmless. Some deserve a closer look. Check the shell, straps, buckle and inner foam for cracks, dents, loose parts or anything that suddenly looks uneven.
If the helmet has taken an actual riding impact, be cautious. Parents often focus on the scrape outside and miss the fact that the protective job happened inside. If you're unsure, replacing it is the safer call.
A buying checklist that keeps things clear
When you're comparing helmets, strip the decision back to essentials:
- Certification first: Look for the appropriate approved standard.
- Correct current size: Buy for today's head measurement, not future growth.
- Stable fit: The helmet should stay level during real movement.
- Reasonable weight: Light enough for a small rider to wear happily.
- Usable straps and buckle: Easy for adults, comfortable for children.
- Good everyday comfort: Ventilation, padding and shape should support regular use.
The bigger safety picture at home
Parents sometimes think the job is done once they've bought a certified helmet. It's a great start, but the everyday setup matters just as much. A child on a balance bike is safest when the area is calm, the surface is predictable, and an adult is close enough to step in before a wobble turns into a hard fall.
If you'd like hands-on help, in-store fitting can be especially useful for children who sit between sizes, dislike straps near the ears, or keep pulling the helmet backwards. Local workshop support also helps families keep the bike itself in easy-to-control condition, which is part of the same safety puzzle.
If you'd like help choosing a balance bike helmet that fits your child's head shape and riding stage, Rider 18 can help with kids' helmets, balance bikes, and practical fit advice from its Nelson store at 60 Vanguard Street. You can browse gear or plan an in-store visit through Rider 18.


