
Brake Bleed Kit Shimano: How to Choose and Use One
- by Nigel
-

Your lever squeezed fine last weekend. Now it pulls closer to the bar on every descent, firms up if you pump it twice, then goes vague again by the next corner. That's usually air, aged oil, or both, and it's the point where riders search for a Brake Bleed Kit Shimano they can use at home.
Don't buy on the label alone. A kit that seals on one Shimano lever can refuse to thread onto another, and a bottle of the wrong fluid can turn a routine job into a seal replacement. I would treat compatibility as the purchase, not as a detail you check after the courier arrives.
Nelson gives you little room for guesswork, because riding here isn't a fringe habit. The Waka Kotahi research report on cycling in New Zealand recorded that only 2.4% of journeys to work were made by bicycle in 2006, while Nelson reached 7.2%, compared with just 0.9% in Auckland. More riders on steep local trails, commutes and family bikes means more hydraulic brakes that need scheduled fluid changes, not emergency fixes the night before a ride.
That pressure is growing with e-bikes, which are heavier and ask more of a brake on long descents. The Waka Kotahi 2023 national attitudes report found that e-bike access or ownership reached 20% of New Zealanders and the proportion using an e-bike at least once a year doubled from 3% in 2018 to 6% in 2023. Whether you bleed at home or book a workshop, the first job is matching the kit, oil and fittings to the exact brake in your stand.
Which Brake Bleed Kit Fits Your Shimano Brake
The brake model decides the kit. Before you compare prices, find the caliper model printed on the caliper body and the lever model on the lever housing, then look at the bleed boss or nipple at the caliper port. Photograph all three markings in good light, because a photo settles arguments that memory won't when you're reading a product listing later.
A generic Brake Bleed Kit Shimano label doesn't confirm fit. The Shimano dealer manual for hydraulic disc brakes distinguishes between hydraulic mineral oil systems, low-viscosity oil systems, different bleed bosses or nipples, and model-specific tools such as the SM-DISC funnel, funnel adapters, TL-BR001/TL-BR002 tools, and different wrench sizes or opening turns. Shimano also warns that the wrong oil can stop the brakes operating and cause serious injury, so a mismatch isn't just an inconvenience.
Run the checklist before you order
Match each row against the kit listing and your brake's manual. If a listing can't answer a row, that listing hasn't earned your money yet.
| Check | What to confirm | Why it matters |
|---|---|---|
| Fluid type | Shimano hydraulic mineral oil, not DOT fluid | Wrong oil can stop the brakes working |
| Funnel thread | M5 × 0.8 interface | Reduces the risk of cross-threading the lever bleed port |
| Brake model | Caliper and lever model, plus bleed boss or nipple type | Bleed fittings differ between models |
| Adapter or spacer | Model-specific funnel adapter, bleed spacer or hose fitting | A generic kit may lack the part your brake needs |
| Oil system | Hydraulic mineral oil system or low-viscosity oil system | Shimano manuals specify the oil for each system |
| Tools | SM-DISC funnel, TL-BR001 or TL-BR002 tools, and wrench size | Model-specific tools decide whether the kit fits your brake |
Start with fluid, because it's essential, then confirm the funnel will fit properly in your lever. A syringe and a length of hose aren't enough when your brake requires a specific funnel adapter, a bleed spacer to hold the pistons, or a hose fitting that seals on your caliper's nipple. Mixed households make this harder, since a mountain bike, a gravel bike and a commuter e-bike can each need a different combination.
The cheapest kit stops being cheap when you buy the missing adapter separately, ruin a bleed with a poor seal, or pay for new pads after a spill.
I would write down both model numbers, keep the port photo beside you, and tick off the table line by line. If you can't confirm the adapter, spacer or oil system, pause and get the fit checked. That ten minutes is cheaper than a second kit.
Why Shimano Brakes Need Mineral Oil, Not DOT Fluid
The brake is a sealed circuit, so the fluid must match the system it runs in. Shimano built its hydraulic brakes around mineral oil, and every seal, hose and reservoir in that circuit expects it. DOT fluid belongs to a different family of brakes with different seal chemistry, and the two fluids aren't interchangeable just because both sit in a squeeze bottle.
According to Shimano's guide to brakes, its mineral oil maintains a constant boiling point of approximately 200°C without absorbing water and is non-corrosive to plastic and painted bicycle surfaces. That stability matters on a Nelson descent where you're dragging a brake through repeated heat cycles, then riding home in the wet. A fluid that holds its boiling point and doesn't take on moisture gives you a lever that behaves the same way ride after ride.
The set-up below shows the mineral oil and funnel ready before any port is opened.
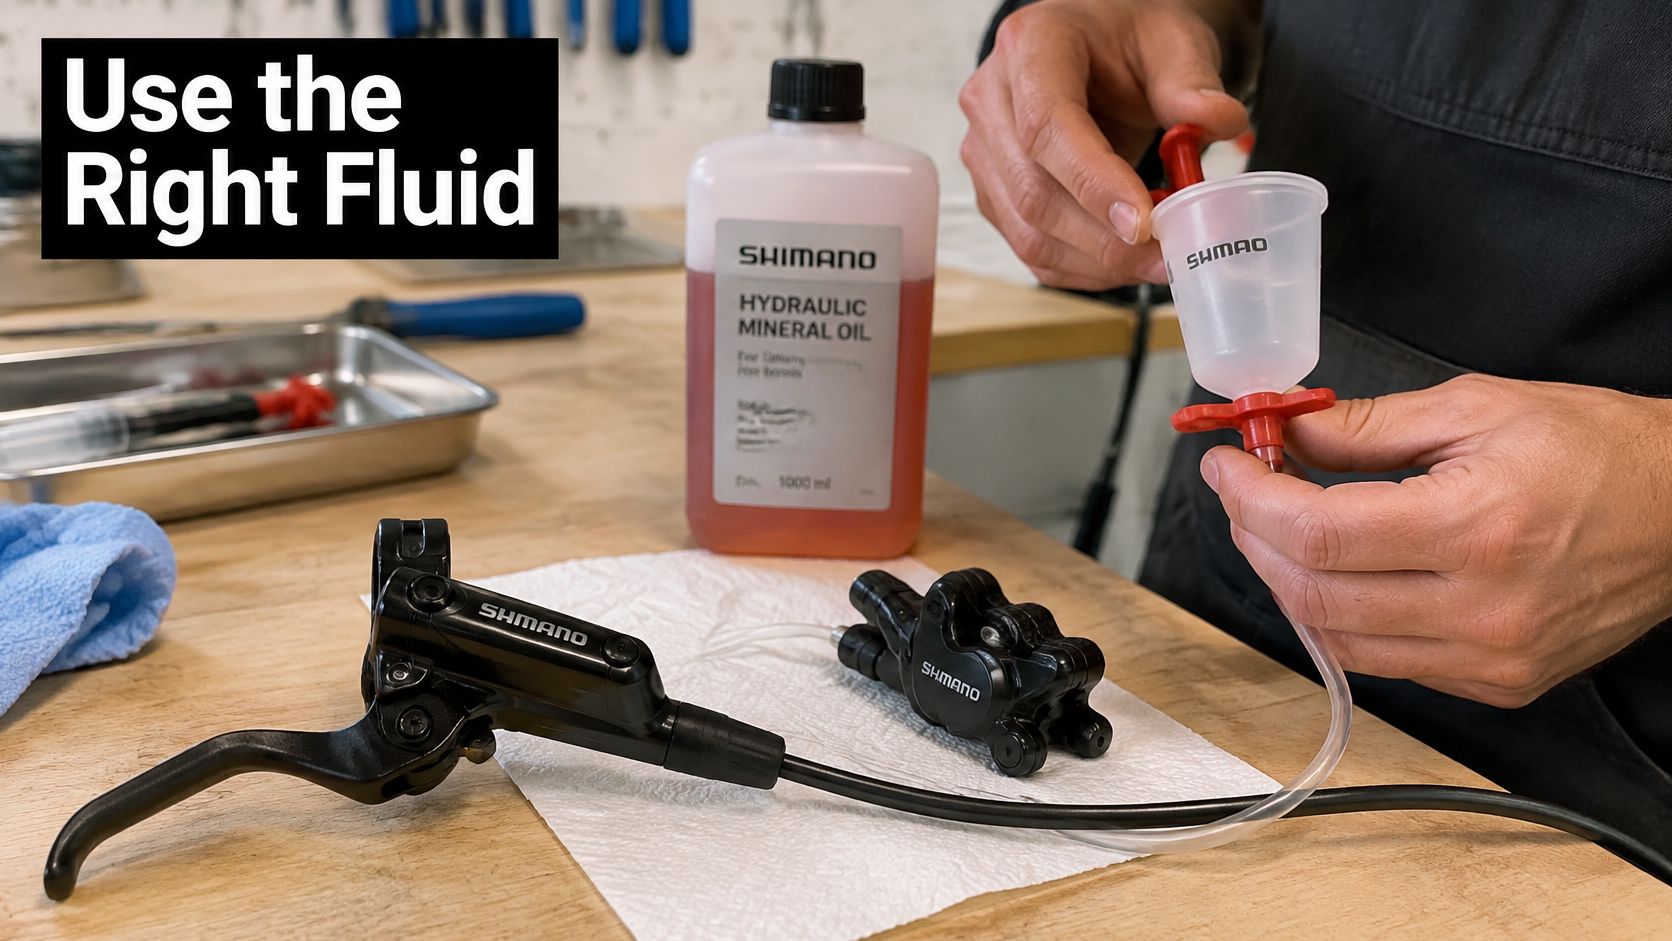
Put DOT fluid into a Shimano system and you risk compatibility problems, contamination and seal damage, plus damage to paint if it spills where mineral oil wouldn't bite. The correct funnel, hose and oil reduce the chance of both seal trouble and paint contamination, which is why the kit and the bottle should be bought as a matched pair, not as whatever is already open on your bench.
Use Shimano mineral oil in a Shimano system, every time.
Before you pour, read the bottle label out loud and confirm it matches your oil system. Riders who need the correct fluid can use Shimano hydraulic mineral oil for disc brakes rather than borrowing a bottle from a DOT kit. If a kit ships with DOT fluid, treat it as the wrong kit for your Shimano brake and set it aside for a different bike. Once the fluid choice is settled, the bleed itself is a careful, unhurried sequence.
How to Bleed a Shimano Brake and Confirm It Worked
Work slowly and keep pads and rotors away from oil. Shimano's one-way bleeding routes oil through the circuit in a direction intended to prevent air bubbles becoming trapped, and the funnel gives you a controlled reservoir at the lever while you work.
The flow below summarises the sequence before you start on the bike.
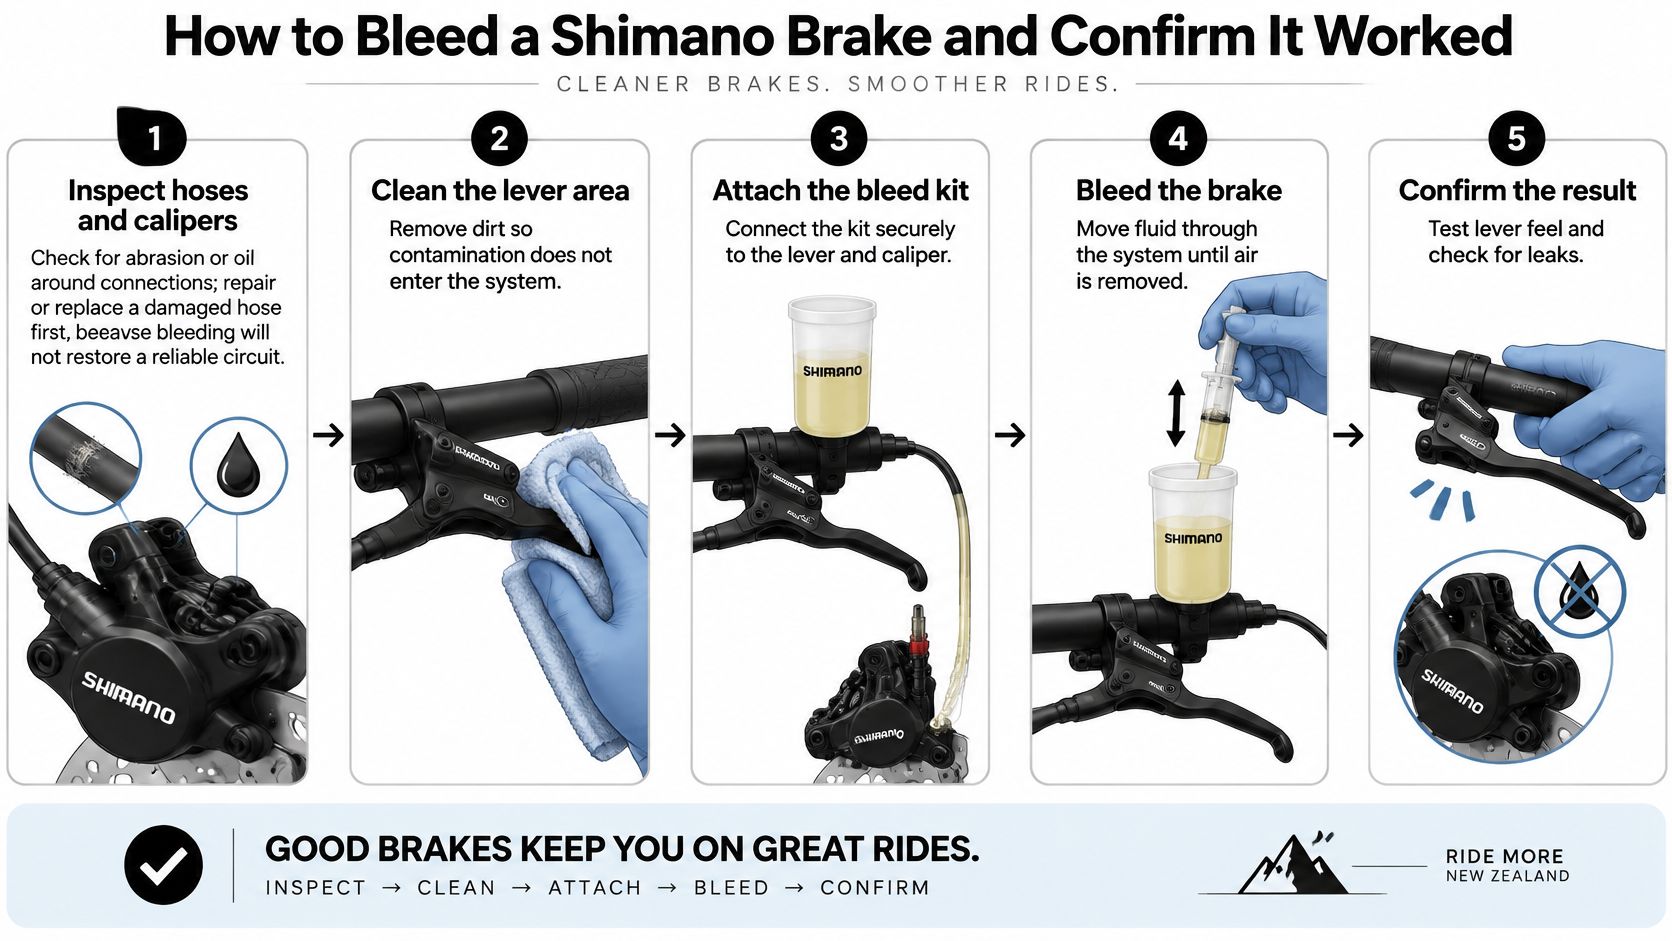
The bleed, step by step
- Inspect first. Check hoses and calipers for abrasion or oil around connections before you open anything. The Shimano product page for hydraulic disc brake components specifies the genuine funnel unit for Shimano hydraulic disc-brake bleeding with an M5 × 0.8 interface, increased volume and spill limitation. Repair or replace a leaking or damaged hose first, because fresh fluid can't restore pressure in a circuit that won't hold it.
- Clean the lever area. Wipe around the bleed port with a clean rag so grit can't fall into the reservoir when you open it. Dirt that enters at the lever travels through the whole system and can score seals you can't see.
- Confirm the funnel fit. Thread the funnel in by hand and stop if it binds. The correct thread reduces the risk of cross-threading the lever bleed port, and forcing a funnel that's started crooked is an easy, costly mistake. Fit the bleed spacer at the caliper with the wheel and pads removed so the pistons stay put.
- Fill and flow. Fill the funnel with Shimano mineral oil, open the caliper bleed point as your manual directs, and let the one-way flow carry oil through the hose. Keep the funnel topped up the whole time, because a funnel that runs dry pulls air straight back in. Tap the hose gently to help stubborn bubbles move.
- Keep going past firm. Continue until the fluid runs clean with no bubbles. The common slip is stopping early because the lever feels firm on the bench, while a pocket of air still sits at the caliper or in a high loop of hose. Pump the lever gently, watch the funnel for rising bubbles, and repeat until they stop.
- Close without adding air. Close the caliper point first as directed, keep the funnel filled, then remove it and refit the port screw and O-ring without overtightening. Wipe every connection dry.
- Test low and slow. Refit pads and wheel, squeeze the lever several times to seat the pads, then test at walking pace somewhere flat and safe. Only head for technical terrain once the brake stops the bike predictably.
Watching the funnel technique once helps before your first attempt, particularly the order in which ports open and close.
Two checks that judge the result
Fluid colour tells you whether you bled or merely topped up. Clean Shimano fluid is pink and translucent, while dark or black fluid means contamination and calls for a complete fluid change through the whole circuit. Lever feel is the second check, since a good bleed leaves a firm lever that doesn't pull toward the handlebar, squeeze after squeeze.
Record the bleed date on the bottle or in your phone, then let colour and lever feel tell you when the next one is due rather than guessing. Before you ride, confirm these four things:
- Colour: expelled fluid finished pink and translucent, not dark.
- Travel: the lever stays firm over several hard squeezes.
- Connections: no oil appears at the lever, hose or caliper.
- Test ride: you completed a low-speed stop test in a safe area.
If the lever stays spongy, don't ride and hope it beds in. Air doesn't leave on its own, and the symptom is telling you the job isn't finished.
Symptoms That Mean Air or Contamination Remains
The most common complaint after a home bleed is a spongy or long lever, one that feels springy instead of solid and travels further than it did before you started. That single symptom can point to remaining air, contaminated fluid, a leak or a hose problem, and each cause wants a different fix. Repeating the same quick bleed three times won't cure a leaking hose.
Use the table to match what your hands and eyes are telling you with the job that's required. Riders who want more background on how the system should feel can read about hydraulic bike brakes and how they work before opening the system again.
| Symptom | Likely cause | Fix |
|---|---|---|
| Spongy or long lever | Remaining air, contaminated fluid, leak or hose problem | Re-bleed carefully; inspect for leaks; do not ride until the lever is firm |
| Lever pulls toward the handlebar | Air or a leak in the circuit | Stop riding and diagnose the circuit before the next ride |
| Dark or black fluid | Contamination | Complete fluid change, not a top-up |
| Oil around hose or caliper connections | Leak or abraded hose | Repair or replace the hose before bleeding again |
| Bubbles keep returning | Air trapped at the fitting or in the funnel | Re-bleed in stages and check the funnel seals properly |
One session, or parts first
A second, slower bleed fixes the straightforward cases. If bubbles keep returning, work in stages, tap the hose, rotate the lever slightly to free trapped pockets, and check that the funnel is sealing properly in the port rather than drawing air past its O-ring. Dark fluid is also a one-session job, but it's a full flush, so keep pushing fresh oil until what leaves the caliper matches what's in the funnel.
Oil at a connection is different. That bike needs a hose repaired or replaced, or a fitting sorted, before any further bleeding, and squeezing the lever harder to test it only pumps more oil out. The same applies if the lever pulls to the bar despite two careful bleeds, because a seal or hose fault is now more likely than trapped air. I would stop at that point and treat it as a workshop diagnosis rather than a third attempt with the same kit.
Stop rule: a lever that won't stay firm after two careful bleeds is asking for parts or diagnosis, not more pumping.
Choosing the Right Option
Start with a reference point for the hardware. Browsing a collection like Gravity Nelson's bleed kit range shows what a basic Shimano hydraulic brake bleed kit typically sells for, which sits around NZ$45. That figure is an anchor rather than your total cost, because you still need the correct oil, possibly a funnel adapter or bleed spacer the basic kit omits, clean rags, and your own time to do the job twice if the first pass leaves air behind. The cheapest kit becomes expensive the moment it lacks the fitting your brake needs.
When a home bleed makes sense
You're well placed at home when you have one or two brakes of a model you've confirmed against the checklist, a clean workspace where oil can't reach pads or rotors, and the patience to judge fluid colour accurately.
Confidence matters too. If you can tell the difference between a firm lever and a springy one, and you're willing to re-bleed rather than ride, the home route pays for itself over a few services.
When a workshop is the better spend
A workshop earns its fee when your household runs several brake models, when an e-bike's weight makes a failed bleed more consequential, or when you suspect a leak. Add a lever that stays spongy after two attempts, or any row of the checklist you couldn't confirm, and paying for a fit check before oil is poured becomes the cheaper decision. The comparison below puts the two routes side by side.
| Factor | Home bleed | Workshop bleed |
|---|---|---|
| Cost | Basic kit around NZ$45, plus Shimano mineral oil bought separately | $45.00 per brake with oil charged as an extra |
| Fit check | You confirm the model yourself from the checklist | Shop confirms fit before any oil is poured |
| Best for | One or two brakes with a confirmed kit | Mixed fleets, e-bike brakes, suspected leaks |
| Turnaround | Your own session, repeated if the lever stays spongy | Booked job, timing confirmed when you book |
Nelson riders have local workshop options, so distance isn't a reason to persist with a brake you don't trust. The rule that makes this decision simple: if any compatibility item is unknown, or the lever still feels spongy after a careful bleed, book the workshop. If everything checks out and the fluid ran clean, ride it after your low-speed test.
Booking a Workshop Bleed With the Right Kit
Use this route when a home check fails, and bring information rather than just the bike. A shop can only match the right kit and oil quickly if you supply the details that identify your brake.
Three steps before you book
- Record the models. Write down the caliper and lever model, photograph the markings on both, and note the bleed port or nipple type at the caliper. Mention any oil you've seen at a connection, because that changes the job from a bleed to a repair.
- Ask for a fit check first. Ask the shop to confirm the funnel, adapter and oil system before any work begins, so no oil goes into a brake the available kit can't serve. If you're still deciding where to go, our guide to finding a bicycle repair shop near you covers what to ask when you ring.
- Get the oil quoted with the labour. We charge $45.00 per brake for a hydraulic brake bleed or service, with oil charged as an extra, so ask for both figures together rather than treating the labour price as the total. That way a full fluid change holds no surprises at pickup.
A bleed visit is also a sensible time to deal with the small jobs you've been deferring. We offer mountain bike maintenance, so pads near the wear limit, a dragging rotor or a drivetrain that's due attention can be assessed while the bike is already in the stand, rather than on a second trip across town.
Bring the caliper and lever model details in with you, or send the photos ahead, and the right kit and oil can be matched before the bike is booked in. You'll leave with a firm lever and a straight answer about whether anything else in the circuit needs attention.
If your lever won't firm up, or you can't confirm which funnel and oil your Shimano brake needs, bring the bike and the model details to us and we'll match the kit before any oil is poured. Visit Rider 18 to sort your brake bleed, mountain bike maintenance and the oil and parts to keep your brakes feeling firm all season.


Please upload banner from store admin blog pages