

Mountain Bike Drivetrain Explained: Parts, Gears and Care
- by Nigel
-

You're halfway up a steep Nelson climb when the pedals lurch forward. The chain catches again, then skips on the same cog as soon as you push harder. Back home, it's tempting to add lubricant and wind the barrel adjuster, but neither will repair worn teeth.
A mountain bike drivetrain works as a system. Keeping it reliable means recognising which part is causing trouble, choosing compatible replacements, and matching maintenance to the mud, dust, coastal exposure and motor load your bike experiences.
Mountain Bike Drivetrain Parts and What Each One Does
That repeatable skip on a climb is useful evidence. If it happens on one rear cog but not its neighbours, inspect that cog closely. If it happens across the cassette, check chain wear, adjustment and freehub engagement before buying parts.
Mountain biking has an established place in New Zealand riding. Sport New Zealand's Active New Zealand Survey found that approximately 292,000 adults aged 16 and over mountain biked at least once during the preceding 12 months in 2013/14. Whether you ride regularly or pull the bike out occasionally, the same components need inspection.
Follow the force from pedals to wheel
Your cranks turn the chainring, which pulls the chain around a cassette cog. The cassette drives the freehub and rear wheel. Meanwhile, the shifter commands the derailleur, and its jockey wheels guide the chain and manage slack.
Drivetrain components, jobs and wear signs
| Component | Job | Wear sign | Replacement trigger |
|---|---|---|---|
| Chain | Transfers pedal force to the rear wheel | Measured elongation, stiff links, damaged plates | Manufacturer's wear limit or physical damage |
| Cassette | Provides the rear cogs | Worn tooth profiles, skipping under load | Confirmed wear or skipping with a correctly fitted new chain |
| Chainring | Provides the front drive teeth | Hooked teeth, poor chain release | Wear causes skipping, lifting or chain retention problems |
| Rear derailleur | Moves the chain and maintains tension | Excessive pivot play, damaged cage, poor shifts | Adjust first; replace damaged or excessively worn parts |
| Shifter and cable or wire | Sends shift commands | Sticky housing, frayed cable, intermittent electronic commands | Replace damaged cable or housing; diagnose electronic faults |
| Bottom bracket and cranks | Support and turn the crank axle | Bearing roughness, crank play, creaking | Persistent bearing play, damage or worn interfaces |
| Freehub | Holds the cassette and allows coasting | Engagement slip, sticking mechanism, excessive play | Service or replace the mechanism according to the hub manual |
| Jockey wheels | Guide and tension the chain | Worn teeth, seized bearings, excessive play | Teeth or bearings no longer guide the chain properly |
Don't mistake every shaped tooth for damage. Manufacturers deliberately shape some cassette teeth to help shifting, and narrow-wide chainrings have alternating tooth profiles. Look for abnormal wear alongside a symptom, not an unfamiliar shape alone.
Practical rule: When a chain reaches its replacement limit, inspect the cassette and chainring too. They've worked together, even if only the chain has an obvious measurement.
A bent derailleur hanger also deserves separate attention. It's the mounting interface between frame and derailleur, so replacing the derailleur won't correct a hanger that points it in the wrong direction.
How Gear Ratios Change Your Climb and Top Speed
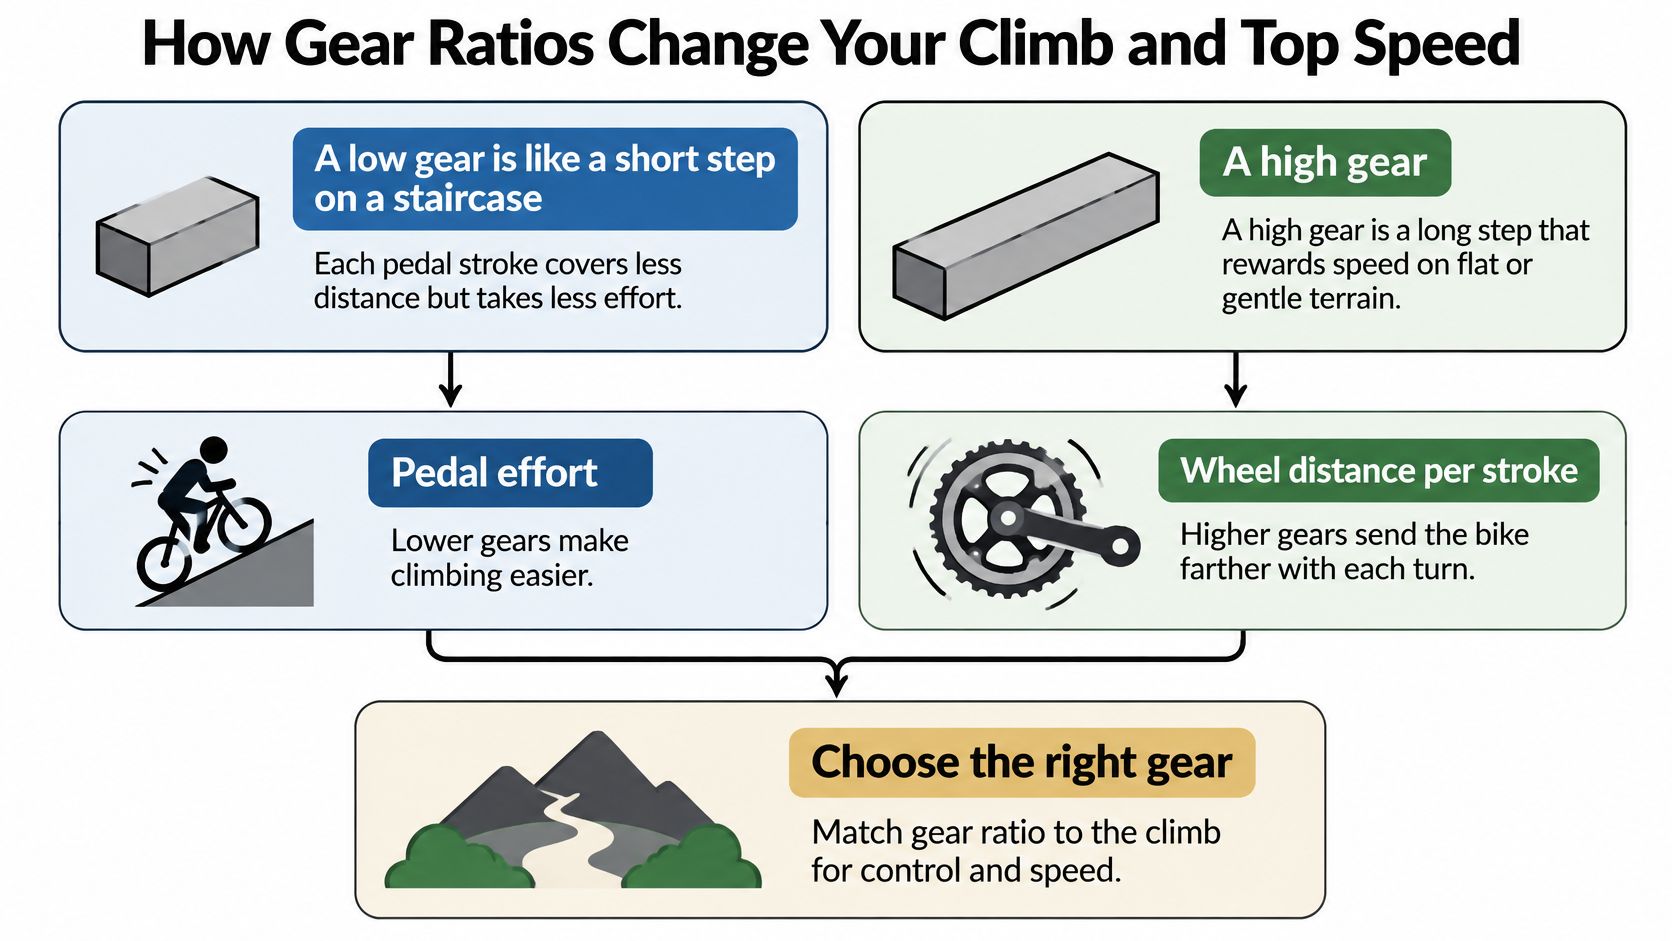
A low gear is like a short step on a staircase. Each pedal stroke moves the bike less distance, but you need less force at the pedals for the same climbing demand. A high gear is a longer step, useful when you're moving quickly and don't want to spin out.
The relationship between effort and distance is easier to understand visually.
Calculate the ratio, then consider the trail
Gear ratio means chainring teeth divided by rear-cog teeth. In a hypothetical setup, a 32-tooth chainring divided by a 50-tooth cog gives 0.64. Pair that same ring with a 10-tooth cog and the ratio is 3.2.
Those are calculated examples, not recommendations for every bike. Wheel size and tyre diameter also affect how far you travel per crank revolution, while rider strength, gradient and traction determine whether a gear is usable.
A wide-range cassette can give you a low climbing gear without sacrificing as much top-end gearing. The trade-off is that a broad range may bring larger jumps between adjacent ratios. On a steady climb, those jumps can leave you choosing between spinning faster than you'd like and pushing harder than feels comfortable.
| Setup | Range character | Useful for | Main trade-off |
|---|---|---|---|
| Single-chainring wide-range | Broad spread from climbing to faster gears | Trail, enduro and steep terrain | Large sprockets add weight; some shifts feel more pronounced |
| E-MTB-specific system | Range and shift behaviour matched to assisted riding | Loaded climbing and sustained assistance | Compatibility and replacement cost need checking |
| Value single-chainring system | Range determined by the chosen cassette and ring | Recreational trail riding | A cheaper system may offer less range or fewer ratio choices |
| Double-chainring system | Overlapping ratios across front rings | Distance riding and compatible cross-country bikes | More controls, cleaning and adjustment |
Choose usable gears rather than a bigger specification
Gear count alone doesn't tell you the easiest gear. A value drivetrain can climb well if its chainring and largest cog provide the ratio you need. Equally, an expensive cassette won't solve gearing that's too tall for your local climbs.
Use this demonstration to connect the gearing choices with drivetrain operation.
The useful test is on the trail: can you climb a representative steep section seated, with a controlled cadence and enough traction to keep moving? If you're always grinding in the easiest gear, consider a smaller compatible chainring before assuming you need a complete drivetrain.
Matching Chains, Cassettes and Freehubs Without Guesswork
A cassette can look right on the bench and still be wrong for your bike. It might not fit the freehub, exceed the derailleur's limits, or require a chain that doesn't match your chainring.
Start with system compatibility, not brand loyalty. Matching speed count is necessary in many systems, but it isn't sufficient. Chain construction, tooth profiles and shifter-to-derailleur compatibility can differ within the same nominal gear count.
Check the interfaces before ordering
Read the component model codes and identify the hub's freehub body. Shimano HG, Shimano Micro Spline and SRAM XD are distinct interfaces, but a brand name alone won't identify the fit. Some SRAM cassettes use HG bodies, for example.
Drivetrain compatibility checks before you buy
| Check | How to confirm | Common mismatch |
|---|---|---|
| Speed count | Count cassette cogs, read chain markings and check the system compatibility chart | Chain and cassette belong to incompatible systems |
| Freehub body | Identify the hub model and inspect its body specification | HG cassette offered up to an XD body |
| Rear derailleur capacity | Check total capacity and maximum supported cog separately | Cassette exceeds the derailleur's operating limits |
| Chain length | Use the drivetrain maker's sizing procedure, including suspension requirements | Excess slack or a chain that pulls the derailleur tight |
| Chainline | Check frame specification, crank chainline and chainring offset | Incorrect offset or crank spacers |
| Crank and bottom bracket | Match axle diameter and length, shell standard and frame clearance | Incompatible axle, bearings or spacer arrangement |
| Chainring bolt pattern | Confirm bolt circle diameter or direct-mount interface, plus chain compatibility | Ring won't fit the spider or mounting spline |
Derailleur capacity is the amount of chain slack the derailleur can take up. Calculate the rear difference, largest cog minus smallest cog, then add the difference between the front chainrings. With a single chainring, there's no front-ring difference to add.
Maximum cog size is a separate limit. A derailleur may have enough total capacity yet still lack clearance for the proposed largest cog. Adjusting its body-position screw beyond the intended range isn't a reliable substitute for compatibility.
Don't overlook the parts you're keeping
A cassette change can expose another limitation: the existing shifter may not operate the replacement derailleur correctly. Cable pull and derailleur movement must work together, while electronic systems need compatible controls and components.
For a value-oriented alternative, the microSHIFT Advent X drivetrain guide is useful when considering a matched system rather than piecing together unrelated parts.
Bring component photographs, model codes and the bike's frame details to a workshop before ordering. If practical, bring the old cassette and chainring too. That lets the mechanic check mounting interfaces, wear and gearing together instead of guessing from a description such as a wide-range mountain-bike cassette.
Matching Parts to Your Riding and Your E-Bike
Choose parts for the load and conditions they'll face, not just their weight on a specification sheet. A Nelson trail rider, an enduro rider and an assisted-bike owner can need different compromises even when their bikes look similar.
NZTA's walking, cycling and micromobility report reported that 8% of New Zealanders had used an e-bike in the previous year. That covers e-bikes generally, not specifically e-MTBs, but it makes compatible parts and accessible servicing relevant to a broad group of riders.
Match the purchase to the rider
- Nelson mixed-trail rider: A ride from dry open tracks into damp bush calls for useful climbing range and readily available replacement parts. Choose gearing for the steepest regular climb, then choose lubricant for the conditions rather than the drivetrain's price tier.
- Enduro rider: Repeated hard accelerations and rough descents favour dependable chain retention, a sound derailleur clutch or stabilising mechanism, and durable replacement parts. Inspect impact damage before spending money on lighter components.
- E-MTB owner: Prioritise a chain, cassette and chainring explicitly approved for the drivetrain and intended motor application. A reinforced chain isn't automatically compatible merely because the packaging mentions e-bikes.
Motor placement changes the maintenance decision
A mid-drive motor sends assistance through the chain and cassette. It can keep drivetrain load high while you're pedalling slowly, so avoid treating a slow assisted climb as gentle use. Hub-drive assistance reaches the wheel differently and doesn't transmit motor torque through the bicycle chain in the same way.
Select an easier gear before the steep pitch, then briefly reduce pedal pressure during the shift unless your system's operating instructions specify otherwise. Don't assume every modern e-MTB drivetrain is designed to shift under full assistance.
Buy the drivetrain you can keep running locally, not just the one with the lowest purchase price.
Compare the cost of replacement chains and cassettes, stock availability, diagnostic support and warranty requirements. Stronger parts can be worthwhile when they prevent repeated failures, but extra weight and cost don't guarantee longer service life. A correctly matched, serviceable system is a better starting point than an automatic upgrade.
How to Clean, Lube and Measure Chain Wear
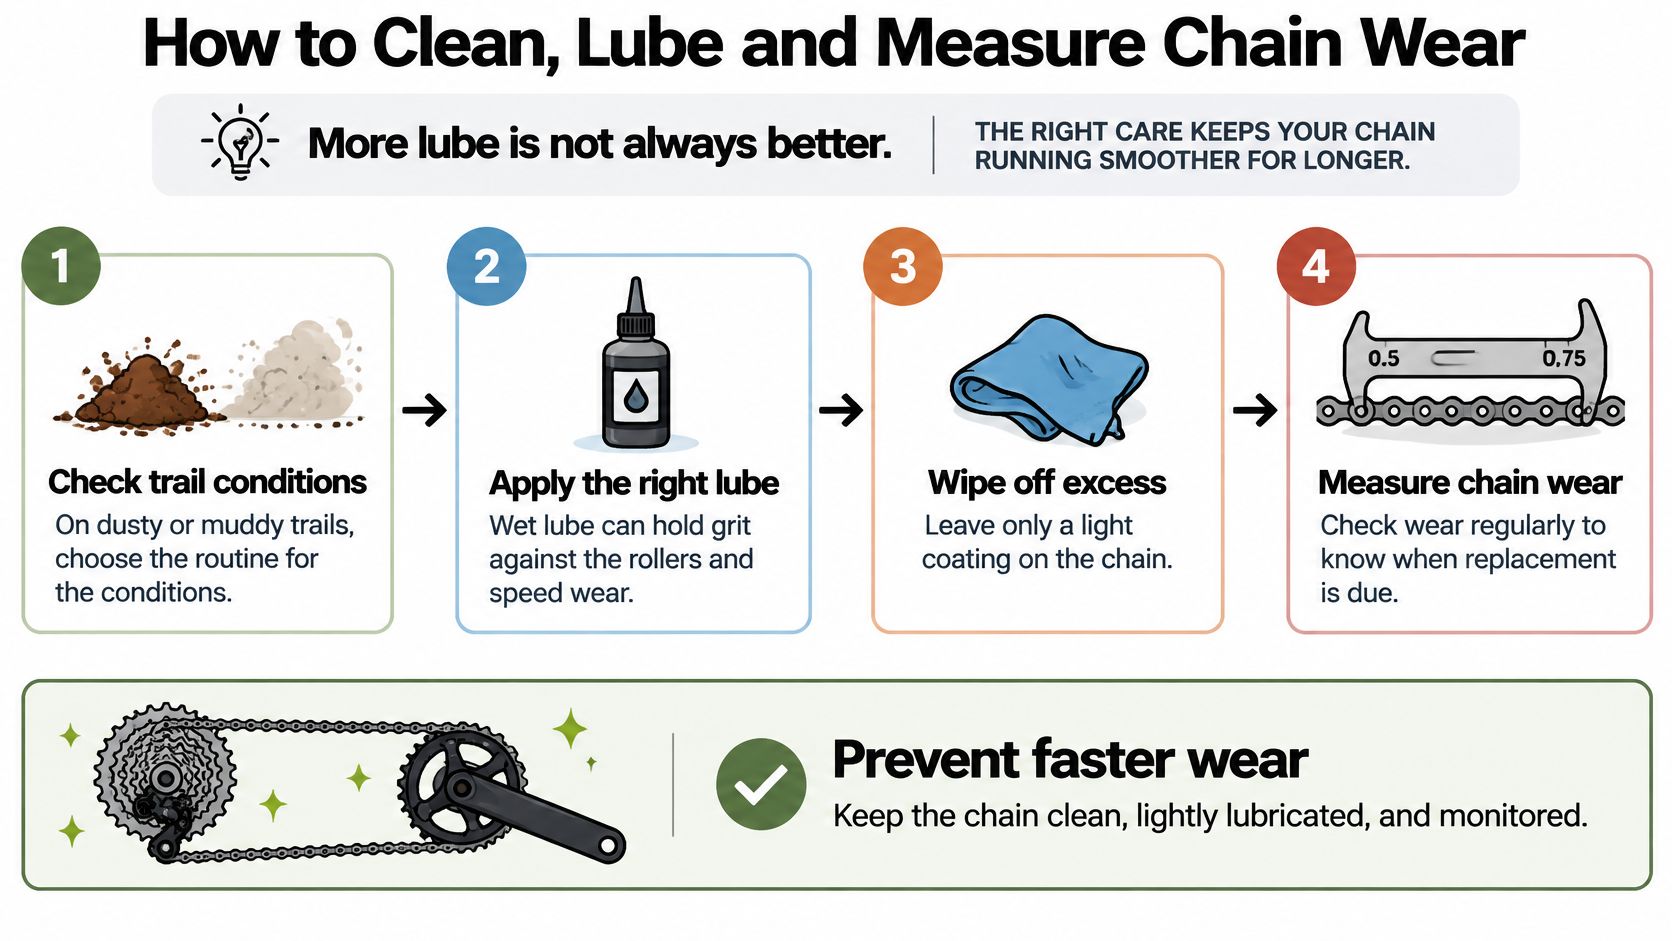
More lube isn't always better. Thick lubricant on the outside of a dirty chain holds grit where you don't want it. The aim is lubricant inside the working joints, with the exterior wiped clean enough that dust doesn't immediately stick.
DOC's Heaphy Track mountain-bike trial report distinguished freely draining track sections from regularly flooded or muddy sections showing visible use effects. That's a trail finding, not a drivetrain wear test, but the practical maintenance distinction is useful: inspect what the bike rode through instead of relying on distance alone.
Clean according to contamination
- Rinse mud gently. Use a low-pressure hose to loosen contamination. Don't direct high-pressure water at bottom bracket seals, hubs or derailleur pivots.
- Dry exposed surfaces. Wipe the chain and cassette, then allow trapped moisture to escape. Don't apply lubricant over a visibly wet drivetrain.
- Brush out packed material. Use a drivetrain brush around cassette gaps, chainring teeth and jockey wheels. Keep dirty brushes away from brake rotors.
- Degrease when necessary. If the chain remains sticky or gritty, use a bicycle drivetrain degreaser and rinse as directed. A lightly dusty chain doesn't automatically need stripping.
- Lubricate the working joints. Apply to the inner run of the chain so lubricant reaches the rollers. Allow the product's specified penetration or curing time, then wipe the outside thoroughly.
- Measure rather than guess. Use a chain-wear gauge suitable for your chain, following its instructions. Check several positions so a local difference doesn't mislead you.
- Record the result. Note the reading, conditions and any shifting symptoms. You'll build a useful service history without inventing a universal kilometre interval.
The maintenance sequence is simple; the amount of cleaning changes with the ride.
Change the routine with the conditions
Maintenance by riding condition
| Condition | Action | Lube rule |
|---|---|---|
| Dry, dusty trail | Brush or wipe off loose grit | Apply lightly if needed, then wipe the outside clean |
| Muddy or flooded section | Low-pressure rinse, clean out grit and dry | Lubricate once fully dry; remove excess |
| Coastal or high-tide exposed | Rinse with fresh water and dry promptly | Lubricate after removing salt and moisture |
| Wet forest with clay | Remove packed clay from teeth and pulleys | Dry before applying lubricant |
| E-MTB on steep climbs | Inspect measured wear and loaded shifting frequently | Choose lubricant for the actual wet or dry conditions |
For product selection and application, the bike chain lube guide provides further guidance. Wet lubricant suits persistent wet conditions but requires careful wiping; dry-condition products need appropriate drying time and reassessment after water exposure.
An externally clean chain can still need lubrication, while a black chain isn't automatically worn out. Use contamination, dryness and the gauge reading as separate checks. If you use a wax-based system, follow its preparation and renewal process rather than topping it up with unrelated oil.
Diagnosing Skipping, Noisy and Slow Shifts
Skipping under load starts with a chain measurement, not a random adjustment. A worn chain can damage mating teeth, but skipping can also come from poor indexing, a stiff link or freehub engagement trouble. Identify whether the chain jumps across teeth or the drive slips without an obvious chain movement.
Test gently in a workstand first. Check that the rear wheel is seated securely and the cassette isn't loose, then inspect the chain's path through the derailleur. A wheel or installation fault can imitate a shifting problem.
Use the symptom to narrow the fault
Drivetrain symptoms, likely causes and first fixes
| Symptom | Likely cause | First fix |
|---|---|---|
| Chain skips under load | Worn chain, cassette or chainring; stiff link | Measure chain wear and inspect the affected teeth and links |
| Ghost shifting or chain hopping | Cable settling, housing movement or bent hanger | Check cable seating and indexing; assess hanger alignment |
| Chain noisy or clicking | Dry rollers, contamination, stiff link or poor chainline | Clean, lubricate and inspect the repeating point |
| Slow or delayed shifts | Cable friction, dirty pulleys or incorrect adjustment | Check cable movement and clean pulleys |
| Chain drops | Incorrect length, weak retention or displaced guide | Check chain sizing, clutch setting and guide alignment |
| Rough spot in each pedal stroke | Chainring damage, crank interference or bearing fault | Inspect the ring and crank area before replacing parts |
A noise recurring with each crank revolution points you towards the front of the drivetrain, but it doesn't prove the chainring is worn. A pedal, crank interface or bottom bracket can produce a similar rhythm.
On double-chainring bikes, avoid extreme cross-chaining where possible. On single-chainring bikes, some chain angle at the cassette extremes is normal, so don't diagnose a fault from angle alone.
Separate home adjustments from alignment work
A careful home mechanic can clean pulleys, identify a stiff link and adjust cable indexing. Make small barrel-adjuster changes and test both shift directions. Don't move limit screws just because ordinary shifts feel slow.
Cable lubrication needs judgement. Some lined housings are intended to run without added lubricant; a frayed or corroded cable needs replacement rather than oil. Electronic shifting calls for battery, connection and setup checks instead.
Use the derailleur hanger alignment guide to understand why alignment matters. A hanger alignment gauge is the right diagnostic tool, not an eyeballed bend of the derailleur cage.
If adjustment improves one end of the cassette but makes the other end worse, stop chasing the barrel adjuster and check alignment.
Deciding When to Replace or Take It to a Workshop
Replace a chain when it reaches the manufacturer's specified wear limit, using a gauge appropriate to that chain. Don't wait for a trail-side failure, and don't assume every chain family uses the same replacement threshold.
Assess cassette and chainring wear through both tooth condition and operation. Confirmed hooking, poor chain release or skipping with a correctly installed compatible chain justifies replacement. Cosmetic polishing alone doesn't.
Keep the repair proportional to the fault
- Replace the worn consumable: A measured-out chain is a straightforward replacement if the mating components remain serviceable.
- Request alignment and shifting diagnosis: Persistent ghost shifting, crash damage or inconsistent indexing needs more than repeated adjustment.
- Stop riding engagement faults: A slipping freehub or loose crank can fail unpredictably under load. Have it inspected before another steep climb.
- Check assisted-bike compatibility: Use approved replacement parts and keep a record of wear, particularly on mid-drive bikes used for loaded climbing.
A new chain fitted to a badly worn cassette may skip immediately and wear prematurely. Check the system together, but don't replace everything automatically. A workshop should be able to explain which component failed its check and why.
Measure your chain today, write down the result and note whether your recent rides were dusty, muddy or coastal. If the gauge reaches the specified limit, or the same symptom returns after basic cleaning and adjustment, arrange an inspection before the next demanding ride.
Rider 18 in Nelson offers drivetrain parts, workshop servicing and bike hire. Bring your bike and your notes on when it skips, clicks or shifts slowly, and visit Rider 18 to arrange a compatibility check or drivetrain inspection before buying replacement parts.


Please upload banner from store admin blog pages