

Bike Helmets for Men: Fit and Riding Style
- by Nigel
-

Adult helmet wearing in New Zealand jumped from 43% in 1993 to 92% in 1994, according to the historical figures compiled in the Ministry for Regulation's bicycle-helmet documents. That reframes shopping for bike helmets for men: wearing one is an established adult habit, but choosing one still takes more thought than finding a masculine colour or a large-size sticker.
Why Men in New Zealand Still Need the Right Helmet
New Zealand's on-road helmet requirement applies to adults as well as children: riders need an approved, securely fastened bicycle helmet. For a man riding to work, heading out for recreation or using an e-bike on the road, the purchase is safety equipment, not an optional sporting accessory.
Say you're replacing the helmet that's been hanging beside your commuter bike. You pick up a larger model, tighten the dial and assume you've finished. But if the shell presses against your temples or tips backwards when you look up, a bigger label hasn't solved the problem.
The legal context is a useful starting point.
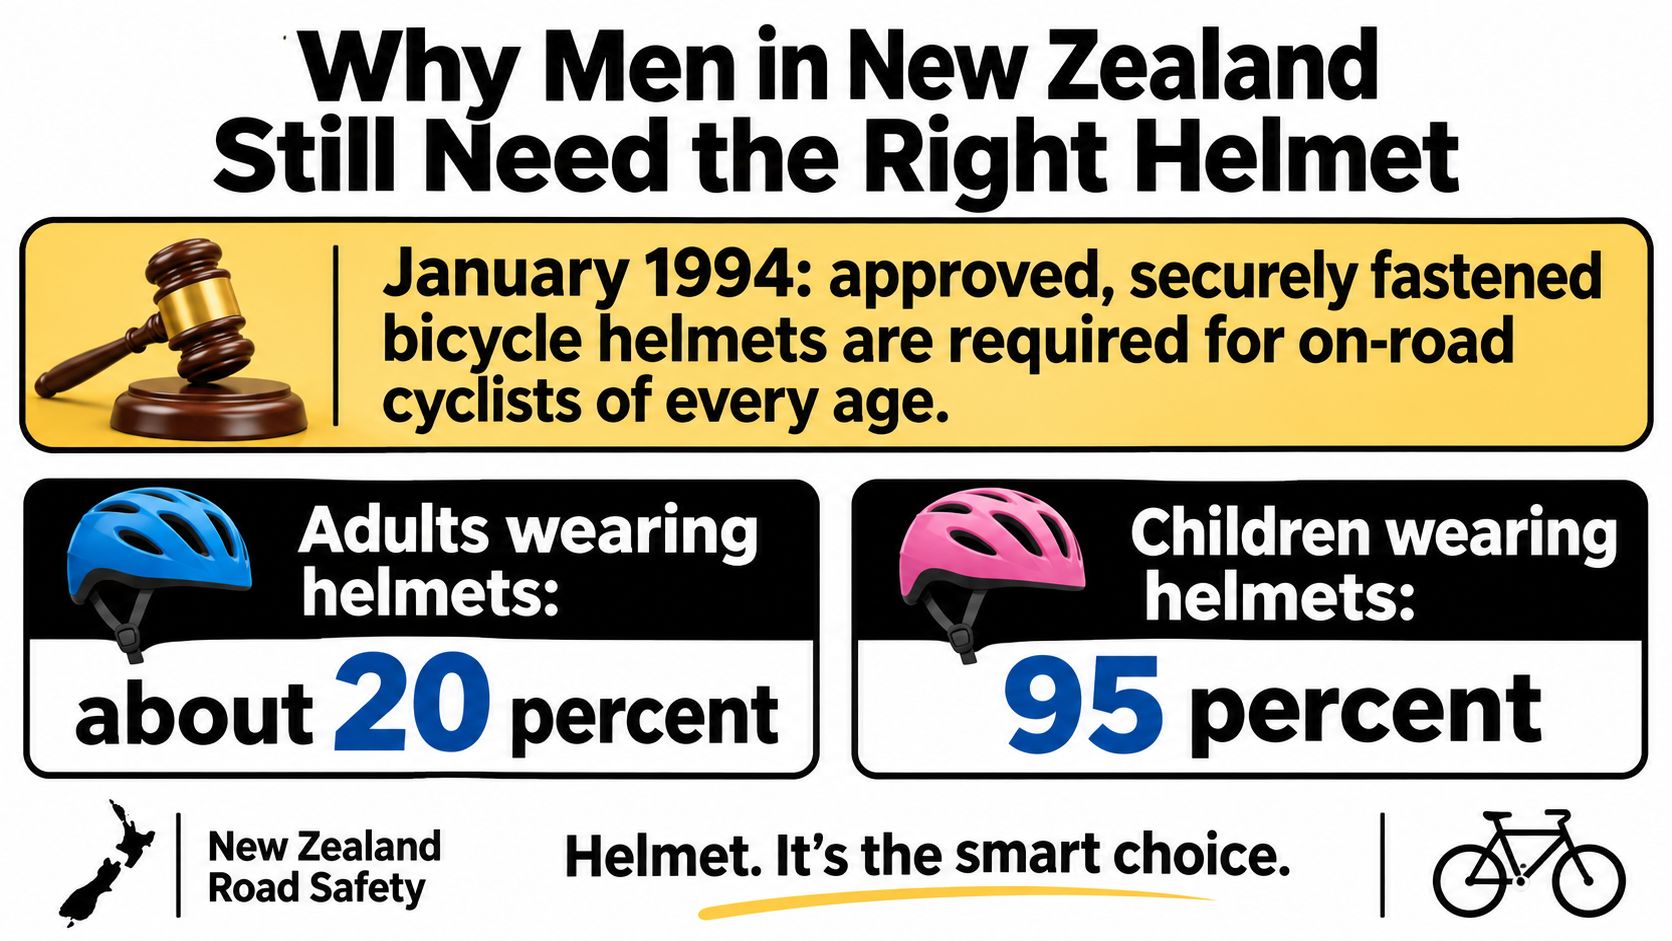
Head size, head shape and riding conditions should guide the choice. There's no separate New Zealand men's helmet standard, so a product described as unisex isn't missing a male-specific safety requirement.
Buying principle: Treat the word men's as a shopping category, not a protective specification.
A helmet also belongs within a wider road-safety routine. The cycle lights guide for New Zealand riders is useful when sorting out visibility alongside head protection.
For readers comparing overseas road-safety advice, Lein Law Offices' discussion of Wisconsin bicycle and motorcycle accident risks provides a different jurisdiction's context. Don't transfer overseas legal advice to a New Zealand purchase; check local approval requirements and the actual helmet in your hands.
Commuter Mountain and E-Bike Helmets Compared
| Ride | Shell and coverage | Venting and extras | Choose it when |
|---|---|---|---|
| Urban commute | Rounded road shell with rear and side cover | Many vents, optional light mount | Daily roads, lights and a bag |
| Road or gravel spin | Light road shell and clear side vision | High vent count, little or no visor | Longer sealed-road or gravel rides |
| Trail mountain bike | Slightly deeper cover and a short visor | Moderate venting for climbing comfort | Singletrack and lower-speed falls |
| Enduro or downhill | Extended rear and temple cover, with full-face options | Often fewer vents, longer visor and goggle room | Bike-park riding and rough terrain |
| E-bike on the road | Approved commuter-style bicycle shell | Ventilation plus a compatible light mount | Sustained riding in traffic |
| E-bike off road | Trail or enduro shell matched to the terrain | Visor and a stable cradle | Routes that involve mountain biking |
Helmet shells by the ride men do.
Choose the row that resembles your regular ride, not the logo that says men. These are useful shopping patterns rather than rigid design rules: individual helmets differ, and vent count alone doesn't tell you how comfortable a helmet will feel.
Roads and everyday riding
For an urban commute, look for a rounded shell that gives useful rear and side coverage without interfering with your collar or backpack. Try it while looking over your shoulder. A helmet that bumps your bag whenever you check traffic is a poor everyday match.
A compatible light mount can be handy, but use the attachment intended for the helmet rather than drilling or modifying the shell. Check that the light doesn't pull the helmet backwards or obstruct the adjustment dial.
Longer road and gravel rides put more emphasis on airflow, low bulk and an unobstructed view. Little or no visor can make it easier to see ahead when you lean forward. Try the helmet with your usual glasses, because a comfortable shell can still push their arms against your ears.
Trails and electric assistance
A trail helmet generally extends farther down the back of the head. A short visor helps with sun and spray, but it isn't protective armour against branches. Check that you can look uphill without the visor blocking your view.
For enduro or downhill, consider more extensive coverage and whether a full-face design suits the terrain. Try goggles with the helmet rather than assuming the opening will accommodate them. Don't choose a poorly ventilated model solely because it looks tougher.
For road-going e-bikes, electric assistance doesn't make a men's-specific shell necessary. Stable adjustment and practical visibility features matter more than matching the helmet to the motor badge. The New Zealand electric-bike buying guide can help you identify whether your bike's intended use is predominantly commuting or trail riding.
Off road, choose for the surface and consequences of a fall. A skate-style cap isn't a substitute unless it has approved bicycle certification. If your week combines road commuting with demanding hill riding, separate helmets may be more practical than forcing a compromise.
How to Fit a Helmet on a Larger Head
| Label | Typical circumference | Who it often suits | Fit warning |
|---|---|---|---|
| S | Use the model's published small range | Smaller adult heads | Don't pad a loose shell up to size |
| M | Use the model's published medium range | Heads within that model's middle band | Try neighbouring sizes where ranges overlap |
| L | Use the model's published large range | Larger adult heads | Reject a shell that only grips at an adjustment stop |
| XL | Use the model's published extra-large range | Heads beyond the model's large range | Change brand if pressure points remain |
Adult helmet size bands men should start from. Letter sizes aren't universal circumference bands.
Measure around the widest part of your head with a flexible tape, just above your eyebrows and ears. Keep the tape level and record the circumference in centimetres, then compare it with the specific manufacturer's chart, not a general internet size table.
The NZTA cycle guidance says a helmet should be the correct size, fit snugly and need only a minimum amount of padding. That makes fit a safety setting, not merely a comfort extra.
Use the visual guide to organise the fitting process.
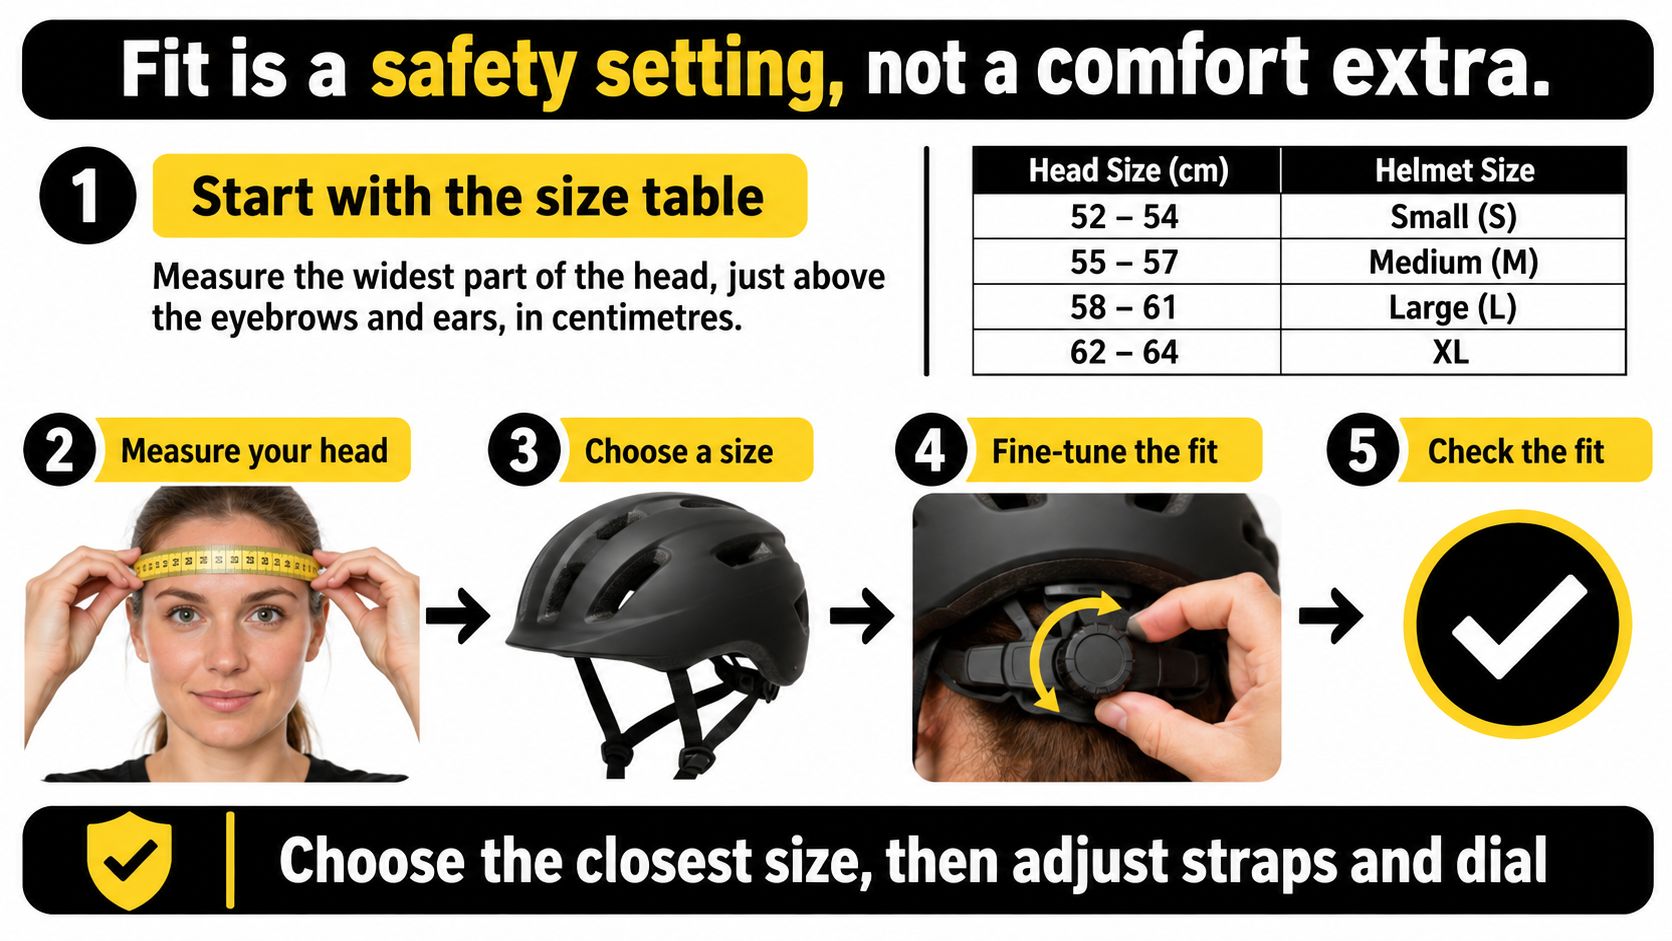
Adjust the shell before the straps
A larger circumference doesn't necessarily mean a rounder head. One brand may squeeze your temples while leaving space at your forehead; another may sit evenly at the same measured size. Tightening the dial harder won't change the shell's shape.
- Set it level. Place the front edge low on your forehead, roughly two finger-widths above your eyebrows as a practical starting point. Don't tip it back like a cap.
- Adjust the rear cradle. Tighten until it contacts evenly without pain. It should support the helmet, not clamp your head.
- Arrange the side straps. Form a stable V around each ear, with the strap junction below the earlobe. Remove twists before tightening.
- Fasten the chin strap. Leave it firm but comfortable, using a flat finger underneath as a starting check. Open your mouth and check that the helmet doesn't roll out of position.
- Move your head. Nod, turn and gently shake. If the shell shifts, reassess its size and position before adding padding.
The video offers another way to follow the fitting movements.
Check comfort and condition
Leave the helmet on while you browse or prepare the bike. As a practical shop-floor test, give pressure points time to become noticeable rather than approving the fit immediately.
A snug helmet feels evenly supported. A painful helmet needs a different adjustment, size or shape.
Replace a helmet after a crash or damaging impact, even if the outside looks tidy. Its energy-absorbing foam may be compromised, and cracked internal polystyrene means it's finished.
For Nelson commuters and e-bike riders, buying new avoids uncertainty about previous impacts and storage damage. The final pass is simple: level, stable, no hot spots and comfortable enough to keep wearing.
Labels That Make a Helmet Legal on NZ Roads
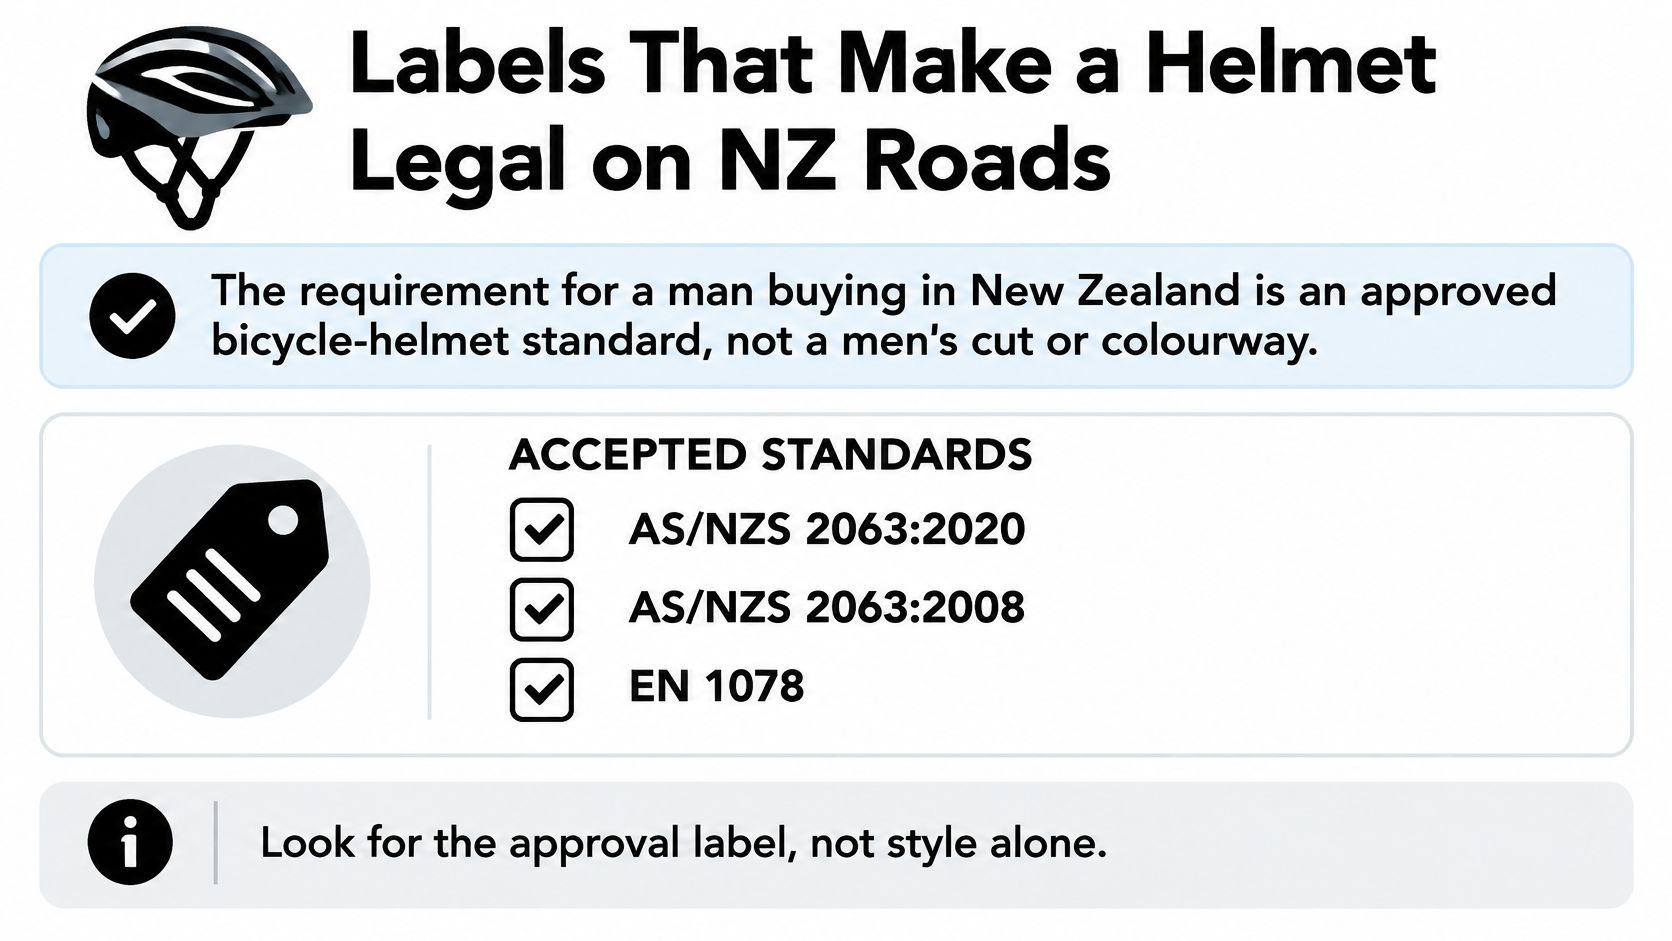
AS/NZS 2063:2020, incorporated into the current Land Transport framework, sits alongside recognised alternatives including EN 1078, ASTM F1447, Snell bicycle standards and the US CPSC bicycle standard, as outlined by Standards New Zealand's bicycle-safety guidance.
The requirement is an approved bicycle-helmet standard, not a men's cut, colourway or marketing name. Find the internal compliance label before paying. A familiar brand or a sporty shell isn't a substitute for checking the actual model.
Use the graphic as a reminder to look inside the helmet rather than judging its appearance.
What the testing means in practice
The standard addresses more than a blow to the top of the shell. Its testing covers several connected functions:
- Impact-energy attenuation. The helmet must manage impact energy rather than provide a hard covering.
- Stability and load distribution. Its protective structure needs to remain appropriately positioned and spread loading.
- Retention strength. Straps, buckles and attachment points must hold the helmet in place.
- Peripheral vision. The design must leave the rider suitable clearance to see around them.
Think of the energy-absorbing liner as a crumple zone. It needs to remain between your head and the impact to do its intended job. A compliant helmet that rocks when you nod hasn't passed your personal fit check.
What a label doesn't tell you
Certification isn't a ranking of commuter helmets against mountain-bike helmets. Nor does it establish that a particular visor, adjustment dial or men's graphic makes one product safer than another.
A skate or scooter helmet may look substantial, but don't use it for cycling unless its label confirms approved bicycle certification. Ask the retailer to identify the marking if it's unclear; don't rely on an online product title alone.
Overseas requirements also need separate checking. For travel planning, Nares Law Group LLC's guide to understanding Colorado's bicycle helmet rules is a jurisdiction-specific resource, not evidence that a helmet is approved for New Zealand roads.
Once you've confirmed the label, judge the individual shell against your measured head and your riding conditions. Approval establishes the baseline; suitability still requires a try-on.
Three Riders and the Helmet Each Needs
The city commuter
A man rides through Nelson traffic with a backpack and a rain jacket. He wants something easy to put on before work, comfortable when he's warm and straightforward to adjust with cold fingers.
A commuter-style helmet with a compatible light mount makes sense. He should try it with his bag loaded and check that his jacket collar doesn't lift the rear edge. If he uses a hood, it mustn't push the shell out of position or obstruct his view.
His mistake would be choosing a bulky downhill model purely for its substantial appearance, then finding it so inconvenient that he leaves it hanging on the handlebars.
His decision: choose for the commute he makes, verify approval and make the daily fit effortless.
The weekend trail rider
Another rider spends his weekends on local singletrack. He climbs slowly, looks up through corners and descends over roots, so he needs coverage and adjustment that remain comfortable through those changes in posture.
A trail shell with a short visor is a sensible starting point. He should test it while looking uphill, then with his glasses in place. Straps that rub an ear in the shop won't become less irritating halfway through a climb.
His mistake is tipping an old road helmet backwards to accommodate sunglasses. That solves an accessory problem by creating a positioning problem.
If his riding develops towards more demanding descents, the full-face helmet guide can help him assess a different coverage category.
His decision: match the trail demands, check the marking and choose eyewear that works with the helmet in its proper position.
The mixed-route e-bike owner
A third rider follows roads to a trailhead, then continues onto rough off-road tracks. The journey starts like a commute but doesn't stay that way.
He should choose for the demanding part of his normal route, rather than letting the sealed-road approach determine the whole purchase. A trail or enduro design may suit that mixed use better than a minimalist road shell, provided he's comfortable wearing it on the approach.
Match the helmet to where you ride, not simply to whether the bike has a motor.
His mistake would be assuming electric assistance requires a special men's construction, or that a comfortable road helmet automatically suits every track he can reach.
His decision: describe the complete route when asking for advice, confirm bicycle approval and test the helmet in his riding posture.
What the Evidence Proves and What It Cannot
A New Zealand before-and-after study estimated that each 5-percentage-point increase in helmet wearing corresponded to a 3.2% reduction in adult head injuries in crashes not involving motor vehicles; it also estimated an approximately 28% reduction in those adult injuries associated with the legislation-driven increase in wearing, with a 24% to 32% range across age groups and about 20% fewer head injuries in motor-vehicle crashes, according to the study published in Accident Analysis & Prevention.
Those are meaningful findings for adult riders. They concern adult cycling, not just children learning to ride, and support taking helmet use seriously for everyday journeys.
The association is illustrated below.
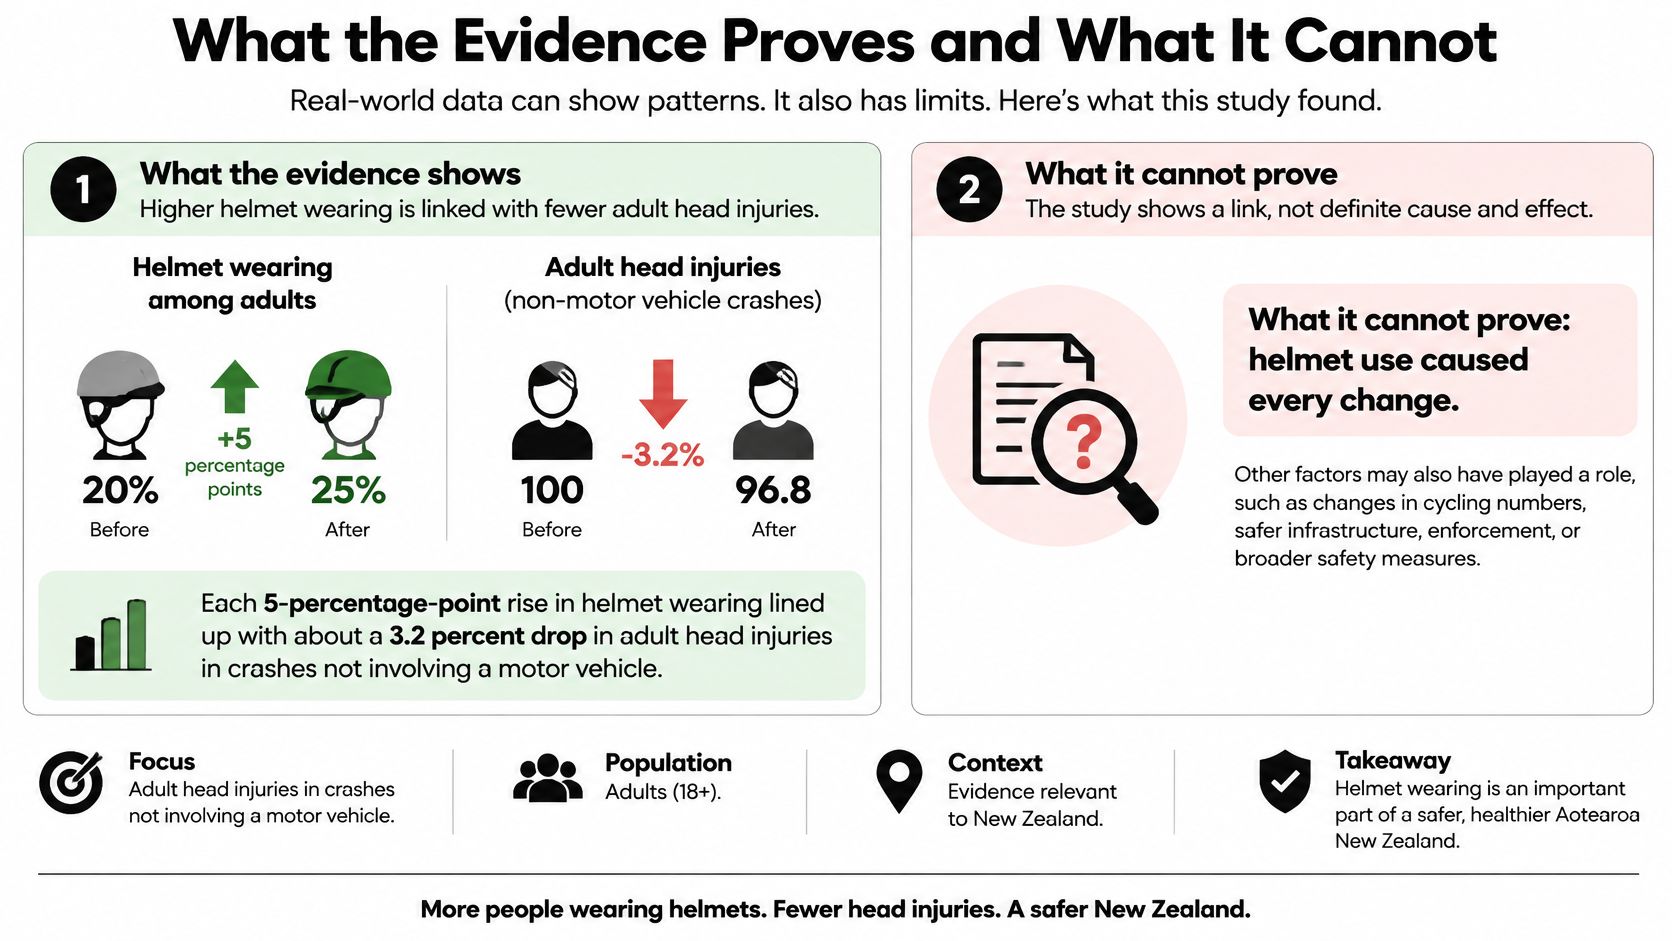
Read the estimates within their scope
| Measure | Estimated effect |
|---|---|
| Each increase in helmet wearing | Fewer adult head injuries in non-motor-vehicle crashes |
| Legislation-associated wearing increase among adults | Reduced adult head injuries in non-motor-vehicle crashes |
| Legislation-associated wearing increase across age groups | Reduced head injuries across the groups studied |
| Legislation-associated wearing increase in motor-vehicle crashes | Reduced head injuries |
Estimated effects of the mandatory helmet law on head injuries. The numerical estimates and source are given above.
A percentage-point increase describes a change in the proportion wearing helmets. It isn't the same thing as an individual rider's percentage reduction in injury risk.
The study also doesn't compare today's individual men's helmet models. It doesn't establish that a particular liner, visor or adjustment system caused the observed reductions. Nor should an older before-and-after result be presented as a direct test of modern e-bike riding.
Helmets address head protection, not every consequence of a collision. They don't prevent a driver from turning across your path, remove the possibility of concussion or protect your arms and legs from every injury.
The local evidence gap
An ACC response covering New Zealand and Canterbury head injuries from financial years 2014/15 to 2023/24 states that ACC doesn't collect whether protective equipment was worn during the accident. That prevents those records from answering whether particular men's helmet preferences produce different injury outcomes.
It doesn't prove every helmet design performs identically. It means this local dataset can't support a claim that one men's style, fit system or liner is demonstrably safer.
Separate sales claims into distinct questions:
- Legal compliance. Does the helmet carry an approved bicycle certification?
- General protection. Does the evidence support wearing a helmet to reduce head injuries?
- Product superiority. What testing supports this exact model's claimed advantage, and under what conditions?
Ask a retailer to explain any technology claim in those terms. A named liner system may be worth considering, but the name alone doesn't establish a New Zealand injury-outcome advantage.
The practical response isn't to stop choosing carefully. Buy a compliant helmet that fits securely, then manage speed, maintain the bike and choose routes with your traffic exposure in mind. Protective equipment complements riding decisions; it doesn't replace them.
Choose a Helmet You Can Wear Every Ride
Use a buying order that keeps appearance and optional extras from taking over the decision.
- Measure first. Record your head circumference and compare it with the model's published range. Where sizes overlap, try the neighbouring options rather than guessing.
- Describe your normal week. Include the roughest terrain you regularly ride, not just the easy journey to reach it. Consider separate shells if your road and hill riding have very different demands.
- Inspect the label. Confirm approved bicycle certification inside the actual helmet you're buying.
- Complete the fit test. Adjust the position, cradle and straps, then wear it long enough to notice discomfort. Don't use extra padding to disguise the wrong shell shape.
- Buy with a known history. Choose new equipment and replace it after a crash or damaging impact.
Bring your glasses and usual riding bag to a try-on. If you're comparing models such as the Giro Radix Adult MIPS Equipped and Giro Source Adult MIPS Equipped, start with how each sits on your head rather than assuming their shared features mean an identical fit.
The right purchase passes the label, size and comfort checks. An unworn helmet protects nobody.
Rider 18 offers adult helmets and fitting advice for commuter, mountain-bike and e-bike riding. Visit Rider 18 with your head measurement and usual riding kit, and ask the team to help you compare suitable shells, check approval labels and adjust your shortlisted helmet before buying.


